Dispatcher Training Sandbox Workflow
Before You Start
Sandbox Access
URL: http://66.23.224.253:8888
Training accounts:
| Username | Password | Role |
|---|---|---|
dispatcher1 |
dispatcher1 |
Dispatcher |
manager1 |
manager1 |
Manager |
You can also log in with any Scott Recycling employee email using password training.
This is a safe copy of our real system. Nothing here affects production — no emails send, no texts go out, no GPS updates push to Samsara. Practice freely.
The sandbox resets periodically from a fresh copy, so don't worry about "breaking" anything. The system is pre-loaded with real route history, truck schedules, customer pickups, fleet vehicles, and driver records — everything you need to practice.
You can also generate additional practice routes on demand using the Generate Sandbox Pickups wizard (see below).
Sandbox Limitations
Because this is a training copy, some live integrations are disabled:
- Samsara GPS tracking — Routes won't update in real-time. You can see historical data and explore the buttons, but "Push to Samsara" won't actually send.
- SMS/Email notifications — Buttons exist but messages won't deliver.
- Google Maps routing — Date suggestions in the Add a Note wizard may not calculate travel times.
Everything else works normally — you can create, edit, and explore all records.
Sandbox Training Data Guide
The sandbox is a copy of our real system with additional training-specific routes inserted. You'll see both training routes (described below) and real historical data — this is intentional. Learning to navigate a system with real data is part of training.
Dates Refresh Weekly
Training route dates are refreshed automatically. Draft routes always appear next week, and in-progress routes always appear today, regardless of when you log in.
Generate Sandbox Pickups (On-Demand)
In addition to the pre-loaded training routes below, you can generate your own practice routes using the Generate Sandbox Pickups wizard:
- Go to Scott Recycling → Operations → Generate Sandbox Pickups
- The wizard opens with these options:
| Field | Default | What It Controls |
|---|---|---|
| Start Date | Tomorrow | First date to generate routes for (weekdays only) |
| Number of Days | 5 | How many weekdays to generate routes across |
| Routes per Day | 3 | Number of truck routes created each day |
| Min Stops per Route | 3 | Minimum customer stops on each route |
| Max Stops per Route | 5 | Maximum customer stops on each route |
- Click Generate Pickups — the system creates draft truck schedules with random stops from real customers
- Generated routes are named with an "SB-" prefix (e.g., "SB- SBT-1") so you can easily distinguish them from the pre-loaded training routes
When to Use the Generator
Use the generator when you want fresh routes to practice with — especially after you've already explored the pre-loaded training scenarios below. You can generate routes for any date range and practice the full dispatch workflow: reviewing routes, checking capacity, optimizing, rescheduling stops, and using the wizards.
Generated Routes vs. Training Routes
Generated routes use random customer assignments, so they won't have the specific scenarios (over capacity, direction conflict, over hours) that the pre-loaded training routes have. Use the pre-loaded routes for the guided exercises below, and generated routes for free-form practice.
Draft Routes for Next Week
These are training routes with pre-loaded stops, ready for Exercises 5, 6, 7, and 9. Find them by going to Operations → Truck Schedule or Operations → Scheduling and looking at next week's dates.
Finding Training Routes
The sandbox has many routes. The training routes are the ones with stops loaded and the drivers listed below. Use the search bar to filter by truck name (SBT-1, MOR-1, PUL-1) and look at next week's dates.
| Route Name | Truck | Driver | Stops | Scenario |
|---|---|---|---|---|
| RT- SBT-1 (next Monday) | SBT-1 | Kable West | 5 stops | Over capacity — 13 projected boxes on a 12-box truck. Capacity Status = Critical. |
| RT- SBT-1 (next Tuesday) | SBT-1 | Kable West | 4 stops | Clean route — normal load, good for exploring the basic form. |
| RT- MOR-1 (next Wednesday) | MOR-1 | Jonathan Putman | 5 stops | Direction conflict — one stop goes the opposite direction from the rest. Check Direction Coherence %. |
| RT- MOR-1 (next Thursday) | MOR-1 | Jonathan Putman | 3 stops | Light day — room for additional pickups if a CSR asks. |
| RT- PUL-1 (next Friday) | PUL-1 | Devin Sutphin | 4 stops | Over hours — total trip time is 11.5 hours (exceeds 10-hour limit). Is Over Hours = True. |
Special data on these routes:
- The Monday SBT-1 route has a Fixed Appointment on one stop (10:00 AM, ±15 minutes)
- The Monday SBT-1 route is at Capacity Critical (13 boxes / 12 capacity)
- The Friday PUL-1 route is flagged Over Hours (11.5 hours total trip time)
Today's In-Progress Routes (Dispatcher Dashboard)
Open Dashboards → Dispatcher Dashboard to see today's active routes. The sandbox includes real historical routes that were in-progress when the database was copied, plus training routes. You'll see routes for several drivers:
| Driver | Truck | What to Look For |
|---|---|---|
| Kable West | SBT-1 | 3 stops, En Route, no alerts. A clean route to explore. |
| Jonathan Putman | MOR-1 | 3 stops, En Route. Look at the pickup stages — one stop is in a different stage than the others. |
| Devin Sutphin | PUL-1 | 3 stops, En Route. Practice opening the route and reading the fields. |
| Brandon Collins | SBT-2 | 4 stops, Behind schedule with a Critical alert. This route has mixed pickup stages — examine the delay and alert fields. |
Critical Alert Route
The Brandon Collins SBT-2 route has a critical alert and behind-schedule status. Use it to practice reading alert levels, delay minutes, and pickup stage progression — exactly what you'd see on a real dispatch day when a driver is running late.
Flagged Customers
The sandbox contains 220+ real flagged customers from production. These are customers with notes in the flaggedForAttentionComment field — typically customers who are closed, no longer want service, or have special conditions.
To find flagged customers:
- Go to Customers & Sales → open any customer list
- Search or browse for customers with the flag icon
- Open the customer record and look for the flag/attention fields
- Read the comment to understand why they're flagged
Examples you'll find:
- Customers marked as permanently closed
- Customers who use a competitor
- Customers with special pickup instructions
- Customers who asked to be removed from contact lists
Why This Matters
In production, you'd check if any customer on a route is flagged before pushing to Samsara. A flagged customer might mean "don't schedule" or "call before arriving."
LTL Shipments
LTL records are available for Exercise 11. Go to Operations → LTL Calendar to find them:
| LTL Pickup | Date | Status | Notes |
|---|---|---|---|
| XPO Logistics | Next Monday | Pending | Training LTL — standard third-party pickup |
| Old Dominion (ODFL) | Next Tuesday | Pending | Training LTL — meeting required (someone must be on-site to sign BOL) |
| FedEx Freight | ~1 week ago | Completed | Reference example — see what a finished LTL looks like |
The sandbox also contains real historical LTL records you can browse for additional examples.
Training Path Overview
Complete these exercises in order. Each one builds on the previous. Plan for about 4 hours total.
| # | Exercise | What You'll Practice | Time |
|---|---|---|---|
| 1 | Navigate the Dispatcher's View | Operations menus, Dispatcher Dashboard, key screens | 15 min |
| 2 | Understanding the Truck Schedule | Every field on the route form explained | 25 min |
| 3 | Understanding Customer Pickups | Every field on the pickup record explained | 20 min |
| 4 | Understanding the Dispatcher Dashboard | Dashboard columns, color coding, alert system | 15 min |
| 5 | The Truck Schedule Calendar | FullCalendar views, route cards, the map tab | 15 min |
| 6 | Read a Truck Schedule | Hands-on: route forms, timing, direction, capacity | 15 min |
| 7 | Work with Customer Pickups | Hands-on: pickup stages, statuses, service windows | 15 min |
| 8 | Monitor the Dispatcher Dashboard | Hands-on: real-time monitoring, alerts, quick actions | 15 min |
| 9 | Route Actions & Wizards | Push to Samsara, Optimize, Reschedule, Call Off, Change Truck/Driver | 20 min |
| 10 | Communicate with Drivers | Dispatcher notes, text/call buttons, messages, barcode labels | 10 min |
| 11 | LTL Shipments | Less-Than-Truckload scheduling and tracking | 10 min |
| 12 | Handle Real-World Scenarios | Putting it all together with realistic situations | 20 min |
Exercise 1: Navigate the Dispatcher's View (15 min)
Goal: Learn where everything lives. Dispatchers use three main areas: the Operations menus, the Dispatcher Dashboard, and the Fleet app.
Steps
- Log in at the sandbox URL as
dispatcher1/dispatcher1 - You should see the main Odoo dashboard with app icons
- Open the Scott Recycling app — this is your home base
-
Click the Operations dropdown in the top menu bar. You'll see:
- Customer Pickups — individual pickup stops on routes
- Scheduling — the scheduling management view (kanban with Draft / In-Progress columns, shown below)
- Truck Schedule — your main calendar (FullCalendar with map)
- Tractor Trailer Calendar — OTR/long-haul routes (same interface as Truck Schedule, filtered to tractor trailers only)
- LTL Calendar — third-party Less-Than-Truckload shipments
- Driver Messages — dispatcher-to-driver messaging
- Generate Sandbox Pickups — wizard to create practice routes with random stops (sandbox only)
-
Click the Dashboards dropdown in the top menu bar. You'll see:
- Fleet Overview — fleet-wide capacity and utilization
- Dispatcher Dashboard — your real-time route monitoring screen
- Daily Overview — daily summary
- Truck Location Map — map view of truck positions
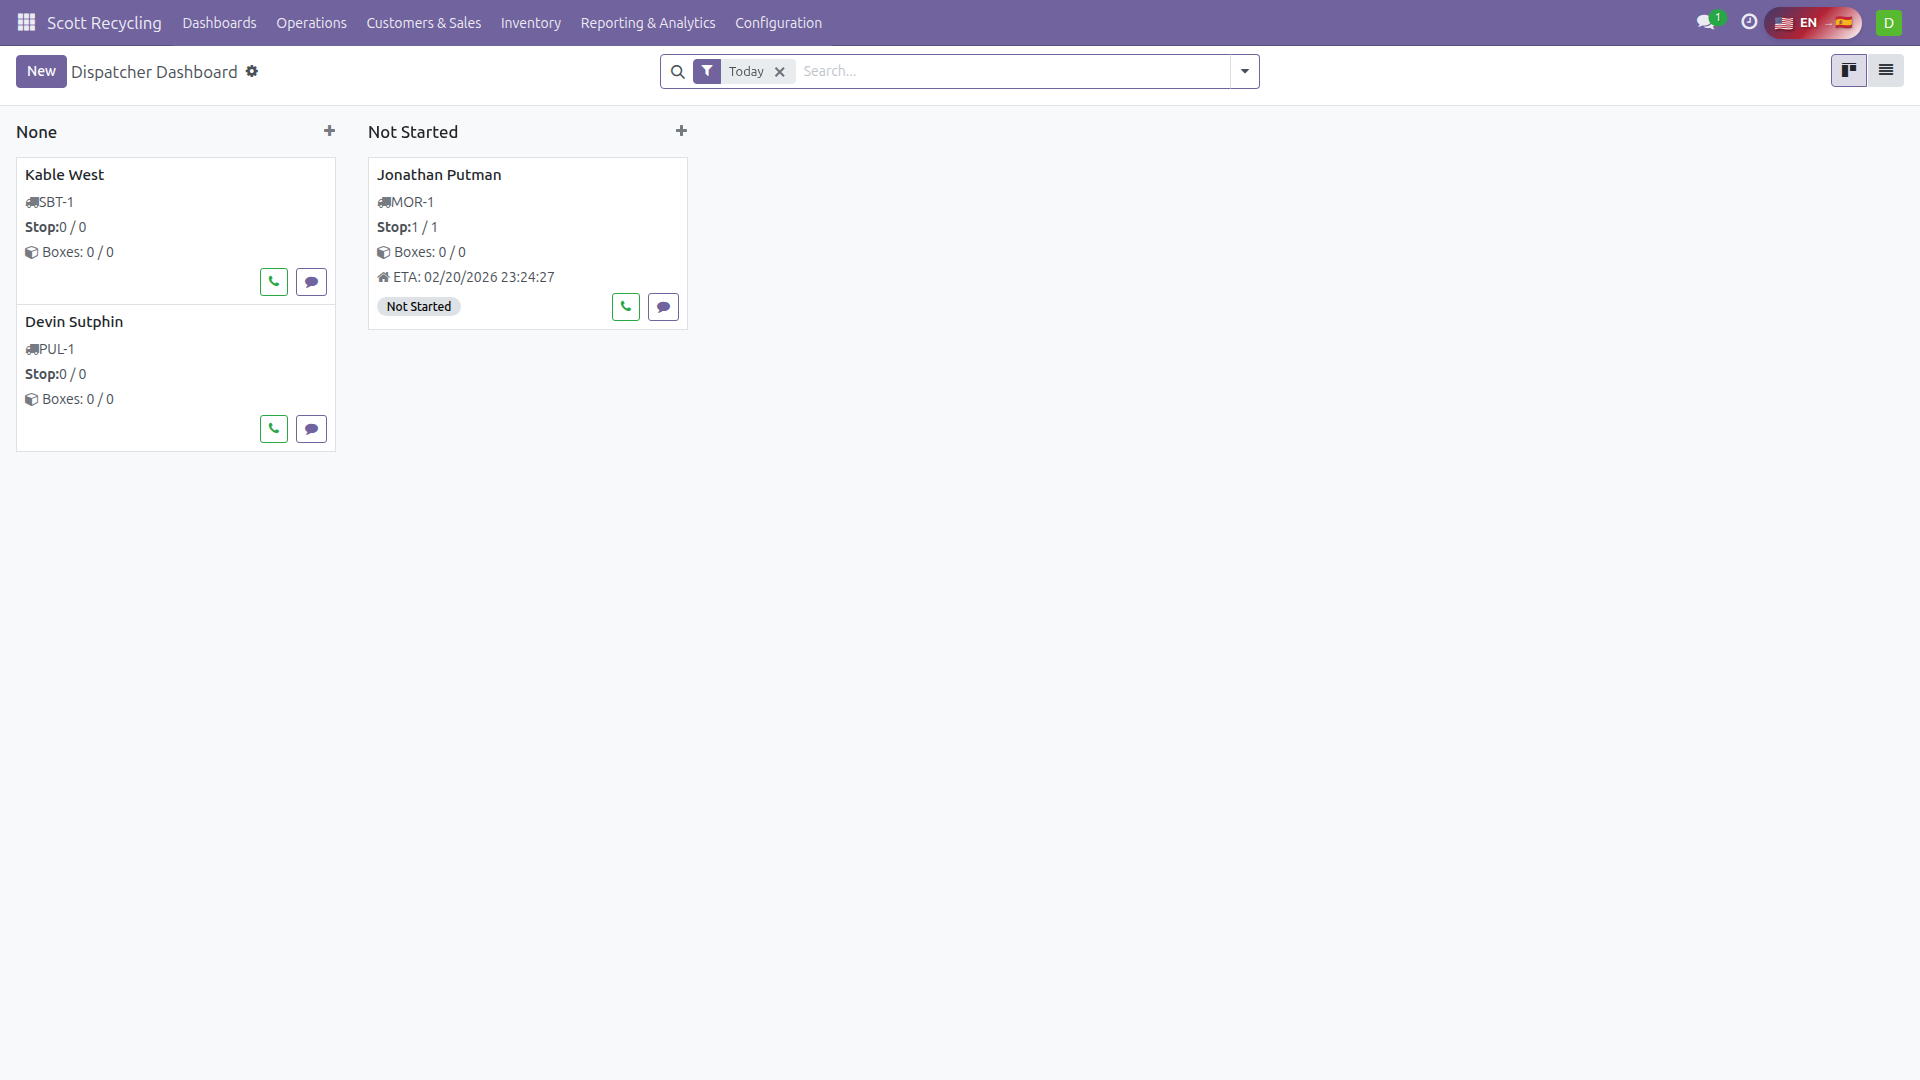 The Dispatcher Dashboard — your real-time route monitoring screen
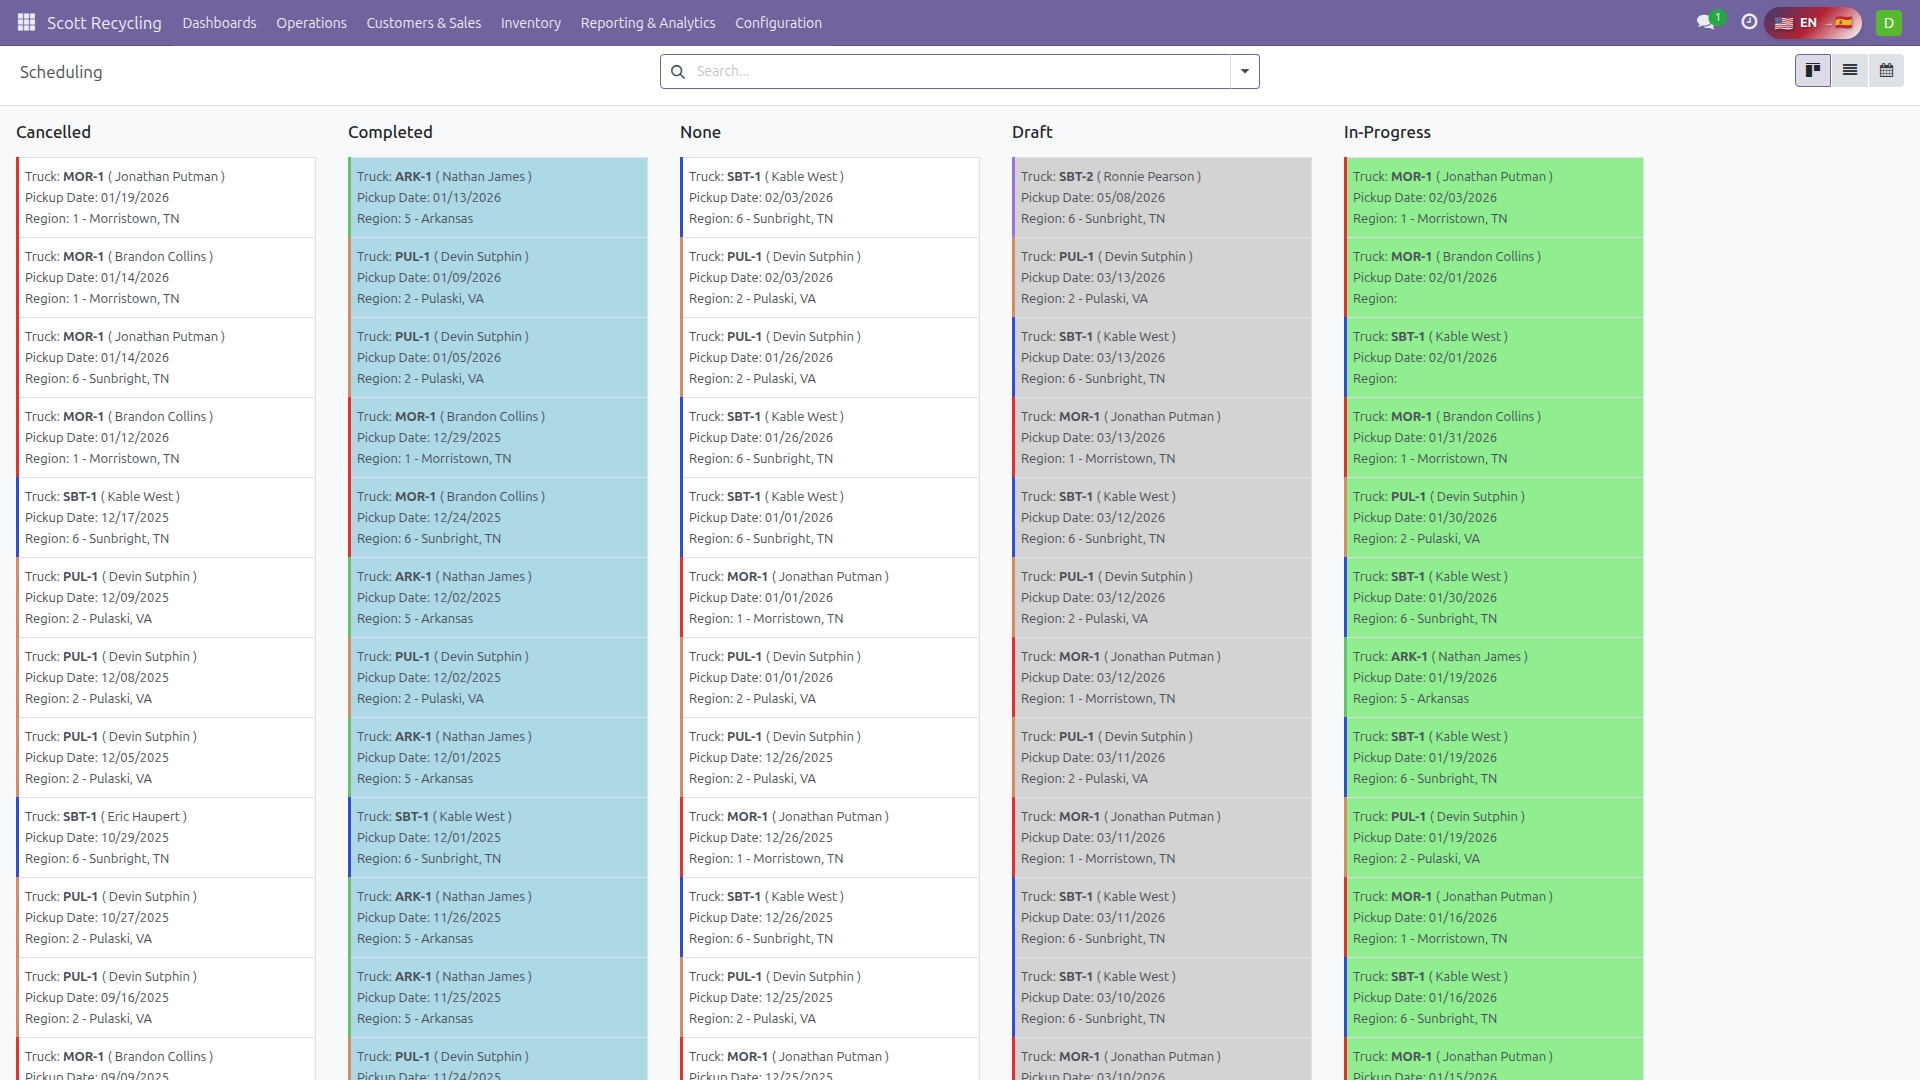 The Scheduling view — kanban columns for Cancelled, Completed, None, Draft, and In Progress routes
-
Click Customers & Sales — you also have access to:
- All four call queues (A, B, C, D)
- Prospect Queue and Key Accounts
- Full customer records
-
Go back to the main dashboard and open the Fleet app — this is where you manage trucks and drivers
Your Daily Screens
As a dispatcher, you'll spend most of your time on these three screens:
| Screen | When to Use It | How to Get There |
|---|---|---|
| Truck Schedule Calendar | Planning routes, reviewing the week ahead | Operations → Truck Schedule |
| Dispatcher Dashboard | Monitoring active routes during the day | Dashboards → Dispatcher Dashboard |
| Customer Pickups | Looking up individual stops, troubleshooting | Operations → Customer Pickups |
Checkpoint
- Where is the Dispatcher Dashboard?
- Where are the three calendars?
- Where do you see customer pickup records?
- Where is the Fleet app?
Exercise 2: Understanding the Truck Schedule (25 min)
Goal: Learn what every field on the truck schedule form means. This is the central record for a daily route — everything about a driver's day is captured here.
A truck schedule represents one truck's route for one day. It contains every pickup stop, all timing information, capacity tracking, direction analysis, and driver communication. Open any truck schedule from Operations → Scheduling or by clicking a route on the calendar, and follow along.
Route Lifecycle
Every truck schedule moves through these stages:
| Status | What's Happening |
|---|---|
| Draft | Route is planned but not yet active. Stops can be added, removed, or reordered. |
| In-Progress | Route is live — the driver is on the road. The system tracks actual times and delays. |
| Completed | All stops are done and the driver has returned. Performance data is locked in. |
| Cancelled | The entire route was cancelled. All pickups on it are also cancelled. |
Draft to In-Progress
Routes automatically change from Draft to In-Progress on their pickup date via a daily cron job. You can also manually start a route.
Route Status (Real-Time)
Separate from the lifecycle status, the Route Status field shows what's happening right now while a route is in progress:
| Route Status | What It Means |
|---|---|
| Not Started | Pickup date has arrived but driver hasn't departed yet |
| En Route | Driver has left the warehouse and is heading to the first stop |
| On Time | Driver is progressing through stops on schedule |
| Ahead | Driver is ahead of schedule |
| At Risk | Driver is slightly behind — could recover or could worsen |
| Behind | Driver is significantly behind schedule — dispatcher attention needed |
| On Lunch | Driver is on their lunch break (pauses ETA calculations) |
| Completed | All stops finished and driver has returned |
Header Fields
At the top of the form you'll see the route's identity and assignment:
| Field | What It Means | Example |
|---|---|---|
| Name | Route identifier — auto-generated from the truck's dispatch name and pickup date | "RT- SBT-1 - 2026-02-23" |
| Truck | The vehicle assigned to this route. Determines capacity limits and Samsara tracking. | "Freightliner/M2/C896HR {40}" |
| Driver | The employee driving this route. Auto-fills from the truck's assigned driver but can be changed. | "Kable West" |
| Dispatch Location | The warehouse this truck departs from and returns to. Pulled from the truck record. | "Sunbright Warehouse" |
| Region | Geographic area this route serves. Determines which customers can be assigned. | "Sunbright TN" |
| Pickup Date | The date this route runs. One truck gets one route per day. | "02/23/2026" |
| Status | Lifecycle stage: Draft, In-Progress, Completed, or Cancelled. | "Draft" |
| Route Status | Real-time progress indicator (see table above). Only meaningful when In-Progress. | "On Time" |
Action Buttons
 The action buttons at the top of every truck schedule
Across the top of the form, you'll see buttons for managing the route:
| Button | What It Does | When to Use It |
|---|---|---|
| Push To Samsara | Sends the full route (all stops with addresses and sequence) to Samsara GPS. The driver sees it on their Samsara app. | Day before the route runs. Push again after any changes. |
| Optimize Route | Re-sequences stops using Samsara's road-network optimizer. Considers shortest total drive time, road conditions, and turn restrictions. | After adding/removing stops, or when direction coherence is low. |
| Change Truck | Opens a wizard to assign a different truck to the entire route. Recalculates all timing and capacity. | When a truck is in the shop or unavailable. |
| Change Driver | Opens a wizard to assign a different driver. Validates their Samsara driver code. | When a driver calls in sick or is reassigned. |
| Cancel Schedule | Cancels the entire route and all pickups on it. Requires a reason. Irreversible. | Last resort — when the whole day's route can't run. |
| Download Labels | Generates a PDF with barcode labels for every box on every stop. | Morning of the route — driver needs labels for scanning at pickup sites. |
| Send Labels | Emails the label PDF to the driver. | When the driver needs labels on their phone/tablet. |
| Call Off Pickups | Opens the bulk cancel/move wizard (see Exercise 9). | When you need to cancel or reschedule multiple stops at once. |
Timing Fields
These fields track when the route should happen vs. when it actually happened:
| Field | What It Means | Example |
|---|---|---|
| Scheduled Route Start Time | When the driver is planned to depart the warehouse. | "08:00 AM" |
| Scheduled Route End Time | When the driver is planned to return to the warehouse. | "04:30 PM" |
| Actual Route Start Time | When the driver actually departed. Set by the driver portal or Samsara. | "08:12 AM" |
| Actual Route End Time | When the driver actually returned. | "04:45 PM" |
| Driver Start Time | The standard departure hour for this driver (from system settings). Used as the baseline for "on-time departure" calculations. | 8.0 (= 8:00 AM) |
| Total Trip Time | Total time for the route from warehouse departure to warehouse return, in hours. Includes drive time + stop time. | "8.5 hrs" |
| Total Trip Time (hh:mm) | Same value in hours:minutes format for easier reading. | "8:30" |
| Return Trip Time | Estimated drive time from the last stop back to the warehouse, in hours. | "1.5" |
| Return ETA | Predicted time the driver will arrive back at the warehouse. Updates as the route progresses. | "4:30 PM" |
| Is Over Hours | Warning flag. True if the total trip time exceeds the daily maximum (typically 10 hours). Signals DOT compliance risk. | True / False |
Lunch Break Tracking
The system tracks driver lunch breaks because they affect ETA calculations:
| Field | What It Means |
|---|---|
| Lunch Start Time | When the driver started their lunch break. |
| Lunch End Time | When the driver ended their lunch break. |
| Lunch Duration | Planned lunch duration. Defaults to 30 minutes (0.5 hours). |
| Is On Lunch | True if the driver is currently on lunch. While true, ETA calculations pause. |
| Lunch After Pickup | Which pickup the driver completed before taking lunch. Helps dispatchers know where the driver is. |
Capacity & Weight Fields
These fields track how full the truck is and whether there's room for more:
| Field | What It Means | Example |
|---|---|---|
| Truck Capacity | Maximum number of boxes the truck can hold. Box trucks = 12, tractor trailers = 48. | 12 |
| Projected Boxes | Total estimated boxes across all stops (from CSR estimates at scheduling time). | 10 |
| Actual Boxes | Boxes actually collected so far (updated as driver completes stops). | 6 |
| Remaining Capacity | How many more boxes the truck can hold: Truck Capacity minus Actual Boxes. | 6 |
| Capacity Status | Color-coded indicator based on utilization. | "OK" / "Warning" / "Critical" |
| Capacity Warning | True if actual boxes reach 80% or more of truck capacity. | True / False |
| Box Variance | Difference between actual boxes collected and projected boxes. Positive = more than expected. | +2 or -1 |
| Total Pickup Weight | Combined estimated weight (lbs) across all stops on this route. | 8,500 lbs |
| Total Estimated Boxes | Sum of estimated box counts from all stops. | 10 |
| Total Actual Boxes | Sum of actual box counts from completed stops. | 6 |
Capacity Status levels:
| Status | Meaning | Action |
|---|---|---|
| OK | Under 80% capacity | Normal — room for more if a CSR asks |
| Warning | 80–99% capacity | Caution — check before adding stops. Route may fill up. |
| Critical | 100%+ capacity | Overloaded — remove or reschedule stops immediately |
Capacity Forecast
The Capacity Forecast field projects whether the truck will be OK, Tight, or Over by the end of the route based on remaining stops. A route showing "OK" capacity now could forecast "Tight" if upcoming stops have large estimates.
Direction & Routing Fields
The system groups pickups by compass direction from the warehouse. A well-organized route has all stops going in the same general direction.
| Field | What It Means | Example |
|---|---|---|
| Primary Direction | The most common compass direction of stops on this route, calculated from the warehouse. | "NE" (Northeast) |
| Primary Quadrant | Broader grouping of the primary direction into four quadrants. | "North" |
| Direction List | Comma-separated list of all directions represented on this route. | "NE, NE, NE, E, SW" |
| Direction Coherence % | Percentage of stops in the primary quadrant. 100% = all stops go the same way. Lower = less efficient. | "80%" |
| Has Opposite Directions | Warning flag. True if any stop goes in the opposite direction of the primary direction. A NE route with a SW stop triggers this. | True / False |
Direction Conflicts
When Has Opposite Directions is true, the route has a stop that's geographically opposite to the rest. This means the driver has to backtrack, wasting hours. Use the Change Truck button on the misplaced pickup to move it to a route going in its direction, or use Optimize Route to let Samsara find a better sequence.
Alert & Monitoring Fields
These fields power the Dispatcher Dashboard's alert system:
| Field | What It Means | Example |
|---|---|---|
| Delay (Minutes) | How many minutes behind schedule the driver is, based on actual vs. scheduled arrival times. | 25 |
| Delay Display | Human-readable delay text. | "25 min late" |
| Alert Level | Severity of the current situation. Drives dashboard color coding. | "None" / "Warning" / "Critical" |
| Alert Message | Human-readable description of all current issues on this route. | "25 min behind | 1 missed pickup" |
| Has Missed Pickup | True if the driver skipped a stop (customer closed, couldn't access, etc.). | True / False |
| Missed Pickup Count | Number of stops that were skipped. | 1 |
| Needs Attention | Master flag — true if anything on this route requires dispatcher action (delay, missed stop, capacity, over hours). | True / False |
| Last Critical Alert Sent | Timestamp of the last critical alert email sent to the dispatcher. Prevents alert spam. | "2026-02-18 14:30" |
| Alert Acknowledged | True if the dispatcher has acknowledged the alert (clicked "Acknowledge Alert"). | True / False |
Alert Level thresholds:
| Alert Level | Trigger | Dashboard Color |
|---|---|---|
| None | No issues, on time | Green |
| Warning | 15–29 minutes behind schedule | Yellow |
| Critical | 30+ minutes behind, or missed pickup, or over capacity | Red |
Performance Metrics
After a route is completed, these fields capture how it went:
| Field | What It Means |
|---|---|
| On-Time Departure | True if the driver departed within 10 minutes of the scheduled start time. |
| On-Time Completion | True if the route was completed within 15 minutes of the scheduled end time. |
| Total Delay (Minutes) | Cumulative delay across all stops (sum of individual stop delays). |
| Avg Minutes/Stop | Average time spent at each stop. Useful for identifying unusually slow or fast stops. |
| Departure Variance | How early or late the driver departed compared to the scheduled start. |
| Progress % | Percentage of stops completed (completed stops / total stops × 100). |
Predicted Completion
| Field | What It Means |
|---|---|
| Predicted Completion Time | Estimated time the driver will finish the route, recalculated as stops are completed. |
| Predicted Status | Forward-looking status: On Track (will finish on time), At Risk (might be late), or Will Be Late (projected to exceed scheduled end time). |
Samsara GPS Integration
These fields connect the route to Samsara for GPS tracking:
| Field | What It Means |
|---|---|
| Samsara Route ID | The route's unique identifier in Samsara's system. Set when the route is pushed. |
| Samsara Route Key | Internal key for API communication with Samsara. |
| Samsara Route URL | Direct link to the route in Samsara's dashboard. Click to see the route on Samsara's map. |
| Pushed to Samsara | True if the route has been successfully sent to Samsara. |
| Show Push Button | Controls whether the "Push to Samsara" button is visible (hidden after successful push unless changes are made). |
| Force Manual Pickups | When true, the dispatcher manually controls stop order even after pushing to Samsara. |
Samsara in Production vs. Sandbox
In production, Samsara provides real-time GPS tracking, route optimization, and driver ETA updates. In the sandbox, the Push to Samsara button exists but won't actually send data. All other fields work normally.
Dispatcher Notes
| Field | What It Means |
|---|---|
| Dispatcher Notes | Free-text field visible to the driver on their portal. Your direct communication channel to the driver for this route. |
| Dispatcher Notes Updated | Timestamp of the last edit. Helps the driver know if there are new instructions to read. |
| Is Dispatcher | System flag — true if the current user has the dispatcher role. Controls which buttons and fields are editable. |
Rescheduling & History
| Field | What It Means |
|---|---|
| Is Rescheduled | True if this route was rescheduled from a different date. |
| Reschedule Count | How many times this route has been rescheduled. A high count may indicate planning problems. |
Route Tabs
At the bottom of the form, you'll find tabs with detailed data:
Pickups Tab — Shows each stop with:
| Column | What It Shows |
|---|---|
| Sequence | Stop order (1, 2, 3...) |
| Customer | Link to the customer record |
| City / State | Pickup location |
| Estimated Boxes | Box count from the CSR estimate |
| Estimated Weight | Weight from the CSR estimate |
| Direction | Compass direction from the warehouse |
| Direction Conflict | Warning if this stop conflicts with the route's primary direction |
| ETA Status | On Time, Early, Late, or At Risk |
| HOO Status | Whether the ETA falls inside, barely inside, or outside the customer's business hours |
| Samsara State | GPS tracking state: Scheduled, En Route, Arrived, Departed, Skipped |
| Scheduled Arrival / Departure | Planned times for this stop |
| Actual Arrival / Departure | Real times recorded by the driver |
Route Logs Tab — Shows the step-by-step route timeline:
| Column | What It Shows |
|---|---|
| Stop Name | Customer name or "Warehouse" for departure/return |
| Stop Number | Order in the route |
| Scheduled Departure/Arrival | Planned times |
| Actual Departure/Arrival | Real times |
| State | Scheduled, En Route, Departed, or Skipped |
| Arrival Status | Not Reached, Reached On Time, or Reached Late |
| Delay (Minutes) | How many minutes late to this specific stop |
| Delay Display | Human-readable delay text |
Logs Tab — Shows a history of all changes made to this route (who changed what, when).
Checkpoint
You should be able to answer:
- What's the difference between Status (lifecycle) and Route Status (real-time)?
- What does "Direction Coherence %" tell you, and why does it matter?
- What's the difference between Projected Boxes and Actual Boxes?
- When does Capacity Status change from OK to Warning to Critical?
- What triggers a Warning alert vs. a Critical alert?
- Where do you write notes that the driver can see?
Exercise 3: Understanding Customer Pickups (20 min)
Goal: Learn what every field on a customer pickup record means. Pickups are the building blocks of every route — each one represents one stop where the driver picks up material from a customer.
A customer pickup is a single stop on a truck's daily route. It belongs to one truck schedule and tracks everything about that stop — timing, weight, boxes, service window, direction, and the driver's progress through the pickup workflow. Open any pickup from Operations → Customer Pickups and follow along.
Pickup Stages (Workflow)
Every pickup moves through these stages as the driver works the route:
| Stage | What's Happening | Driver Tasks Created |
|---|---|---|
| Expected | Scheduled and waiting for pickup day. No driver interaction yet. | None |
| Arrival | Driver has arrived at the customer's location. | Meet contact, locate materials, verify box count, take photos, get signature |
| In Progress | Driver is actively loading material onto the truck. | Label all boxes with barcodes, load onto truck, photo of boxes on truck, verify customer satisfaction |
| Next/End | Loading is complete. Driver is moving to the next stop or heading back to the warehouse. | Box statuses updated automatically, customer notification email queued |
| Cancelled | Pickup was cancelled. A cancel reason is required. | None |
Driver Task Checklists
At each stage transition, the system automatically creates a task checklist for the driver on their portal. The driver must complete all tasks before advancing to the next stage. Tasks include photos, signatures, box labeling, and satisfaction verification. This ensures consistent documentation at every stop and protects both the driver and the company.
Arrival Status (Timing)
Separate from the stage, the arrival status tracks whether the driver arrived within the scheduled window:
| Status | Meaning |
|---|---|
| Pending | Driver hasn't arrived yet — pickup is still upcoming |
| Not Reached | Scheduled time has passed but driver hasn't arrived |
| On Time | Driver arrived within the scheduled arrival window |
| Reached On Time | Confirmed on-time arrival (after departure) |
| Late | Driver arrived after the scheduled window |
| Reached Late | Confirmed late arrival (after departure) |
Core Pickup Fields
| Field | What It Means | Example |
|---|---|---|
| Customer | The company being picked up from. Links to the full customer record. | "ABC Electronics" |
| Pickup Date | The scheduled date for this stop. | "02/23/2026" |
| Truck Schedule | Which route this pickup belongs to. Links to the truck schedule record. | "RT- SBT-1 - 2026-02-23" |
| Truck Assigned | The vehicle making this pickup. | "C896HR {40}" |
| Driver | The driver assigned to this route. Auto-fills from the truck schedule. | "Kable West" |
| Lead | The CRM lead/opportunity that generated this pickup. Created when a CSR schedules via Add a Note. | "Lead #1234" |
| Region | Geographic region, pulled from the customer record. Determines which trucks can serve them. | "Sunbright TN" |
| State | Customer's US state, pulled from the customer's address. | "Tennessee" |
| Stop Number | Position in the route sequence (1st stop, 2nd stop, etc.). | 3 |
| Sequence | Ordering value used to sort stops. Lower number = earlier in the route. Can be changed to reorder stops. | 30 |
Weight & Box Fields
| Field | What It Means | Example |
|---|---|---|
| Estimated Weight (LBS) | Expected weight from the CSR's estimate when scheduling. Used for route capacity planning. | 1,500 lbs |
| Actual Weight (LBS) | Real weight after pickup. Computed from individual box weights. | 1,650 lbs |
| Estimated No. of Boxes | Expected box count from the CSR estimate. | 3 |
| Actual No. of Boxes | Real box count after the driver loads. | 4 |
| Remainder E-Waste Weight | Total remaining e-waste weight after sorting (computed from box contents). | 200 lbs |
| Assorted E-Waste Weight | Weight of unsorted/mixed e-waste materials. | 150 lbs |
Timing Fields
| Field | What It Means | Example |
|---|---|---|
| Scheduled Arrival | When the driver should arrive at this stop, based on route optimization. | "10:30 AM" |
| Scheduled Departure | When the driver should leave this stop to stay on schedule. | "11:15 AM" |
| Actual Arrival | When the driver actually arrived (recorded by driver portal or Samsara). | "10:42 AM" |
| Actual Departure | When the driver actually left. | "11:20 AM" |
| En Route Time | Travel time from the previous stop to this one. | "45 min" |
| ETA | Estimated time of arrival, updated as the route progresses. | "10:35 AM" |
| Current ETA | Recalculated ETA based on the driver's current progress and position. | "10:50 AM" |
| ETA Variance (Minutes) | Difference between scheduled arrival and current ETA. Positive = arriving later than planned. | +12 |
| ETA Status | Summary of the arrival forecast. | "On Time" / "Early" / "Late" / "At Risk" |
| Delay (Minutes) | How many minutes behind schedule the driver arrived at this stop. | 12 |
| Delay Display | Human-readable delay. | "12 min late" |
| Stop Duration (Actual) | How long the driver actually spent at this stop, from arrival to departure, in hours. | 0.75 (= 45 min) |
| Duration in Hours | Planned duration at this stop based on the number of boxes and loading conditions. | 0.5 (= 30 min) |
| Additional Time | Extra time (hours) added by the CSR for difficult loading situations, multi-floor buildings, etc. | 0.5 |
Service Window (Hours of Operation) Fields
| Field | What It Means | Example |
|---|---|---|
| HOO Start | Customer's business hours start time in 24-hour decimal format (8.0 = 8:00 AM). | 8.0 |
| HOO End | Customer's business hours end time (17.0 = 5:00 PM). | 17.0 |
| HOO Status | Whether the driver's ETA falls within the customer's business hours. | See below |
| Fixed Appointment | If true, the driver must arrive within ±15 minutes of a specific time. These take absolute priority in routing. | True / False |
| Appointment Time | The exact arrival time for fixed appointments. | "02/23/2026 10:00 AM" |
| Appointment Window (±min) | Acceptable variance from the appointment time. Default is 15 minutes. | 15 |
HOO Status values:
| HOO Status | What It Means | Action |
|---|---|---|
| Inside | Driver is projected to arrive during business hours. | No action needed. |
| Risky | Driver will arrive but close to the edge of business hours — might run over. | Monitor closely. Warn the driver to prioritize this stop. |
| Outside | Driver is projected to arrive outside business hours. Customer won't be available. | Reschedule or reorder the route so this stop is hit earlier. |
| Unknown | Business hours not set for this customer. | Ask the CSR to update the customer's hours of operation. |
Fixed Appointments vs. Service Windows
A service window (HOO) is the customer's general business hours — the driver should arrive sometime within this window. A fixed appointment is a hard commitment to a specific time (±15 minutes). Fixed appointments lock the stop's position in the route and the optimizer won't move them. CSRs need manager approval to set fixed appointments because they reduce routing flexibility.
Direction Fields
| Field | What It Means | Example |
|---|---|---|
| Direction | Compass direction from the warehouse to this customer. Calculated from GPS coordinates. | "NE" (Northeast) |
| Direction Quadrant | Broader grouping: North, East, South, or West. | "North" |
| Direction Bearing | Precise bearing in degrees from the warehouse (0° = North, 90° = East, etc.). | 45.2° |
| Direction Conflict | True if this stop's direction opposes the route's primary direction. A SW stop on a NE route triggers this. | True / False |
Samsara GPS Tracking
| Field | What It Means |
|---|---|
| Samsara State | GPS tracking state from Samsara. |
| Samsara Stop ID | Unique identifier for this stop in Samsara's system. |
| Live Sharing URL | Link to real-time GPS tracking for this stop. |
| Pushed to Samsara | True if this stop has been sent to Samsara. |
Samsara State values:
| State | Meaning |
|---|---|
| Scheduled | Stop is in the route plan but driver hasn't started heading to it yet |
| En Route | Driver is actively driving toward this stop |
| Arrived | Driver has arrived at the customer's location |
| Departed | Driver has left the customer's location |
| Skipped | Driver skipped this stop (customer closed, can't access, etc.) |
Other Pickup Fields
| Field | What It Means |
|---|---|
| Is Forced | True if a CSR overrode the scheduling algorithm to force this pickup onto a date or route. Forced pickups bypass capacity and time checks. Logged for manager review. |
| Force User | The user who authorized the forced pickup. |
| Is Special | True if this customer has special handling requirements (hazmat, HIPAA destruction, etc.). |
| Cancel Reason | If cancelled, explains why (customer closed, material not ready, rescheduled, etc.). |
| Requested Pickup Date | The date the customer originally asked for, which may differ from the actual scheduled date if that date wasn't available. |
| COR Status | Certificate of Recycling status: Sent or Not Sent. |
| Notes | Free-text notes about this specific pickup visible on the route. |
Pickup Action Buttons
From a pickup record, you can take these actions:
| Button | What It Does | When to Use It |
|---|---|---|
| Reschedule Date | Opens a wizard to move this pickup to a different date. If routes exist on the new date, you can assign it directly. If not, a new CRM lead is created. | Customer asks to reschedule, or the route is too full. |
| Change Truck | Opens a wizard to move this pickup to a different route (same or different date). Shows capacity info for the target route. | Stop doesn't fit geographically or the route is overloaded. |
| Cancel Pickup | Cancels this pickup with a reason. The pickup is removed from the route and timing is recalculated. | Customer cancels, location inaccessible, material not ready. |
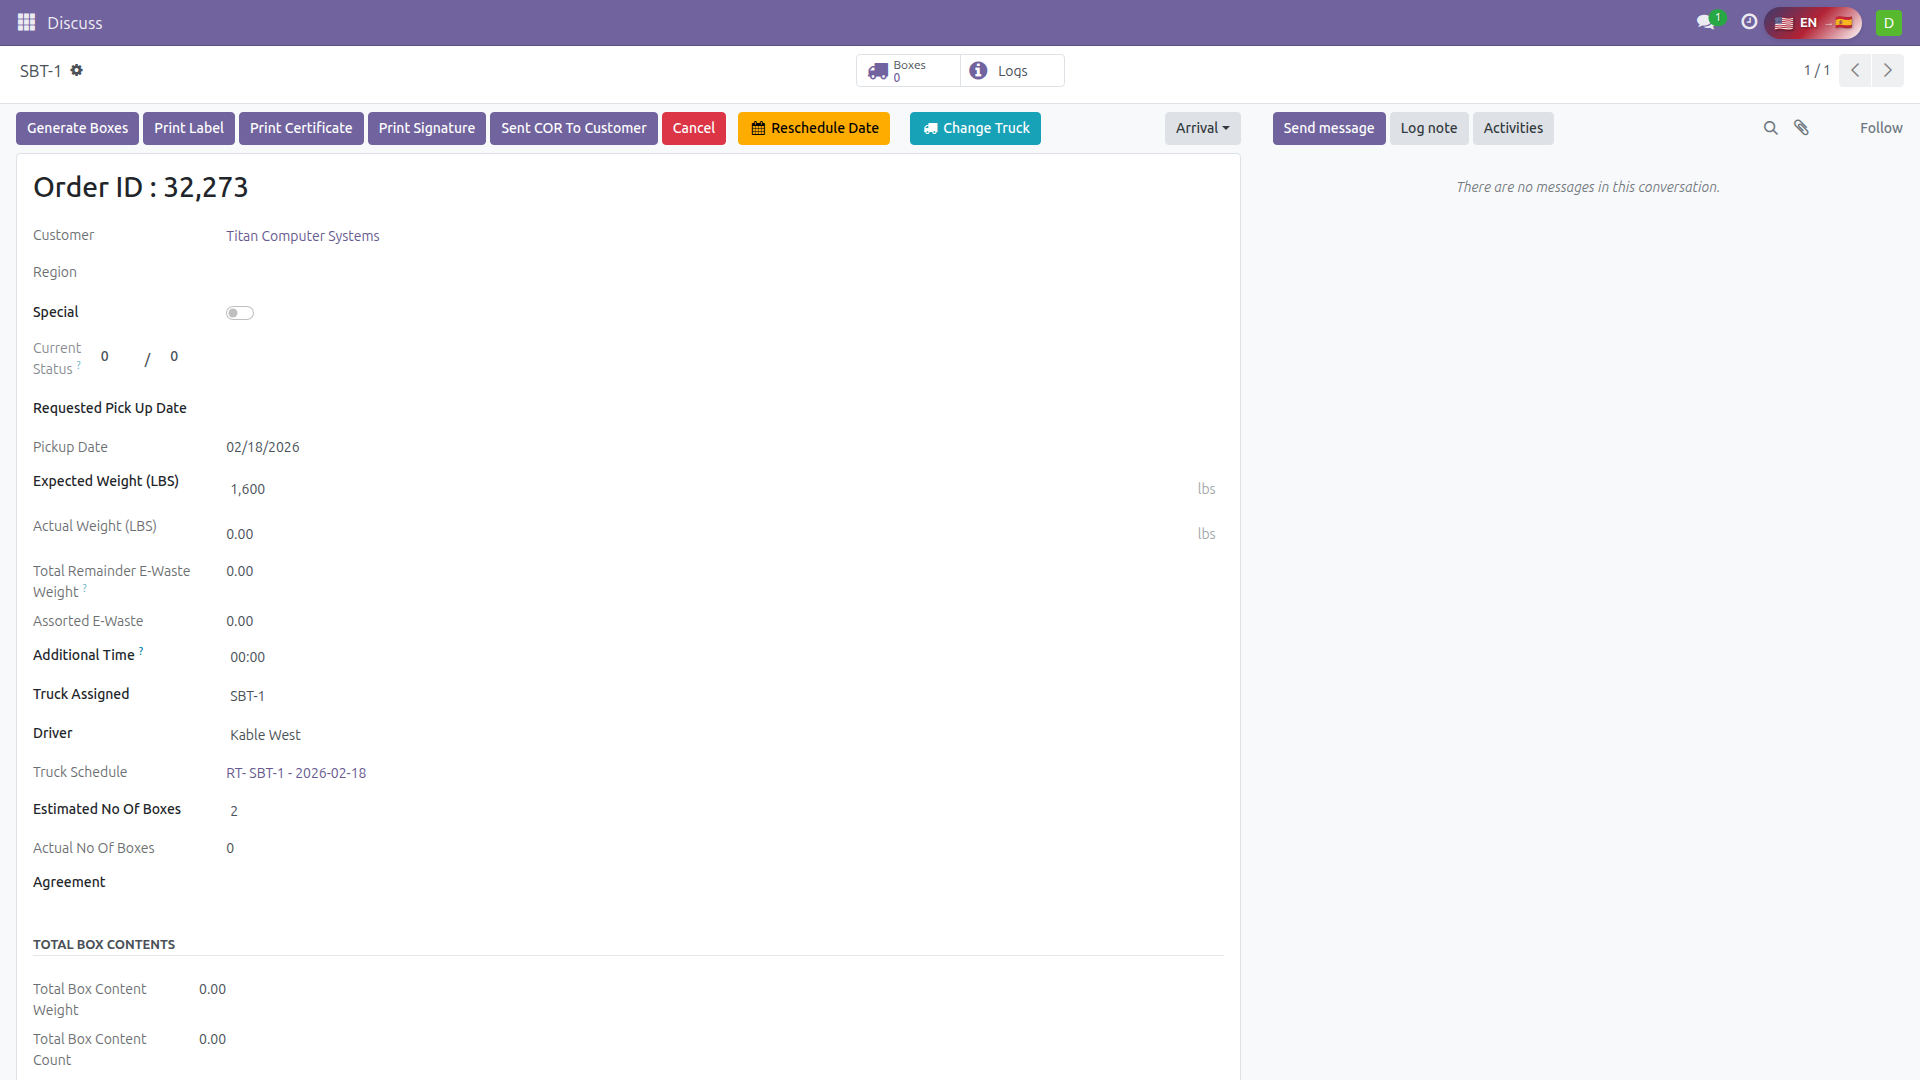 A customer pickup record in form view — showing fields, action buttons, and the Arrival stage badge
Checkpoint
You should be able to answer:
- What's the difference between Stage (workflow) and Status (timing)?
- What happens at each stage transition (what tasks does the driver see)?
- What does "Fixed Appointment" mean and how is it different from a service window?
- What does "HOO Status: Risky" mean and what should you do about it?
- What does "Direction Conflict" on a pickup tell you?
- What does "Is Forced" mean and why is it logged?
Exercise 4: Understanding the Dispatcher Dashboard (15 min)
Goal: Learn every column and feature of your real-time monitoring screen — the command center for active routes.
The Dispatcher Dashboard is a tree view showing all active truck schedules sorted by urgency. Routes needing attention float to the top. Go to Dashboards → Dispatcher Dashboard and follow along.
Color Coding
Rows are color-coded for instant visual scanning:
| Color | Meaning | Example |
|---|---|---|
| Red | Critical alert — 30+ minutes behind, missed pickup, or over capacity. Take action now. | Driver is 40 min late with a skipped stop |
| Yellow | Warning — 15–29 minutes behind. Watch closely, may recover or may worsen. | Driver started 20 min late but is progressing |
| Green | On time or ahead of schedule. No action needed. | Driver is hitting all stops on schedule |
| Blue | Driver is on lunch break. ETAs paused during lunch. | Driver started lunch at 12:30 PM |
| Gray | Route not started yet. Waiting for the driver to depart. | Draft route for tomorrow |
Dashboard Columns
| Column | What to Look At | Why It Matters |
|---|---|---|
| Alert Level | None, Warning, or Critical | Tells you which routes need attention first |
| Alert Message | Human-readable description of the problem | Explains exactly what's wrong ("25 min behind | 1 missed pickup") |
| Needs Attention | True/False flag | Master flag combining all alert conditions — if true, investigate |
| Driver | Who's driving | So you know who to call or message |
| Truck | Which vehicle | Identifies the route at a glance |
| Route Status | Not Started / En Route / On Time / Ahead / At Risk / Behind / On Lunch / Completed | Real-time progress indicator |
| Progress % | Percentage of stops completed (e.g., 3/5 = 60%) | How far through the route the driver is |
| Current Stop | Which stop number the driver is at or heading to | Tells you where the driver is in the sequence |
| Delay (Minutes) | How many minutes behind schedule | Quantifies the problem — 5 min is different from 45 min |
| Missed Pickups | Number of stops that were skipped | Skipped stops need rescheduling |
| Projected Boxes / Actual Boxes | Estimated vs. collected box counts | Capacity tracking — are estimates accurate? |
| Capacity Status | OK / Warning / Critical | Is the truck getting full? |
| Departure Variance | How early or late the driver departed | Late departure usually means the whole route runs behind |
| Predicted Status | On Track / At Risk / Will Be Late | Forward-looking — will this route finish on time? |
| Is Over Hours | True if the route exceeds the daily hour limit | DOT compliance concern |
The Alert System
The system automatically checks all active routes for problems:
| Check | Trigger | Alert Level |
|---|---|---|
| Driver behind schedule | 15–29 minutes late | Warning |
| Driver significantly behind | 30+ minutes late | Critical |
| Missed pickup | Driver skipped a stop | Critical |
| Truck over capacity | Actual boxes ≥ truck capacity | Critical |
| Route over hours | Total time exceeds daily limit | Warning |
In production, a cron job runs every 5 minutes to evaluate these checks and update alert levels. When a critical alert fires, the dispatcher receives an email notification. The cron is disabled in the sandbox, but all alert fields are pre-populated in the training data.
Quick Actions from the Dashboard
Click any route on the dashboard to open it. From there, you have quick action buttons:
| Action | What It Does | When to Use |
|---|---|---|
| Call Driver | Opens the phone dialer with the driver's number | Need immediate verbal contact — urgent route changes, safety issues |
| Text Driver | Sends an SMS to the driver's phone | Quick non-urgent updates or instructions |
| Acknowledge Alert | Marks the alert as seen and being handled | You've assessed the situation and are taking action — prevents repeated notifications |
| Start Lunch / End Lunch | Starts or ends the driver's lunch break timer | Driver reports they're taking or finishing lunch — pauses ETA calculations |
| Add Dispatcher Note | Posts a message visible on the driver's portal | Route instructions, warnings, priority changes |
Checkpoint
You should be able to answer:
- What does each color mean on the dashboard (red, yellow, green, blue, gray)?
- What's the difference between Warning (15 min) and Critical (30 min) alerts?
- What does "Needs Attention" mean?
- What's the difference between "Route Status" and "Predicted Status"?
- What does "Acknowledge Alert" do?
Exercise 5: The Truck Schedule Calendar (15 min)
Goal: Learn the FullCalendar interface — your primary tool for planning and reviewing routes.
Steps
- Go to Scott Recycling → Operations → Truck Schedule
- You'll see a FullCalendar view showing route blocks on each day
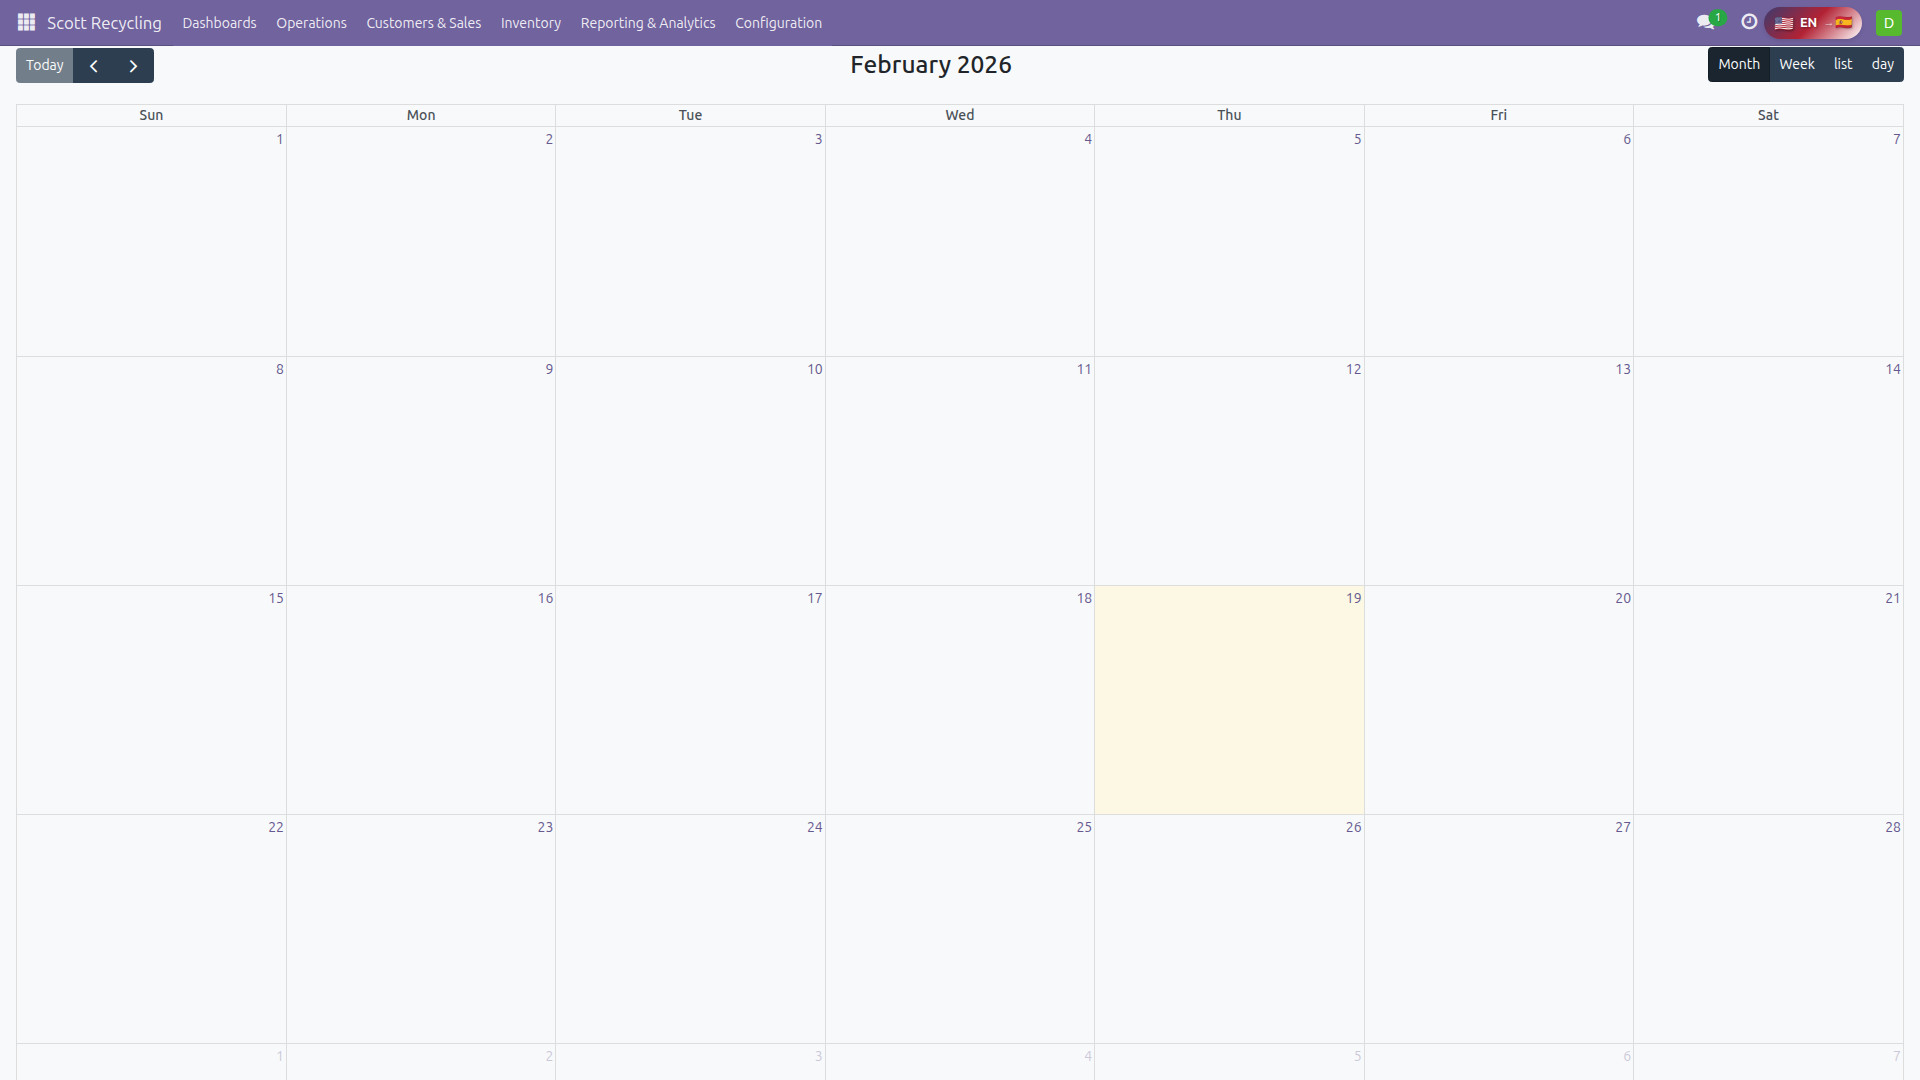 The Truck Schedule Calendar — each block is a route. Click to see details.
Calendar Views
Switch between views using the buttons in the top-right:
| View | Best For |
|---|---|
| Month | Big-picture planning — which days are heavy vs. light |
| Week | This week's detail — how many routes per day |
| Day | Single day focus — see all routes for today |
| List | Scrollable list of all routes |
-
Switch to Month view and scan the calendar:
- Each colored block is one truck's route for that day
- The block shows the region code and total weight
-
Switch to Week view and find the busiest day
The Schedule Dialog (Route Detail)
- Click on any route block on the calendar — a dialog opens with two tabs:
Pickup Details Tab:
| Column | What It Shows |
|---|---|
| Step # | Stop order (1, 2, 3...) |
| Order ID | Link to the pickup record |
| Customer | Link to the customer record |
| City / State | Pickup location |
| Boxes | Estimated box count |
| Weight | Estimated weight |
| Special | Flag for special handling |
| Miles | Distance from previous stop |
| Duration | Drive time from previous stop |
| Start / Arrival / Departure | Scheduled times for each stop |
The bottom row shows totals: total boxes, weight, miles, and time for the whole route.
Map Tab:
-
Click the Map tab — you'll see:
- A Leaflet map with the full route drawn
- Blue "W" marker = warehouse (start/end point)
- Numbered color markers (1, 2, 3...) = each stop in order
- Blue polyline = the driving route
- Turn-by-turn directions listed below the map
-
Click "Open Truck Schedule" at the bottom of the dialog to jump to the full route form
Practice
- Open Monday's SBT-1 route (5 stops, over capacity) — review the Pickup Details tab. Does the stop order make geographic sense?
- Open the Map tab for the same route — can you follow the route visually?
- Open Wednesday's MOR-1 route — this route has a direction conflict warning. Can you spot the problematic stop?
Checkpoint
- Can you switch between Month/Week/Day/List views?
- Can you click a route block to see the schedule dialog?
- Can you read the Pickup Details tab (stops, boxes, weight, timing)?
- Can you view the route on the Map tab?
Exercise 6: Read a Truck Schedule (15 min)
Goal: Apply what you learned in Exercise 2 by reading real truck schedule forms. Now you'll look at actual routes and interpret the fields.
Steps
- From the calendar, click a route block and then click "Open Truck Schedule" (or go to Operations → Scheduling and open a route directly)
- Open a multi-stop route — try Monday's SBT-1 (5 stops, over capacity) or Wednesday's MOR-1 (5 stops, direction conflict)
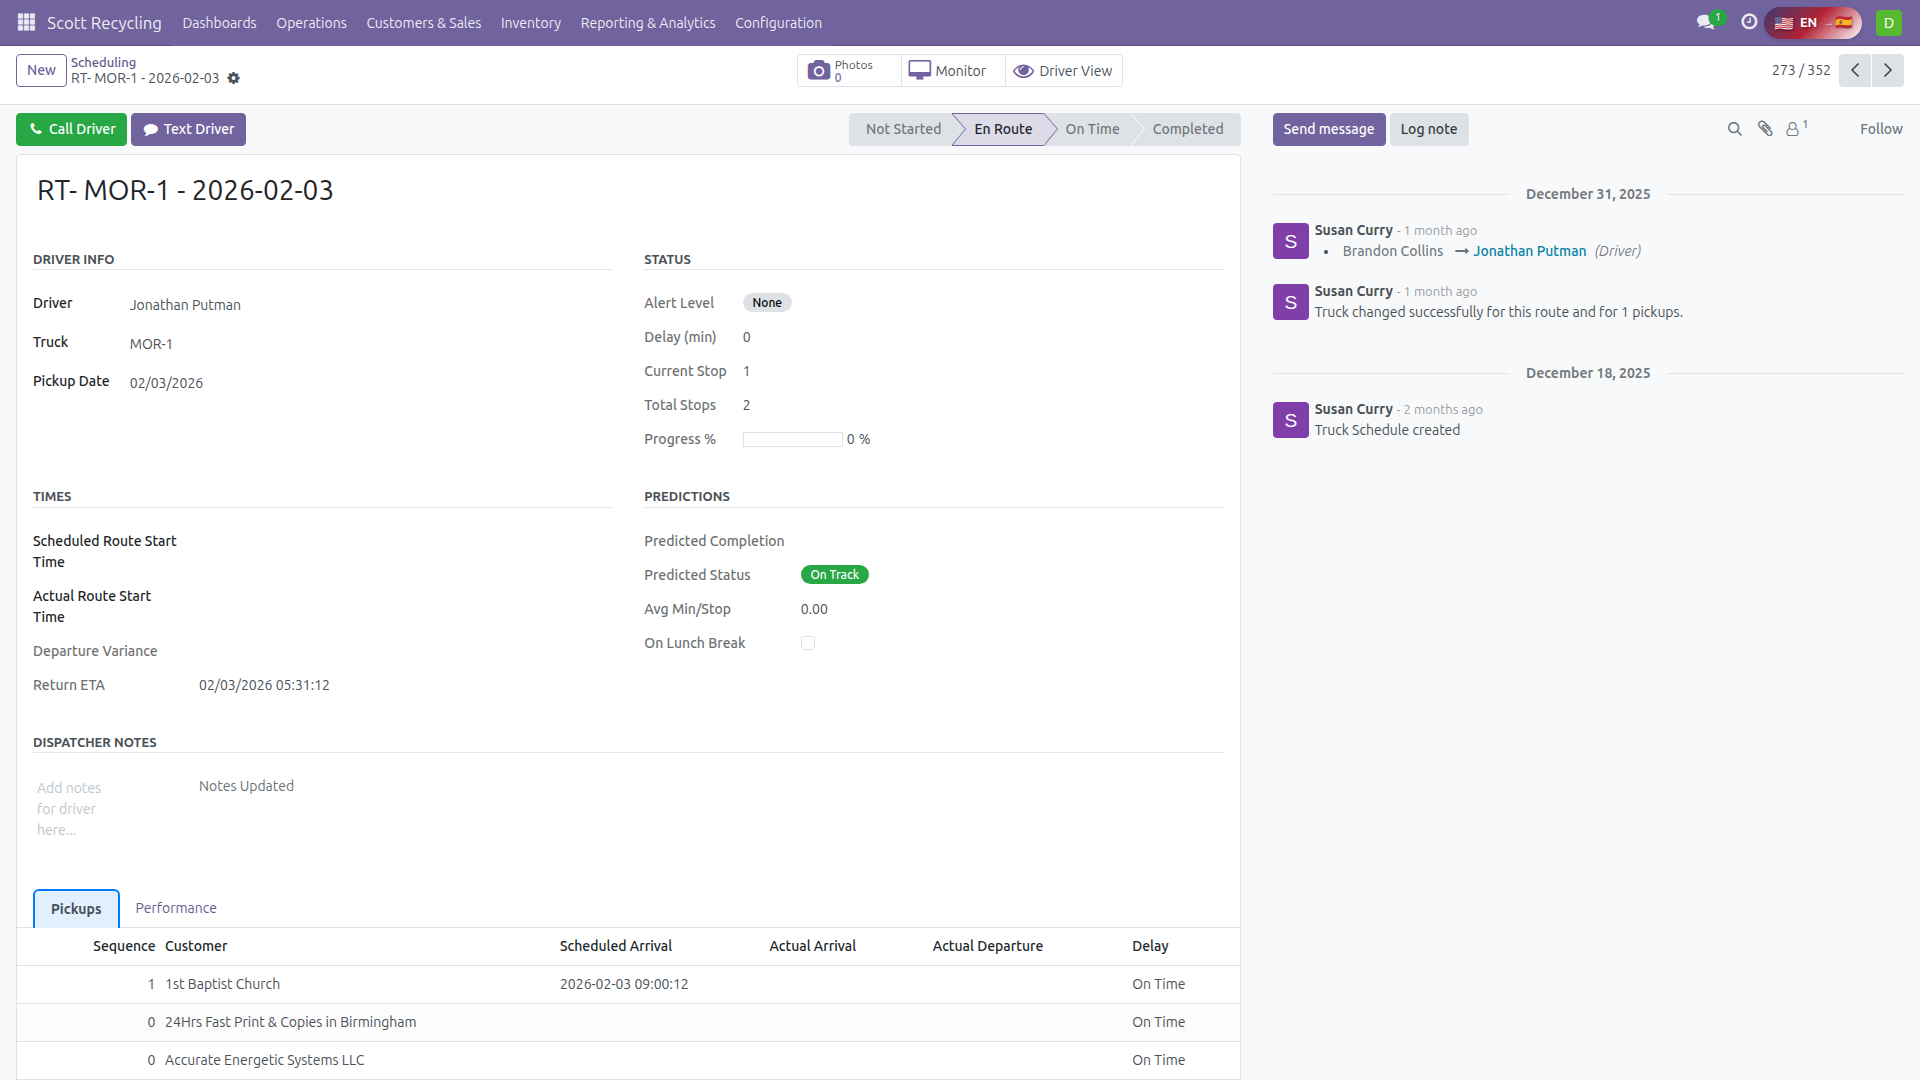 A truck schedule form — route details, action buttons, and pickup list
Practice
Open these three routes and compare them:
-
Monday's SBT-1 route (over capacity) — Check the capacity fields:
- What's the Projected Boxes count? What's the Truck Capacity?
- What's the Capacity Status? (Should be Critical — 13 boxes on a 12-box truck)
- Is there room to add another stop?
-
Wednesday's MOR-1 route (direction conflict) — Check the direction fields:
- What's the Direction Coherence %?
- Is Has Opposite Directions true? Which stop is the outlier?
- Read the Dispatcher Notes — they explain the problem.
-
Find a completed route — use Operations → Scheduling, filter to "Completed" or "Done" status, and open a recent route. Check the Route Logs tab:
- Which stops show "Reached On Time" vs. "Reached Late"?
- What's the Delay (Minutes) on the late stops?
- Was the route an on-time departure? Check On-Time Departure.
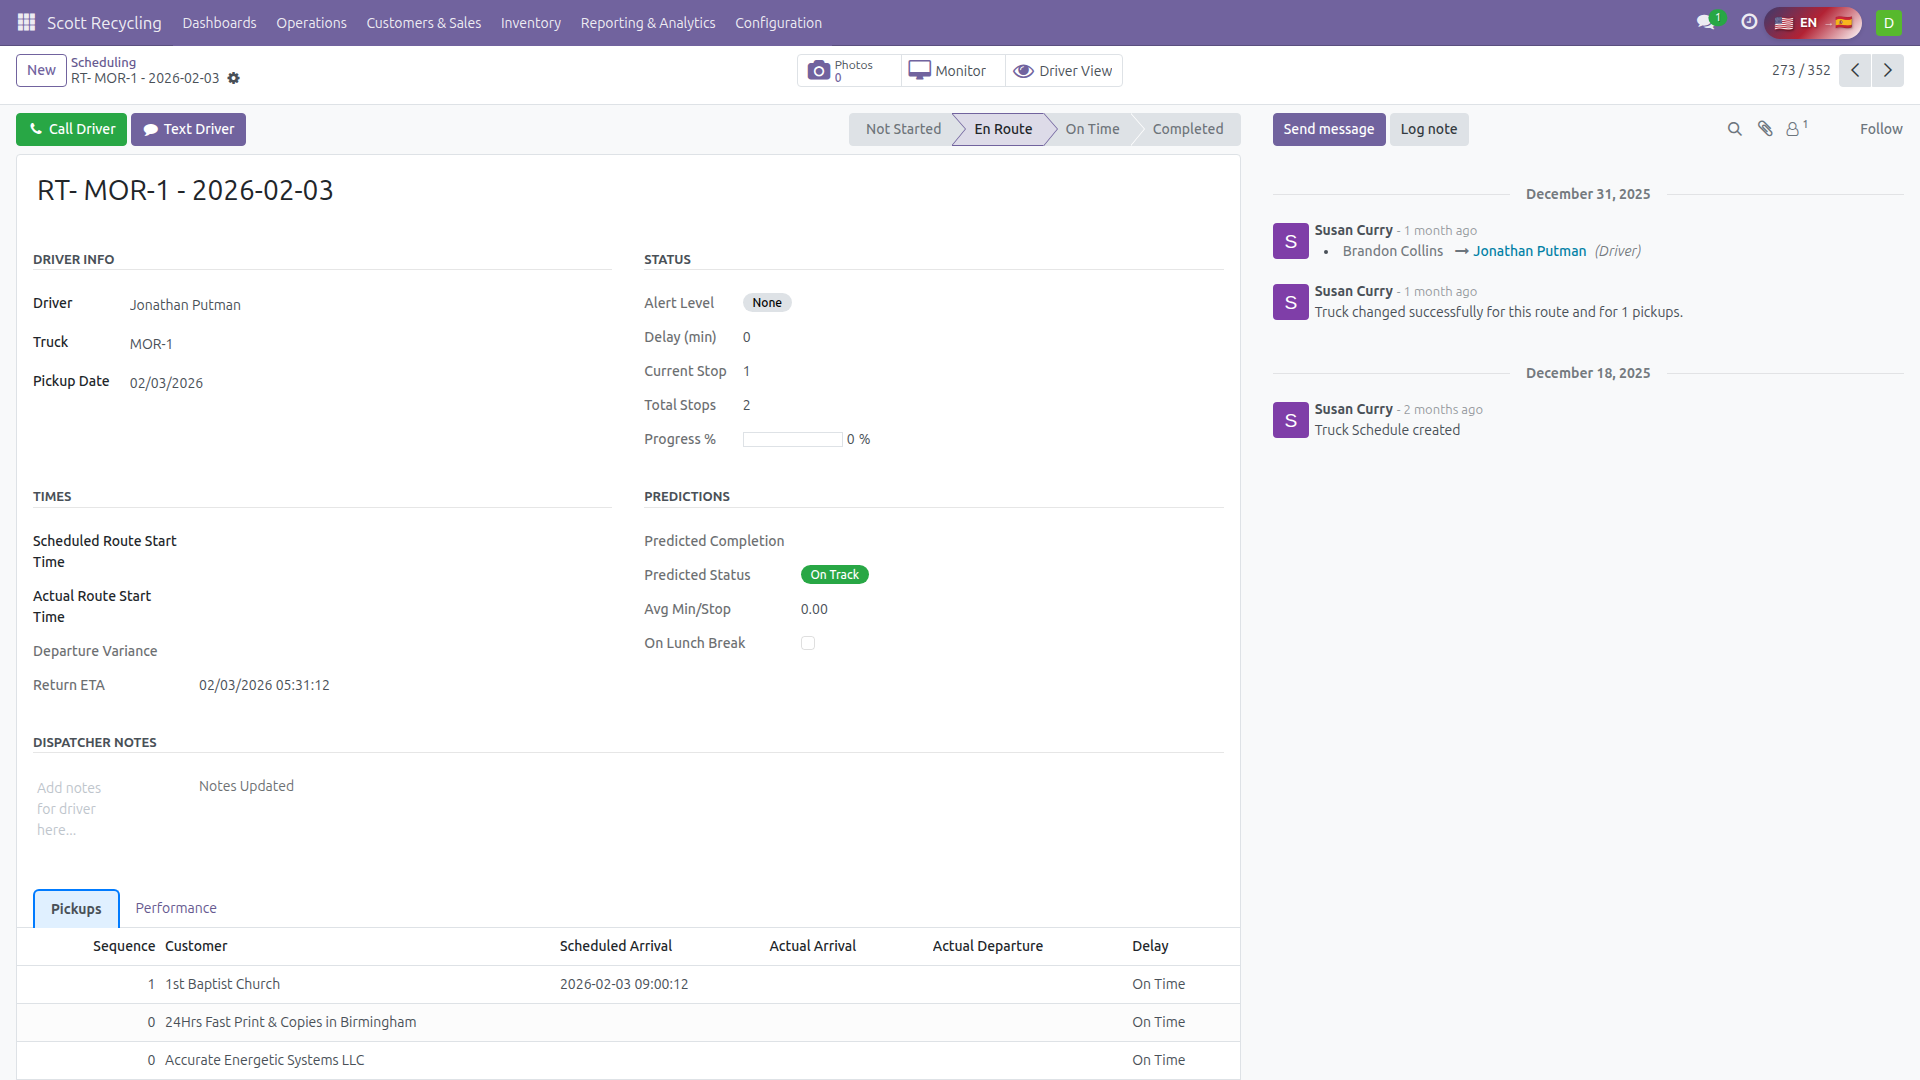 The Dispatcher Notes field — visible to the driver on their portal
Checkpoint
- Can you read capacity (projected vs. actual vs. remaining)?
- Can you identify a direction conflict by looking at the direction fields?
- Can you find the route logs showing scheduled vs. actual timing?
- Can you find and read the dispatcher notes?
Exercise 7: Work with Customer Pickups (15 min)
Goal: Apply what you learned in Exercise 3 by examining real pickup records.
Steps
- Go to Scott Recycling → Operations → Customer Pickups
- Browse the list — each row is one customer stop on a route
Practice
Open 5 different pickup records and examine them:
-
Find a pickup in Expected stage — this is an upcoming stop that hasn't happened yet. Check:
- What's the HOO Status? Will the driver arrive during business hours?
- What's the Direction? Does it match the other stops on the same route?
- Is it a Fixed Appointment?
-
Find a pickup in Next/End stage — this is a completed stop. Check:
- What were the Scheduled vs. Actual arrival times?
- Was the driver on time or late? Check the Delay field.
- How does the Actual Weight compare to the Estimated Weight?
-
Find a pickup with Direction Conflict = True — what direction is it going compared to the route's primary direction?
-
Find a pickup with Is Forced = True — who forced it? What does that tell you about how it was scheduled?
-
Check the HOO Status across several pickups — find one marked "Risky" or "Outside." What should the dispatcher do about it?
Checkpoint
- Can you distinguish between Stage (workflow position) and Arrival Status (timing)?
- Can you check whether a pickup will arrive during business hours?
- Can you identify forced pickups and understand what that means?
- Can you compare estimated vs. actual weight and box counts?
Exercise 8: Monitor the Dispatcher Dashboard (15 min)
Goal: Use the Dispatcher Dashboard to monitor today's active routes and practice responding to alerts.
Steps
- Go to Scott Recycling → Dashboards → Dispatcher Dashboard
- You'll see today's in-progress routes with color coding
Practice
The sandbox has today's in-progress routes on the dashboard — use them:
-
Find the Critical alert (red) — look for the Brandon Collins SBT-2 route:
- What's the Alert Level? (Should be "Critical")
- What does the Alert Message say?
- What's the Route Status? (Should be "Behind")
- Open the route and read the fields — what can you learn about what went wrong?
-
Find the training routes — look for Kable West (SBT-1), Jonathan Putman (MOR-1), and Devin Sutphin (PUL-1):
- What's the Alert Level on each? (They should all be "None" — running on time)
- What's the Route Status? (Should be "En Route")
- Compare a clean route (no alerts) to the critical Brandon Collins route — what's different?
-
Practice reading dashboard columns:
- For any route, find the Progress %, Current Stop, and Predicted Completion Time
- Check the Departure Variance — positive means late departure, negative means early
-
Practice writing a Dispatcher Note:
- Open any training route and find the Dispatcher Notes field
- Write: "TRAINING: Test note from dispatcher training"
- Remember — in production, the driver sees this immediately on their portal
Checkpoint
- Can you find the Dispatcher Dashboard and read the color coding?
- Can you identify routes by alert level and explain the difference?
- Can you read the alert message to understand what's wrong?
- Can you write a dispatcher note?
Exercise 9: Route Actions & Wizards (20 min)
Goal: Learn the tools you use to modify routes — push, optimize, reschedule, reassign, and cancel.
Push to Samsara
Before a route goes live, it needs to be pushed to Samsara for GPS tracking:
- Open a truck schedule in Draft status
- Find the Push To Samsara button at the top
- In the sandbox, this won't actually send (Samsara is disabled), but in production:
- Samsara receives the route with all stops, addresses, and sequence
- Samsara's AI optimizes the stop order based on real road networks
- Each stop gets a Samsara Stop ID and live tracking URL
- The route becomes trackable in real-time
- The driver sees the route on their Samsara app
Push Early, Push Often
Push routes to Samsara the day before they run. The driver will see the route on their Samsara app when they start their shift. If you make changes after pushing, push again to update. There's no harm in pushing multiple times.
Optimize Route
- Find the Optimize Route button on a truck schedule
- This re-sequences the stops using Samsara's road-network optimizer
- The optimizer considers: shortest total drive time, road conditions, turn restrictions
- Fixed appointments are respected — the optimizer won't move them
- After optimization, the stop sequence and ETAs are updated
Change Truck (Route-Level)
Swap the entire route to a different truck:
- Open a truck schedule → click Change Truck
- Select a new truck — the system recalculates all timing based on the new warehouse location
- Confirm — all pickups on the route switch to the new truck
- Use when: a truck is in the shop, needs maintenance, or is better suited for another region
Change Driver
Swap the driver on a route:
- Open a truck schedule → click Change Driver
- Select a new driver — the system validates their Samsara driver code
- Confirm — the route is reassigned
- Use when: a driver calls in sick, is on leave, or needs to be reassigned
Reschedule Pickup Date (Pickup-Level)
Move one pickup to a different day:
- Open a customer pickup record → click Reschedule Date
- The wizard shows the current date and route
- Enter a new date
- If routes exist on the new date, you can assign the pickup directly
- If no routes exist, a new CRM lead is created for re-scheduling
- The old route is automatically recomputed (timing, capacity, direction)
Change Truck (Pickup-Level)
Move one pickup to a different route:
- Open a customer pickup record → click Change Truck
- Select the target truck schedule (can be same or different date)
- The wizard shows capacity info for the target route so you can verify it fits
- Confirm — the pickup moves and both routes (source and target) are recomputed
Call Off Pickups (Bulk Cancel/Move)
Your power tool for managing route problems:
- Open a truck schedule → click Call Off Pickups
- A wizard shows all pickups on the route with checkboxes
- Select the pickups you want to handle
- You can:
- Cancel Selected — removes them from the route with a reason
- Reschedule Selected — opens the reschedule wizard for each
- Move Selected — moves them to a target route
- Use Select All to quickly select every pickup
- Use when: driver calls in sick mid-route, truck breaks down, half the route needs to move
Cancel Schedule
Last resort — cancel an entire route:
- Open a truck schedule → click Cancel Schedule
- Enter a reason (required)
- All pickups on the route are cancelled
- The CSR team will need to reschedule affected customers
- This is irreversible — use Call Off Pickups to selectively move stops if possible
Practice
- Open a truck schedule and count all the action buttons across the top
- Open a customer pickup and click Reschedule Date — explore the wizard (you can cancel without saving)
- Open a truck schedule and click Call Off Pickups — see the list of stops with checkboxes
- Try writing a cancel reason (you can cancel the wizard without actually cancelling)
Checkpoint
- Do you know the difference between Push to Samsara and Optimize Route?
- Can you find and open the Reschedule Date wizard on a pickup?
- Can you find the Call Off Pickups wizard on a route?
- Do you know when to use Change Truck vs. Change Driver vs. Cancel Schedule?
Exercise 10: Communicate with Drivers (10 min)
Goal: Learn every communication tool available to dispatchers.
Dispatcher Notes
The most common and important communication tool:
- Open any truck schedule
- Find the Dispatcher Notes field
- Type a message — this is visible on the driver's portal for this route
- The Notes Updated timestamp tells the driver when new instructions were posted
Use dispatcher notes for:
- Route instructions ("Customer at Stop 3 said use the south loading dock")
- Road warnings ("Bridge out on Route 11, take the detour via I-81")
- Priority changes ("Do Stop 4 first — they close at 3 PM")
- Box count corrections ("Stop 2 has 8 boxes, not 3 — CSR confirmed")
- Customer-specific info ("Stop 5 customer flagged — outstanding invoice. Proceed with pickup but notify dispatch after.")
Driver Messages
A structured messaging system between dispatchers and drivers:
| Field | What It Means |
|---|---|
| Route | Messages are tied to a specific truck schedule |
| Message | The text content of the message |
| Sender Type | Driver or Dispatcher — identifies who sent it |
| Message Type | Text (normal), Quick Reply (short response), Alert (important), or SOS (emergency) |
| Priority | Low, Normal, High, or Urgent |
| Is Read / Read At | Whether the recipient has seen it and when |
Access driver messages via Operations → Driver Messages or from within a truck schedule record.
Text / Call Driver
From a truck schedule form:
- Text Driver — sends an SMS to the driver's phone (disabled in sandbox)
- Call Driver — initiates a phone call through the system (disabled in sandbox)
In production, use these for urgent, time-sensitive communication that can't wait for the driver to check their portal.
Barcode Labels
Drivers need labels for each box at every stop:
- Open a truck schedule → click Download Labels — generates a PDF with barcode labels for all stops
- Click Send Labels — emails the PDF to the driver
Labels include: customer name, pickup date, box number, and barcode for scanning at the warehouse when boxes are received.
The Chatter
Like all Odoo records, truck schedules have a chatter (message log) at the bottom. Use it for:
- Internal notes that the driver does NOT see (use "Log Note")
- Tracking history of changes made to the route
- Tagging other dispatchers or managers with @mentions
Dispatcher Notes vs. Chatter
Dispatcher Notes = driver-facing. The driver sees these on their portal. Chatter = internal-only. Only Odoo users see these.
Put driver instructions in Dispatcher Notes. Put internal discussion in the Chatter.
Practice
- Open a truck schedule and write a dispatcher note: "TRAINING: Test note from dispatcher training"
- Find the Download Labels button — click it to see the label PDF
- Scroll down to the chatter and post a log note: "TRAINING: Reviewing this route for dispatcher training"
Checkpoint
- Do you know the difference between Dispatcher Notes (driver-facing) and Chatter (internal)?
- Can you find the Text/Call Driver buttons?
- Can you download barcode labels for a route?
- Do you understand the four driver message types (Text, Quick, Alert, SOS)?
Exercise 11: LTL Shipments (10 min)
Goal: Understand Less-Than-Truckload shipments — pickups handled by third-party trucking companies.
What Is LTL?
When a pickup is too far for our trucks or requires special transport, we use a third-party trucking company. These are tracked separately as LTL Pickups.
Steps
- Go to Scott Recycling → Operations → LTL Calendar
- Browse the LTL records — the sandbox has three training LTL pickups:
- XPO Logistics (next Monday) — Pending, 12 pallets. Standard LTL.
- Old Dominion (next Tuesday) — Pending, meeting required. Someone must be on-site to sign the BOL.
- FedEx Freight (~1 week ago) — Completed. Good reference for what a finished LTL looks like.
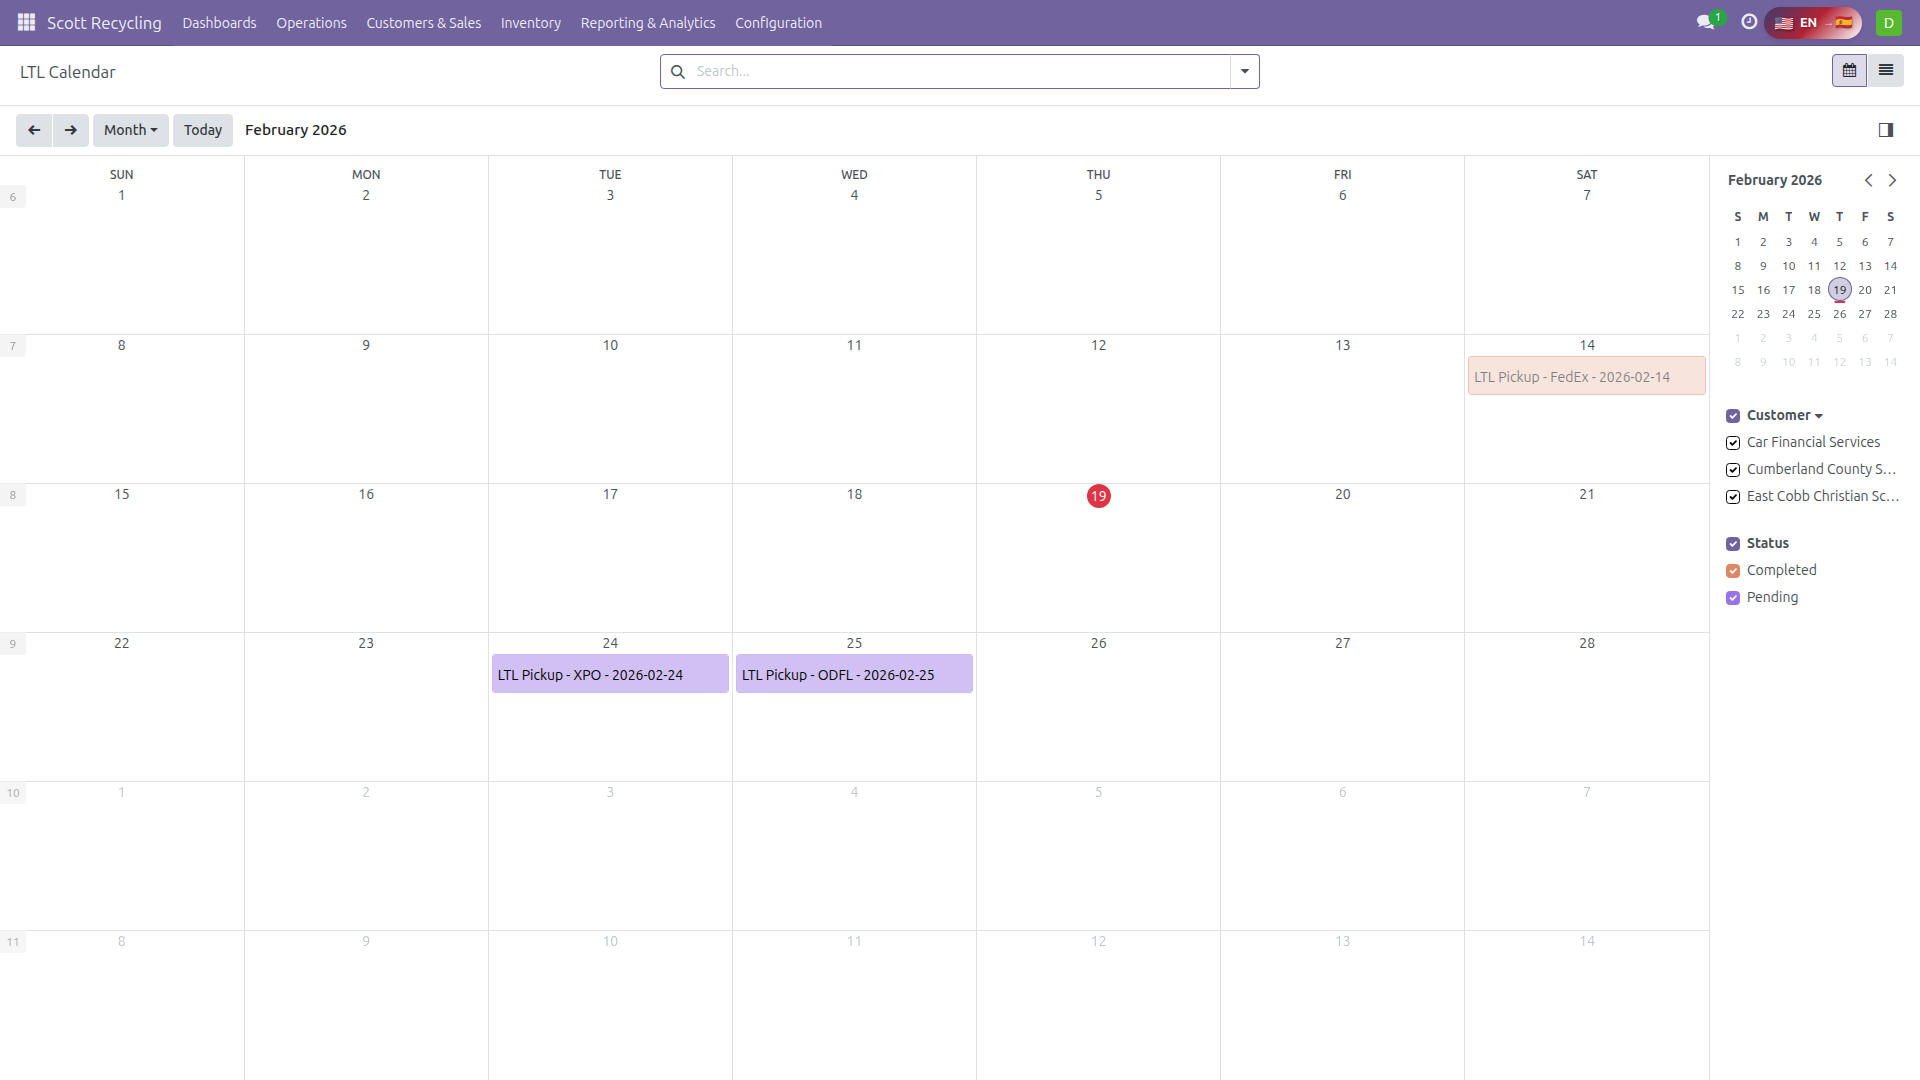 The LTL Calendar — third-party shipments on a calendar view
LTL Pickup Fields
| Field | What It Means | Example |
|---|---|---|
| Pickup Description | Short description of the shipment. | "XPO Logistics — Datacenter Decommission" |
| Customer | The customer being picked up from. | "ABC Electronics" |
| Pickup Date | Scheduled date for the third-party truck to arrive. | "02/24/2026" |
| Trucking Company | The third-party company handling the shipment (e.g., XPO, Old Dominion, FedEx Freight). | "XPO Logistics" |
| Trucking Phone | Contact number for the trucking company — call if the truck is late or there's a problem. | "(800) 555-1234" |
| Pro Number | The trucking company's tracking number (like a shipping tracking number). Required to mark as complete. | "PRO-2026-001" |
| Invoice Number | Our invoice number for this shipment. | "INV-5678" |
| Shipper | Who arranged the shipment. | "Scott Recycling" |
| Box Count | Number of boxes, pallets, or containers. | 12 |
| Status | Current state of the shipment. | "Pending" / "Completed" / "Cancelled" |
| Truck | If one of our trucks is involved (e.g., meeting the LTL truck at a customer site). | "C896HR {40}" |
| Driver | Related driver if a truck is assigned. | "Kable West" |
| Verified By | Which Scott Recycling employee verified the pickup happened — required to mark as complete. | "Summer Benedict" |
| Is Meeting Required | True if someone from Scott Recycling must be on-site when the third-party truck arrives (e.g., to sign the BOL, supervise loading, verify material). | True / False |
| Assigned Employees | Staff assigned to handle or meet the LTL pickup. | "Kable West, Summer Benedict" |
| Attachments | Documents related to the shipment (BOL, photos, receipts). | — |
| Notes | Additional instructions or details about the shipment. | "12 pallets from datacenter decommission" |
LTL Status Flow
Completing an LTL
To mark an LTL as complete, two things are required:
- The Pro Number from the trucking company (their tracking/reference number)
- A Verified By employee who confirmed the pickup happened
Without both, the system won't let you mark it complete.
Checkpoint
- Do you know the difference between a regular pickup and an LTL pickup?
- Can you find LTL records in the system?
- Do you know what a Pro Number is and why it's required?
- What does "Meeting Required" mean on an LTL pickup?
Exercise 12: Handle Real-World Scenarios (20 min)
Goal: Put it all together — use everything you've learned to handle realistic dispatcher situations.
Scenario 1: Morning Route Review
It's 7:00 AM. Before the drivers head out, you need to review today's routes.
Do this:
- Open the Truck Schedule Calendar and look at routes for next week
- For each draft route, check:
- Are all stops going in a consistent direction? (Check Direction Coherence % — Wednesday's MOR-1 has a problem!)
- Is any truck over capacity? (Check Projected Boxes vs. Truck Capacity — Monday's SBT-1 is at 13/12 boxes — Capacity Critical!)
- Is any route over hours? (Check Total Trip Time — Friday's PUL-1 is 11.5 hours)
- Are any drivers on leave today? (Check the route warnings)
- Open the Dispatcher Dashboard — you should see today's in-progress routes. Which one needs attention first? (Hint: look for the red/critical alert)
Scenario 2: Driver Calls In Sick
Kable West calls at 6:30 AM — he can't drive today. His route (SBT-1) has 5 stops.
Do this:
- Find Kable's route in the Truck Schedule
- Check the stops — do any have Fixed Appointments or tight HOO Status?
- Click Change Driver — who could take over? Consider:
- Does the replacement driver know the area?
- Are they already on another route today?
- If no driver is available, use Call Off Pickups to reschedule the stops that can wait, and Change Truck on individual pickups to move urgent stops to another route
Scenario 3: Truck Breaks Down Mid-Route
Jonathan Putman calls from MOR-1. He's completed 2 of 5 stops and the truck won't start.
Do this:
- Open Jonathan's route and check which stops are completed (stage = Next/End) vs. remaining (stage = Expected)
- Check Fleet — which trucks are "In Service" and not on a route today?
- Options:
- If a backup truck is available, send it to the driver's location
- If not, use Call Off Pickups → select remaining stops → Move Selected to another driver's route
- Add a Dispatcher Note: "MOR-1 breakdown after Stop 2. Remaining stops moved to [new route]. Maintenance notified."
Scenario 4: Customer Calls — "Where's My Pickup?"
A customer calls: "Your truck was supposed to be here at 2 PM and it's 2:45."
Do this:
- Search Customer Pickups for their company name
- Check the pickup's ETA, Delay (Minutes), and ETA Status fields
- Open the truck schedule for their route — check:
- What's the Route Status? (Behind? At Risk?)
- What's the Current Stop number? How many stops before this customer?
- What's the Predicted Completion Time?
- Now you have a realistic ETA to give the customer
- If needed, use Text Driver to ask for a status update
Scenario 5: CSR Asks "Can We Fit One More Pickup on Friday?"
A CSR wants to add a pickup to an existing Friday route.
Do this:
- Open the Truck Schedule Calendar and find Friday's routes
- Click the route to see the schedule dialog — check:
- Projected Boxes vs. Remaining Capacity — is there room?
- What Direction are the current stops going? Does the new customer fit geographically? (Would it cause a Direction Conflict?)
- What's the Total Trip Time? Is there time for another stop without going Over Hours?
- If it fits: tell the CSR to schedule it (the Add a Note wizard will auto-assign to this route based on region and date)
- If it doesn't fit: suggest a different day or truck, and explain why (capacity, direction, or time constraint)
Scenario 6: Route Has Opposite Directions
Open Wednesday's MOR-1 route — it's flagged with Has Opposite Directions = True and low Direction Coherence.
Think through:
- Open the route and look at each stop's Direction — which stop is going a different direction from the rest?
- Check the Direction Conflict flag on each pickup — which one is True?
- Is there another route on the same day going in that stop's direction? (Check the calendar for Wednesday)
- Use Change Truck on the misplaced pickup to move it to a better route
- After moving, check Direction Coherence % on both routes — it should improve
Know Your Trucks
When reviewing routes, you need to know the trucks, their capacity, and who drives them. Here's a quick reference for the most common vehicles:
| Truck | Dispatch Name | Driver | Capacity | Type |
|---|---|---|---|---|
| C896HR | SBT-1 | Kable West | 12 boxes | Box Truck |
| C441HR | SBT-2 | Ronnie Pearson | 12 boxes | Box Truck |
| C448HR | MOR-1 | Jonathan Putman | 12 boxes | Box Truck |
| M574HV | — | Blake Hamby | 48 boxes | Tractor Trailer |
| Ryder Rental | PUL-1 | Devin Sutphin | 12 boxes | Box Truck (rental) |
Full Fleet Documentation
For complete vehicle fields, vehicle states, driver assignment history, Samsara integration details, and service tracking, see the Fleet Management Guide.
What the Driver Sees
Understanding the driver's experience helps you communicate effectively. When you write a dispatcher note, send a message, or update a route — this is what the driver sees on their end.
The Driver Portal
Drivers access their daily route through a mobile-friendly web portal. They don't use the full Odoo interface — their view is purpose-built for the cab of a truck.
Key driver pages:
| Page | URL | What It Shows |
|---|---|---|
| Home | /driver/home |
Landing page with route summary for today |
| My Route | /driver/my-route |
Full day's route with all pickups — the main view drivers live in |
| Pickup Detail | /driver/pickup/<id> |
Detail page for a specific stop (tasks, photos, signature) |
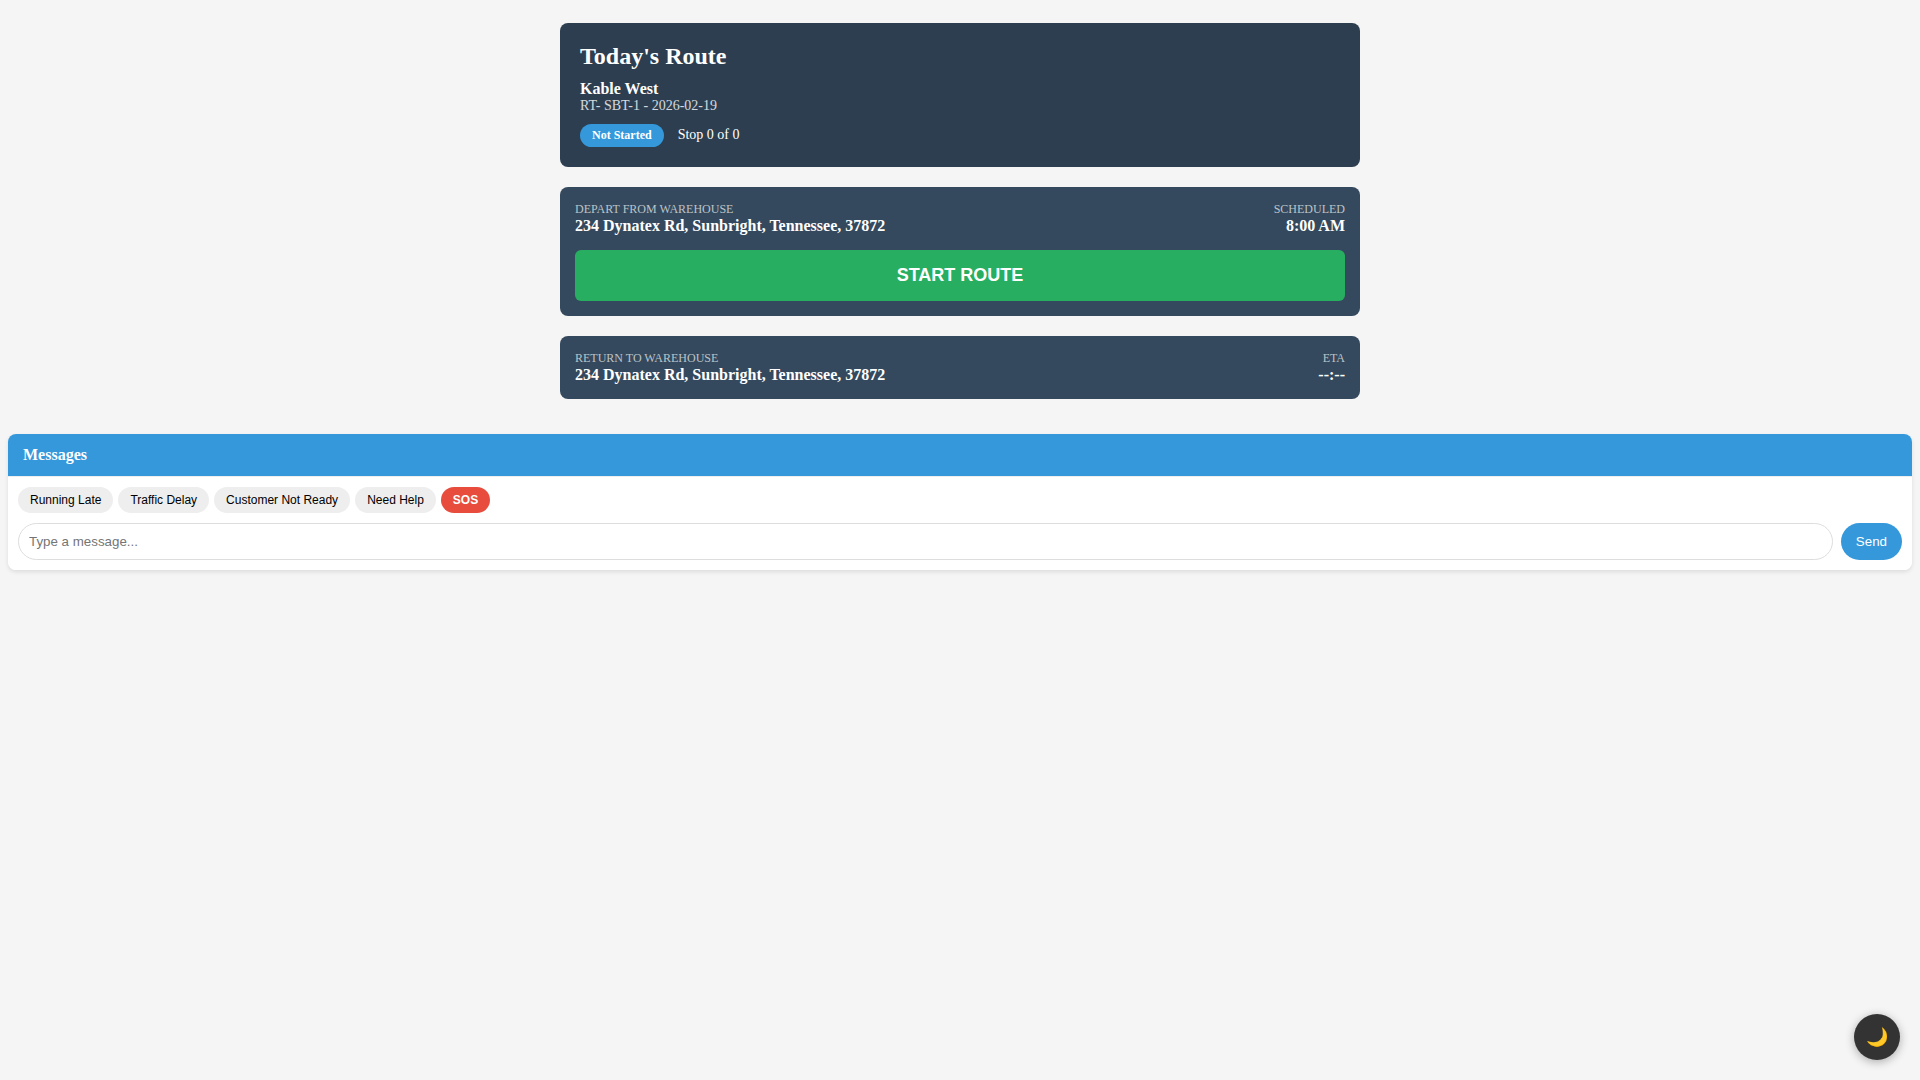 The driver portal — route header, START ROUTE button, warehouse departure card, and quick message buttons
Route Page Layout
The main route page (/driver/my-route) is what the driver sees all day. From top to bottom:
1. Route Header
- Truck name, date, and dispatcher name
- Status badge showing real-time route state: Not Started, In Progress, On Time, Behind, On Lunch, or Completed
- Current stop progress — e.g., "Stop 3 of 12"
- Delay indicator — if the driver is behind, this shows by how much
- Estimated completion time — when the driver should finish the route
2. Dispatcher Notes (Yellow Alert Box)
Your dispatcher notes appear in a prominent yellow box near the top of the page. Drivers see these immediately — they can't miss them. When you update the notes field, the change appears the next time the driver refreshes.
3. START ROUTE Button
Before the driver leaves the warehouse, they tap START ROUTE. This:
- Changes the truck schedule status from Draft/Not Started to In-Progress/En Route
- Records the actual route start time
- Begins ETA calculations for all stops
4. Box Tracking Section
Shows the driver their progress:
- Projected boxes vs. Actual boxes collected so far
- Capacity warnings — if the truck is getting full, the driver sees it here
- Helps the driver flag to dispatch if actual counts don't match projections
5. Pickup Stop Cards
Each stop is shown as a card, sorted by sequence. Every card shows:
| Element | What the Driver Sees |
|---|---|
| Stop number | Position in route (1, 2, 3...) |
| Customer name | Company name |
| Address | Full address with a Google Maps Navigate button — tapping it opens turn-by-turn navigation |
| Expected boxes | CSR's estimated box count |
| Actual boxes | Updated after loading (if different from estimate) |
| Timing info | Scheduled arrival window and current ETA |
| HOO window | Customer's business hours so the driver knows if they're arriving in range |
| Action buttons | ARRIVED (blue), LEAVING (purple) — these advance the pickup stage |
Completed stops show a green "Completed" badge and are pushed to the bottom of the list.
6. Lunch Break Button
A dedicated Take Lunch button starts a 30-minute lunch countdown. While active:
- The route status changes to "On Lunch"
- All ETA calculations pause system-wide
- The lunch start time is recorded
- A countdown timer shows remaining break time
When the driver taps End Lunch, ETAs resume calculating from the new time baseline. The lunch duration is recorded on the truck schedule.
Driver Task Checklists
This is the part that ensures documentation at every stop. When the driver taps ARRIVED at a stop, a task checklist appears that must be completed before they can advance to the next stage.
Task types the driver sees:
| Task Type | What the Driver Does | Example |
|---|---|---|
| Answer (Yes/No) | Taps Yes or No to confirm a condition | "Is all material accessible?" / "Are there any hazards?" |
| Upload Files (Photos) | Takes and uploads photos from their phone camera | Photo of material before loading, photo of boxes on truck |
| Description (Text) | Types a free-text description | "3 extra monitors not on the manifest" |
| Customer Signature | Hands the phone to the customer to sign on a signature pad | Proof of pickup — customer confirms material was collected |
The driver cannot advance to the next stage until all required tasks are complete. This is enforced by the system — there's no way to skip tasks. This is why you'll always have photos, signatures, and confirmations for every stop.
Tasks by stage:
| Stage Transition | Typical Tasks |
|---|---|
| Expected → Arrival | (No tasks — just tap "Arrived") |
| Arrival → In Progress | Meet contact, locate materials, verify box count, take photos of material, get customer signature |
| In Progress → Next/End | Label all boxes with barcodes, load onto truck, photo of boxes on truck, verify customer satisfaction |
Driver Quick Messages
The driver portal has a messaging panel with pre-built quick message buttons for common situations:
| Quick Message | What It Sends to Dispatch |
|---|---|
| Running Late | Alerts you the driver is falling behind |
| Traffic Delay | Explains the delay is traffic-related, not a stop issue |
| Customer Not Ready | Material isn't ready — driver is waiting or may need to skip |
| Need Help | Non-emergency request for dispatcher assistance |
| SOS (red button) | Emergency — triggers an immediate alert to dispatch. Use is logged. |
In addition to quick messages, the driver can type custom text messages. All messages are tied to the specific truck schedule and visible in Operations → Driver Messages.
Dispatcher Monitoring Page
As a dispatcher, you also have a dedicated monitoring view at /dispatch/monitor that shows:
- All active routes with real-time status
- Driver progress through stops
- Photos uploaded by drivers at each stop (viewable at
/dispatch/photos/<pickup_id>) - Message threads with each driver (at
/dispatch/messages/<schedule_id>)
This is a lightweight alternative to the full Dispatcher Dashboard — useful for quick checks without navigating through Odoo menus.
Why This Matters for Dispatchers
- Dispatcher Notes are front and center — the driver sees them in a yellow alert box at the top of their screen. Write clear, actionable instructions.
- Stage changes are driver-driven — when you see a pickup move from Expected to Arrival, that means the driver tapped the button on their phone. It's happening in real-time.
- Google Maps Navigate — drivers tap the address to get turn-by-turn directions. If an address is wrong in the system, the driver gets sent to the wrong place. Verify addresses on new customers.
- Task checklists are mandatory — the driver can't skip photos or signatures. This means every completed stop has full documentation. If a customer disputes a pickup, the photos and signature are in the system.
- Quick messages tell you what's happening — "Customer Not Ready" means the driver is waiting and the stop may take longer. "Traffic Delay" means ETAs for all remaining stops will slip. Adjust your monitoring accordingly.
- SOS is urgent — if you see an SOS message from a driver, respond immediately. Call the driver. These are reserved for real emergencies (safety issues, accidents, confrontations).
- Box tracking helps you anticipate — if a driver reports more actual boxes than projected, downstream stops may push the truck over capacity. Watch the box tracking section on your dashboard.
Flagged Customers
Some customers have flags that affect how you dispatch their pickups. When you see a flagged customer on a route, open their record and check the Attention tab.
How to Check for Flags
- Open a customer pickup on a route
- Click the Customer link to open their record
- Look for the Attention tab — if it exists, there's a flag
- Read the flag details before making dispatch decisions
Flag Types and What They Mean
| Flag Type | Example | Dispatch Impact |
|---|---|---|
| Payment issue | Outstanding invoice over 90 days | Do not schedule new pickups until resolved. Existing pickups may need to be held. |
| Site restriction | Loading dock under construction | Include specific instructions in dispatcher notes for the driver. |
| Schedule restriction | No pickups before 10 AM | Verify the stop's ETA falls within the allowed window. Reorder if needed. |
| Safety concern | Aggressive dog on premises | Alert the driver via dispatcher notes. May need to call customer first. |
Always Check Flags Before Dispatching
The sandbox has 220+ real flagged customers from production data. When reviewing routes, make it a habit to check if any stops are flagged — especially before pushing a route to Samsara.
How Pickups Get on Routes (Auto-Assignment)
As a dispatcher, you'll notice new stops appearing on routes throughout the day. Here's how that happens:
The CSR Workflow
- A CSR takes a customer call and opens the Add a Note wizard on the customer record
- In the wizard, the CSR selects a truck and date for the pickup
- The system creates or finds an existing truck schedule for that truck + date combination
- A new customer pickup record is created and assigned to the route
- The pickup gets a sequence number (added to the end of the route)
- Route timing, capacity, and direction metrics are recalculated automatically
What Dispatchers See
- A new stop appears on a draft route's pickup list
- Capacity numbers update (projected boxes increase)
- Direction coherence may change if the new stop is in a different direction
- Total trip time is recalculated
What to Watch For
- Capacity creep — CSRs adding stops throughout the day can push a route from OK to Warning to Critical
- Direction conflicts — a new stop might go in the opposite direction from the rest of the route
- Over hours — adding stops increases total trip time, potentially pushing past the daily limit
- Fixed appointments — if the new stop has a fixed appointment, it may conflict with existing timing
Morning vs. Afternoon
Most CSR-scheduled pickups land on routes in the morning. Review your routes again around noon to catch any additions that may have changed capacity or timing.
Tractor Trailer Calendar
The Tractor Trailer Calendar (Operations → Tractor Trailer Calendar) shows OTR/long-haul routes separately from local box truck routes.
- Same interface as the Truck Schedule Calendar — FullCalendar with month/week/day/list views
- Filtered to tractor trailers only — vehicles with
Is Tractor Trailer = True - OTR routes are typically longer (multi-day), higher capacity (48 boxes), and cover greater distances
- Use this calendar when coordinating with Blake Hamby or other OTR drivers
The regular Truck Schedule calendar shows only box truck routes. Both calendars use the same underlying truck schedule records — they're just filtered views.
Quick Reference
Pickup Stages
| Stage | Driver Action | What You See |
|---|---|---|
| Expected | Nothing yet | Upcoming stop, no driver interaction |
| Arrival | Tapped "Arrived" | Driver is at the location |
| In Progress | Tapped "Start Loading" | Driver is actively loading |
| Next/End | Tapped "Leaving" | Loading complete, moving on |
| Cancelled | — | Cancelled with reason |
Alert Levels
| Level | Trigger | Dashboard Color | Action |
|---|---|---|---|
| None | On time | Green | Monitor normally |
| Warning | 15–29 min behind | Yellow | Watch closely, may recover |
| Critical | 30+ min behind, missed pickup, or over capacity | Red | Intervene immediately |
Capacity Status
| Status | Utilization | Action |
|---|---|---|
| OK | Under 80% | Room for more stops |
| Warning | 80–99% | Check before adding |
| Critical | 100%+ | Remove or reschedule stops |
What To Do When...
| Situation | Action |
|---|---|
| Driver calls in sick | Open route → Change Driver to a backup. If no backup, use Call Off Pickups to reschedule or move stops to other routes. |
| Truck breaks down | Check Fleet for available trucks. Change Truck on the route, or use Call Off Pickups to move remaining stops. Add dispatcher note. Notify maintenance. |
| Customer cancels | Open pickup → Cancel Pickup with reason. Route timing recalculates automatically. |
| Customer calls — "Where's my pickup?" | Search Customer Pickups for their name. Check ETA, Delay, and Current Stop on the route. Provide a realistic ETA. |
| Route is over capacity | Check which stops can be moved. Use Change Truck on individual pickups to move to a route with room. |
| Direction conflict on route | Find the conflicting stop (Direction Conflict = True). Use Change Truck to move it to a route going in its direction. |
| CSR asks "Can we fit one more?" | Check Projected Boxes vs. Remaining Capacity, Direction of the new stop, and Total Trip Time. Give a yes/no with reasons. |
| Route is over hours | Check if any stops can be removed or moved. Consider splitting the route across two trucks. |
| Driver sends SOS | Respond immediately. Call the driver. Assess safety. Notify manager if needed. |
| Fixed appointment at risk | Reorder stops so the appointment stop is prioritized. Use Optimize Route or manually adjust sequence. |
Knowledge Check
Test your understanding of dispatcher concepts. Answer these on paper or discuss with your supervisor.
Multiple Choice
-
A route shows Capacity Status: Warning. What does this mean?
- a) The truck is empty
- b) The truck is 80–99% full
- c) The truck is overloaded
- d) The capacity is unknown
-
The Dispatcher Dashboard shows a route in yellow. What's happening?
- a) The driver is on lunch
- b) The route hasn't started yet
- c) The driver is 15–29 minutes behind schedule
- d) The route is completed
-
A pickup shows HOO Status: Outside. What should you do?
- a) Nothing — it will sort itself out
- b) Reschedule or reorder the route so this stop is hit during business hours
- c) Cancel the pickup
- d) Call the customer to extend their hours
-
What's the difference between Dispatcher Notes and the Chatter?
- a) They're the same thing
- b) Dispatcher Notes are visible to the driver; Chatter is internal-only
- c) Chatter is visible to the driver; Dispatcher Notes are internal-only
- d) Both are visible to the driver
-
A route has Direction Coherence: 60% and Has Opposite Directions: True. What does this mean?
- a) The route is well-organized
- b) Some stops go in the opposite direction from the rest, causing backtracking
- c) The route has too many stops
- d) The GPS data is incorrect
Scenario Questions
-
It's 7:00 AM. Kable West calls — he can't drive today. His SBT-1 route has 5 stops, including one fixed appointment at 10:00 AM. Walk through your decision process. What buttons and tools do you use?
-
A customer calls at 2:30 PM: "Your truck was supposed to be here at 2:00." How do you find out where their pickup is and give them an accurate ETA? What fields do you check?
-
You're reviewing tomorrow's draft routes. RT-MOR-1 shows Projected Boxes: 13 and Truck Capacity: 12. The route also has a stop with Direction Conflict: True. How do you fix both problems?
-
The Dispatcher Dashboard shows a route in red with a critical alert and significant delay. What are the first three things you do?
-
A CSR asks if they can add a 4-box pickup to Friday's RT-SBT-1 route, which currently has Projected Boxes: 9, Truck Capacity: 12, and all stops going NE. The new customer is located to the SW. What do you tell the CSR, and why?
Answer Key
Discuss your answers with your supervisor. There's often more than one right approach — the goal is to show you understand the fields, the tools, and the decision-making process.
Dispatcher Shadowing Guide
After completing the sandbox exercises, spend a day shadowing an experienced dispatcher. Use this checklist to make sure you observe all the key activities.
Morning Routine (7:00–8:00 AM)
- Watch how the dispatcher reviews today's routes on the Truck Schedule Calendar
- Observe the pre-departure checklist: Are all drivers assigned? Are routes pushed to Samsara?
- See how the dispatcher checks for overnight changes (new pickups added, cancellations)
- Note how direction conflicts and capacity issues are resolved before drivers depart
- Watch how dispatcher notes are written for each route
Mid-Morning (8:00–10:00 AM)
- Watch the Dispatcher Dashboard as routes go live
- Observe how the dispatcher monitors departure times and departure variance
- See how the first alerts are handled (late departures, missed stops)
- Watch how the dispatcher communicates with drivers who are running behind
- Note how new pickup requests from CSRs are handled during active routing
Midday (10:00 AM–1:00 PM)
- Observe how lunch breaks are managed (which drivers take lunch when)
- Watch how capacity changes as drivers complete stops (projected vs. actual boxes)
- See how the dispatcher handles a customer call ("Where's my pickup?")
- Note how the dispatcher prioritizes multiple alerts at the same time
Afternoon (1:00–4:00 PM)
- Watch how end-of-route monitoring works (return ETAs, predicted completion)
- Observe how the dispatcher handles a route that's going to be late
- See how completed routes are reviewed (Route Logs, timing data)
- Watch how tomorrow's draft routes are reviewed and adjusted
End of Day (4:00–5:00 PM)
- Observe the daily wrap-up: Are all routes completed? Any outstanding issues?
- Watch how the dispatcher communicates end-of-day status to the manager
- Note any lessons learned from the day's routing
Questions to Ask
- "How do you decide which alerts to handle first when multiple routes are yellow/red?"
- "What's your process when a driver calls in sick last minute?"
- "How do you handle it when a CSR wants to add a stop that doesn't fit?"
- "What do you do differently on heavy days vs. light days?"
- "What's the most common mistake new dispatchers make?"
Wrap-Up Checklist
After completing all exercises, you should be comfortable with:
- Navigating to all dispatcher screens (Calendar, Dashboard, Pickups, Fleet, LTL)
- Understanding every field on the Truck Schedule form — timing, capacity, direction, alerts, Samsara
- Understanding every field on the Customer Pickup record — stages, statuses, HOO, ETA, direction
- Reading the Dispatcher Dashboard — color coding, alert levels, columns, quick actions
- Using the Truck Schedule Calendar with map and route details
- Understanding pickup stages and the driver task system at each stage
- Monitoring routes with color-coded alerts and knowing when to intervene
- Using route actions: Push to Samsara, Optimize, Reschedule, Call Off, Change Truck/Driver
- Communicating with drivers via notes, messages, text, call, and barcode labels
- Tracking LTL shipments and knowing what a Pro Number is
- Understanding what the driver sees on their portal and why it matters
- Checking for flagged customers before dispatching
- Understanding how pickups auto-assign to routes from CSR scheduling
- Using the Quick Reference for common scenarios
- Handling real-world scenarios using all the tools together
- Completing the Knowledge Check with your supervisor
What's Next?
- Shadow an experienced dispatcher — use the Shadowing Guide above to structure your observation day
- Review the Scheduling a Pickup guide to understand the Add a Note wizard that CSRs use to create pickups
- Review the Call Queues guide to understand how customer calls lead to pickup requests
- Review the Fleet Management Guide for complete vehicle and driver reference
- Start monitoring live routes with your supervisor watching
- Ask your supervisor if you have questions about anything you saw in the sandbox
Remember: The sandbox is always available for practice. Come back anytime you want to review routes, explore the wizards, or prepare for a busy dispatch day. Use Operations → Generate Sandbox Pickups to create fresh routes whenever you need more practice data.