Scheduling a Pickup
Overview
Pickups are created through the Add a Note wizard. Every time you contact a customer (or they contact you), you open this wizard to log the interaction — and if the customer needs a pickup, you schedule it right there in the same form.
Navigation: Open a customer record → click Add a Note
Last Updated: February 2026 Target Audience: CSRs, Dispatchers, Managers
The Add a Note Wizard
The wizard has two purposes in one form:
- Log the contact — record what happened (phone call, email, walk-in, etc.)
- Schedule a pickup — optionally create a pickup if the customer needs one
You always fill out the contact section. The pickup section only appears when you enable it.
Step-by-Step: Creating a Pickup
Step 1: Open the Add a Note Wizard
From any customer record in Scott Recycling → Customers & Sales, click the Add a Note button to open the wizard.
Step 2: Log the Contact
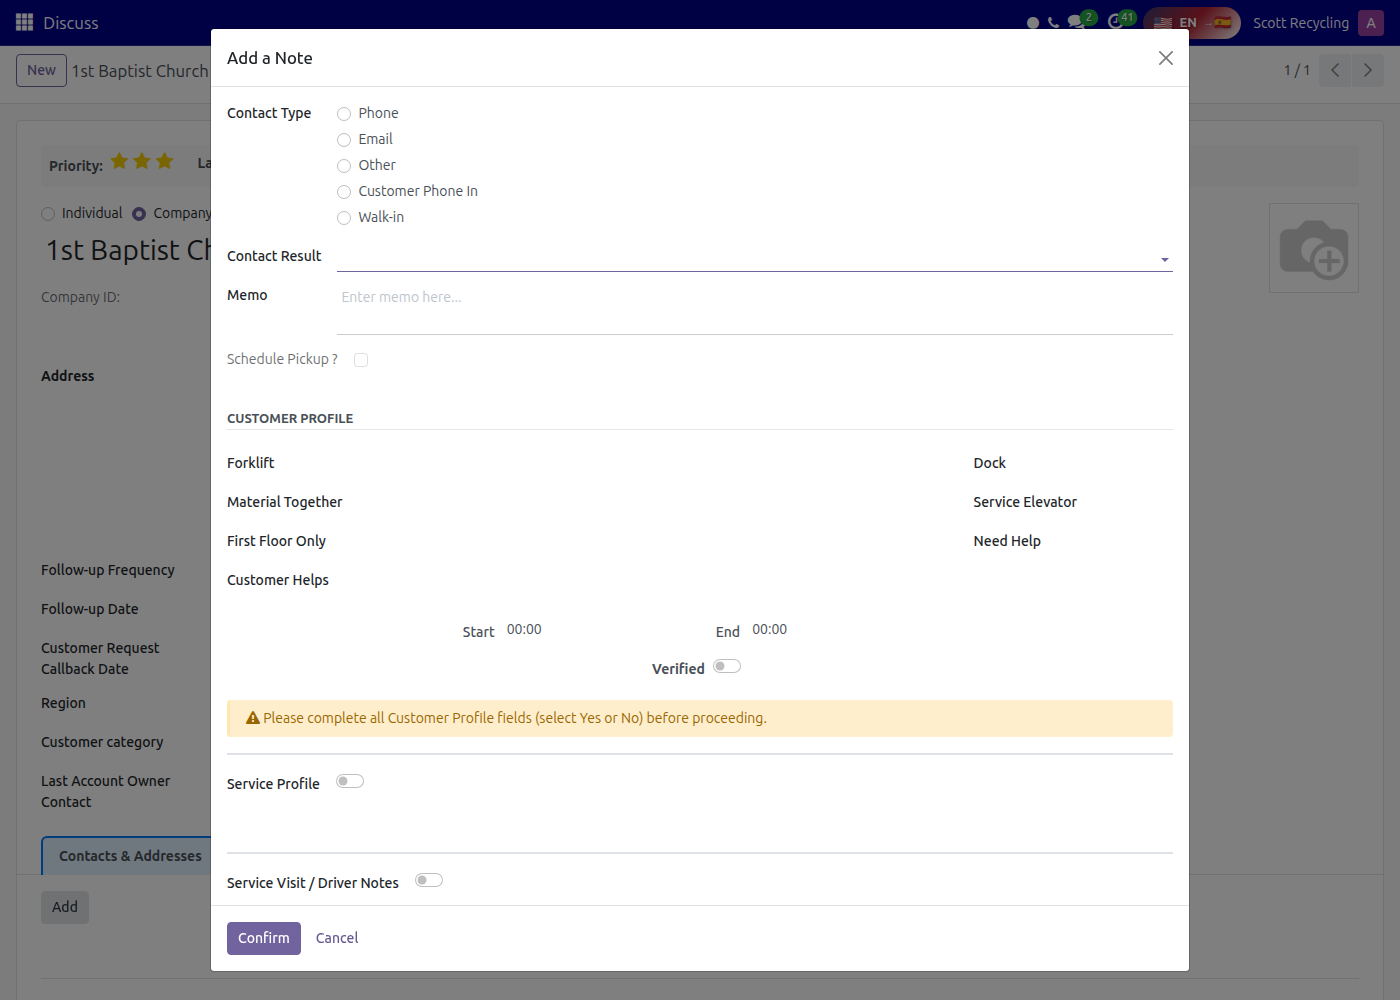
Fill in the top section of the form:
| Field | What to Enter |
|---|---|
| Contact Type | Select one: Phone, Email, Other, Customer Phone In, or Walk-in |
| Contact Result | Select the outcome from the dropdown (e.g., decision-maker reached, left voicemail) |
| Memo | Brief notes about the conversation |
Step 3: Complete the Customer Profile
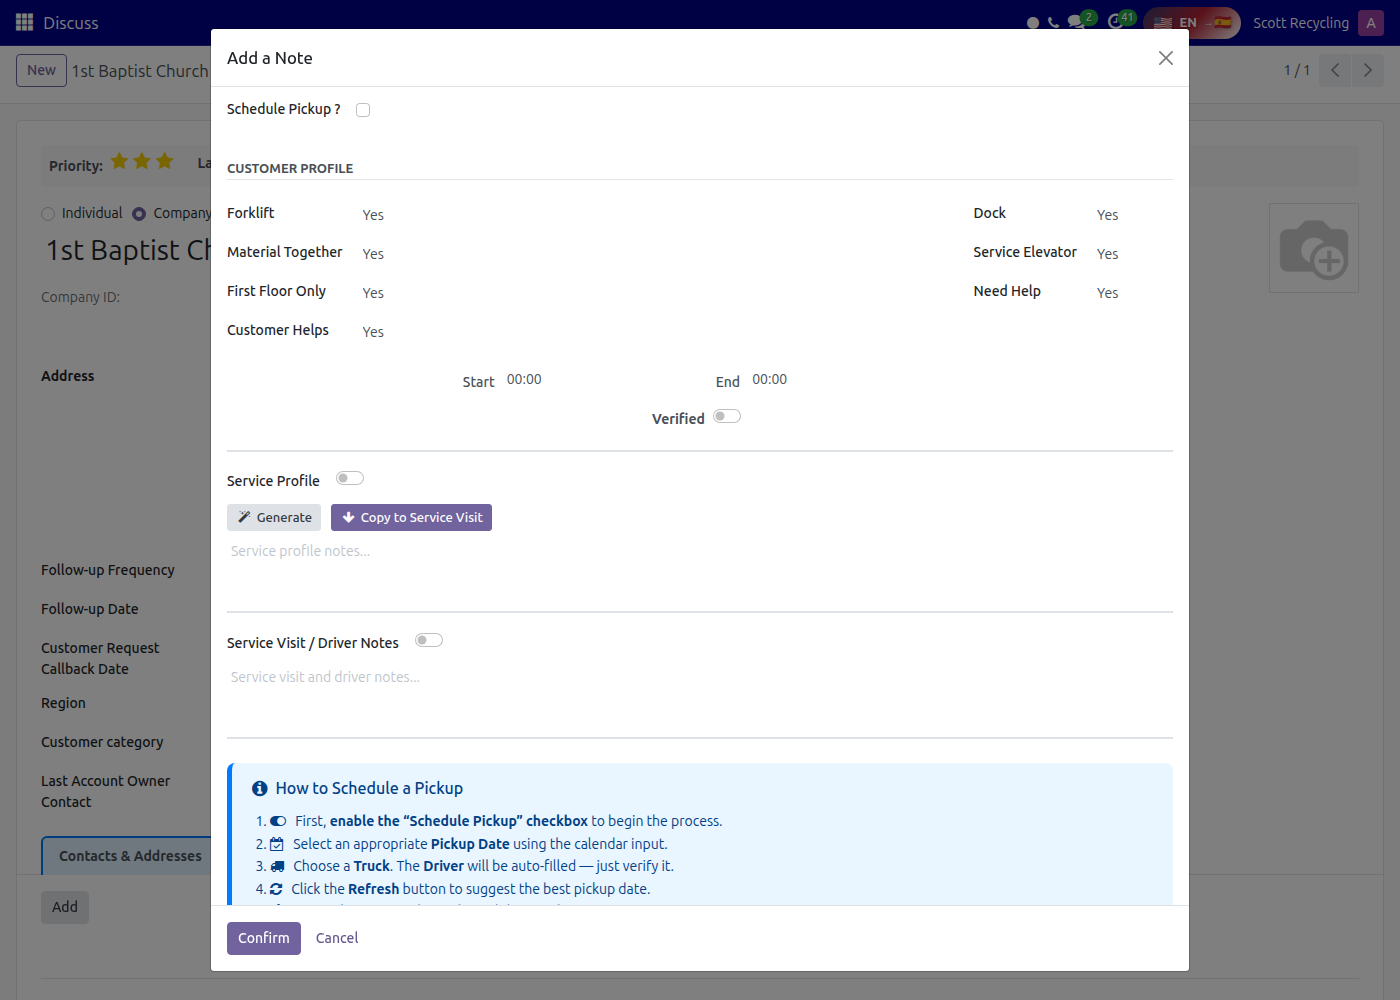
The Customer Profile section shows site logistics. Review and update these fields — they tell the driver what to expect:
| Field | Meaning |
|---|---|
| Forklift | Does the customer have a forklift on site? |
| Dock | Is there a loading dock? |
| Material Together | Is all material gathered in one spot? |
| Service Elevator | Is a service elevator available? |
| First Floor Only | Is material on the first floor? |
| Need Help | Does the driver need help loading? |
| Customer Helps | Will the customer help load? |
Set the Business Hours (start and end times) for when the customer is available.
Toggle Verified once you've confirmed these details with the customer.
Every field must be filled out before you can schedule a pickup
The Schedule Pickup checkbox is locked until every Customer Profile field is set to Yes or No. If any field is left blank or set to "Unknown", you will see a yellow warning banner (shown in the first screenshot above) and the checkbox will be greyed out. You must answer all seven fields — Forklift, Dock, Material Together, Service Elevator, First Floor Only, Need Help, and Customer Helps — before the system allows you to check Schedule Pickup.
The screenshot below shows the profile with all fields completed (all set to Yes). Notice the yellow warning is gone and the Schedule Pickup checkbox is now available:
Step 4: Review Service Profile and Driver Notes
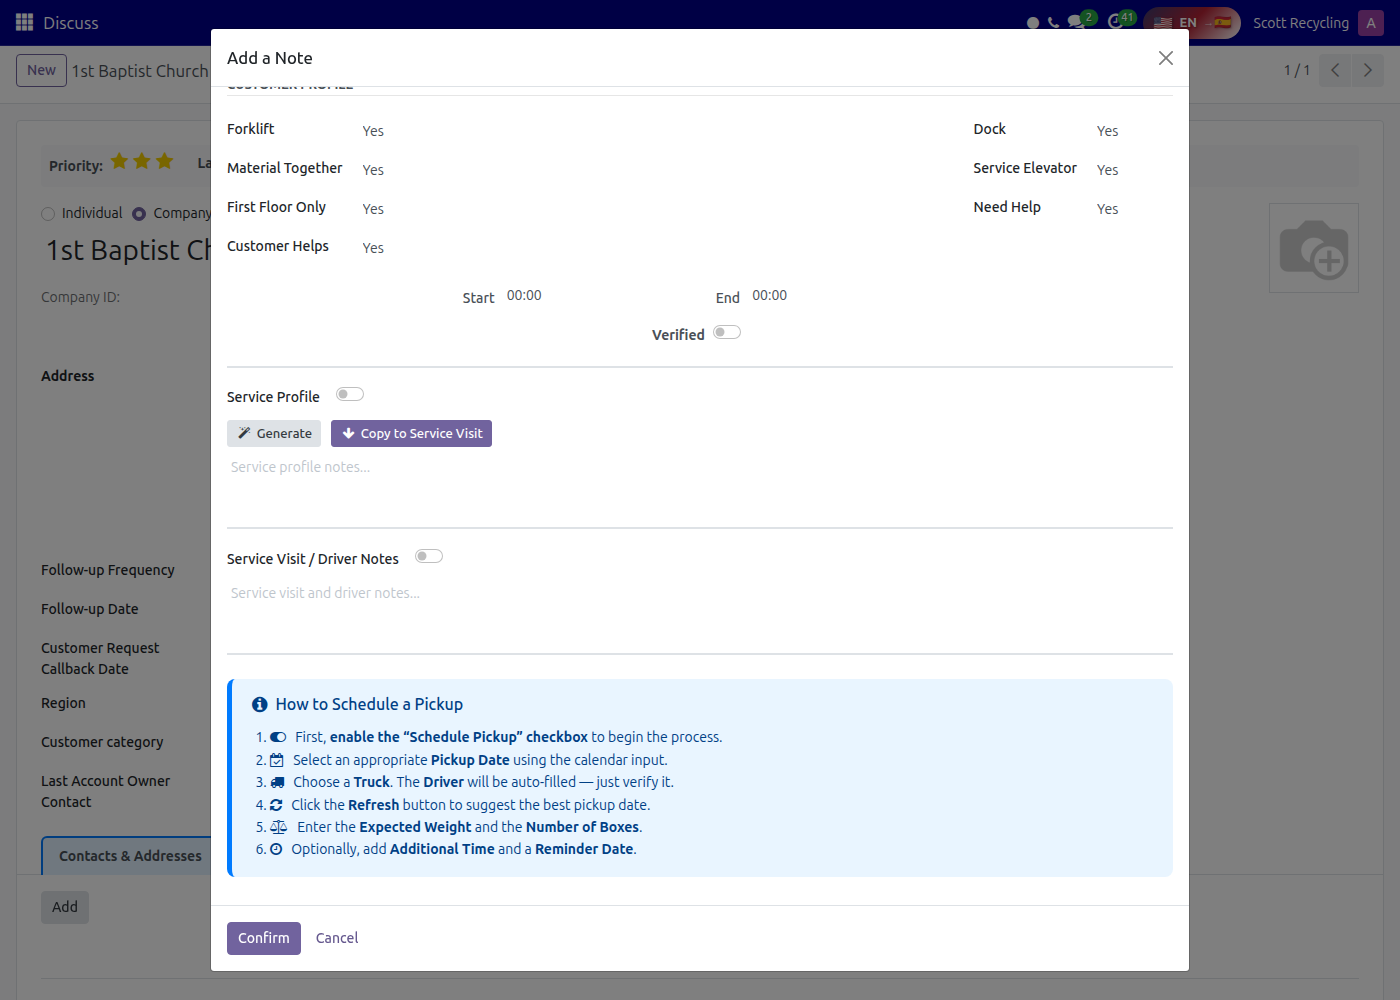
- Service Profile — Notes about the type of service. Click Generate to auto-create based on the customer profile, then review and edit. Click Copy to Service Visit to push it to the driver notes.
- Service Visit / Driver Notes — Specific instructions for the driver (e.g., "Enter through loading dock on south side", "Ask for John at front desk"). Toggle Verified when confirmed.
Step 5: Enable Schedule Pickup
Check the Schedule Pickup checkbox. This reveals the pickup scheduling section below. If the checkbox is greyed out, go back to Step 3 — all Customer Profile fields must be filled out first.
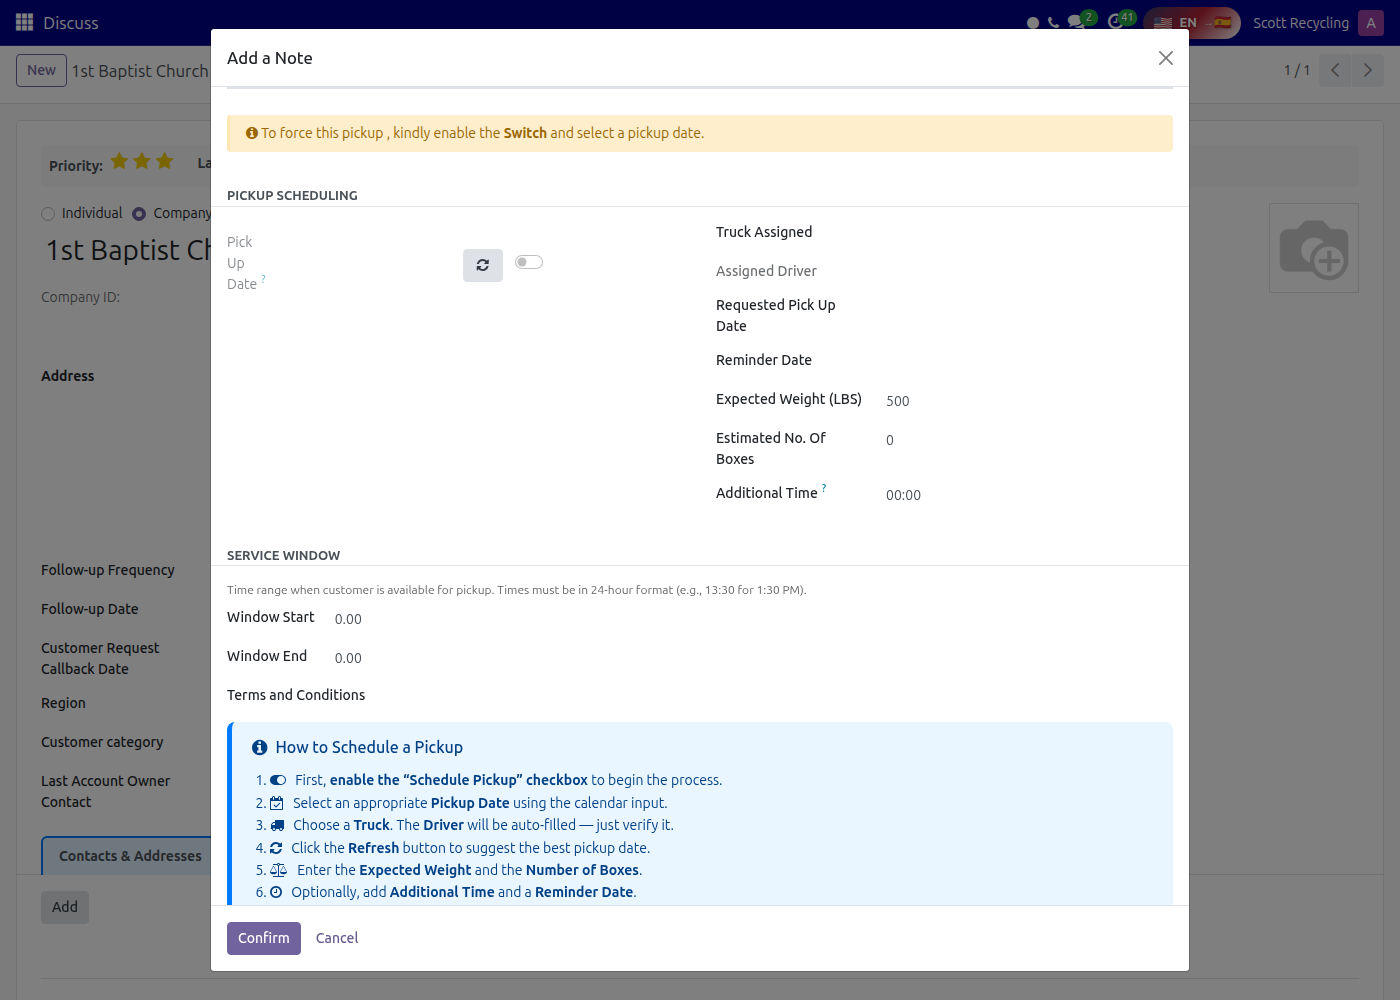
Step 6: Set the Pickup Date
- Click the Pickup Date field to select a date
- Click the Refresh button (circular arrow icon) to have the system suggest the best available date based on truck availability and routing
- The system will show a message if the suggested date has any constraints
Use the Refresh button
The Refresh button checks truck availability, driver schedules, and route optimization to suggest the best date. Always try it first before picking a date manually.
Force Override: If no date is available but you need to schedule anyway, enable the Force toggle. This lets you pick any date regardless of constraints. Use sparingly — forced pickups bypass route optimization.
Forced pickups
When Force is enabled, you'll see a red warning banner. Forced pickups are logged with your name for manager review.
Step 7: Fill in Pickup Details
| Field | What to Enter |
|---|---|
| Truck | Select from the dropdown — trucks are filtered by the customer's region |
| Driver | Auto-filled based on the truck selection. Verify it's correct |
| Requested Pickup Date | The date the customer originally asked for (may differ from scheduled date) |
| Reminder Date | Date to remind you about this pickup |
| Expected Weight | Estimated weight in pounds |
| Number of Boxes | How many boxes to expect |
| Additional Time | Extra time needed at site beyond the standard (hours:minutes) |
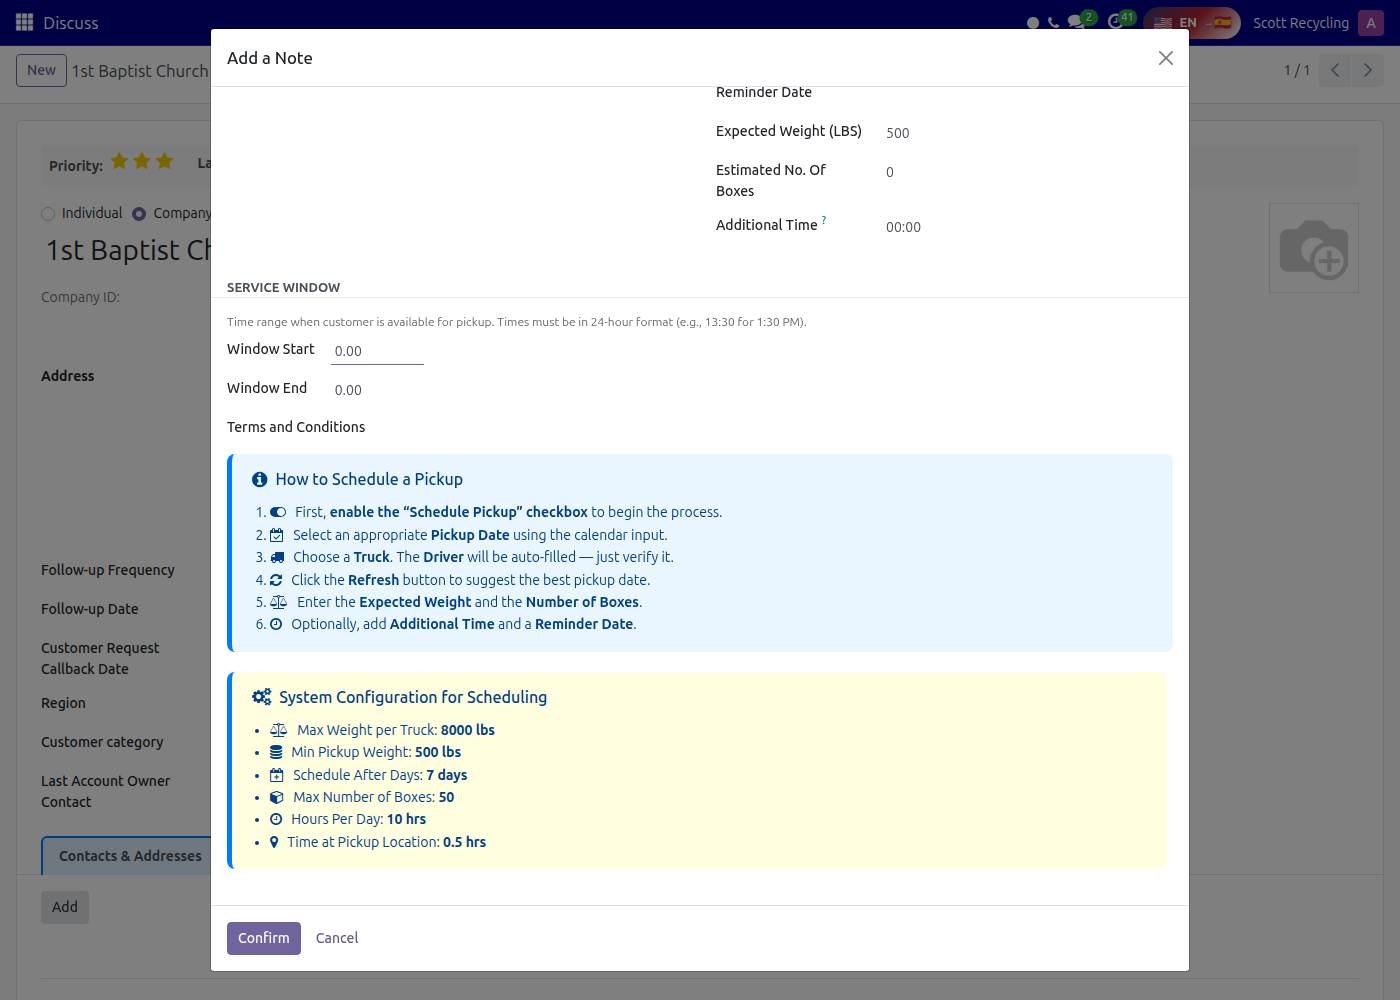
Step 8: Set the Service Window
The Service Window defines when the customer is available for the pickup:
| Field | What to Enter |
|---|---|
| Window Start | Earliest arrival time (24-hour format, e.g., 8:00 for 8 AM) |
| Window End | Latest arrival time (e.g., 17:00 for 5 PM) |
These times are pulled from the customer's Business Hours by default. Adjust if the customer gave different availability for this specific pickup.
Service windows require manager approval
Do not set a service window unless absolutely necessary. A service window locks us into a specific arrival timeframe, which limits routing flexibility and can cause scheduling conflicts. Leave the window at the default (0.00) unless the customer specifically requires a narrow arrival window. If a service window is needed, get manager approval first before entering it.
Step 9: Select Terms & Conditions
Choose the applicable Terms & Conditions tags. The available options are filtered based on the customer type.
Step 10: Review Route Details
If the pickup date matches an existing truck route, you'll see:
- Related Route — The existing route this pickup will be added to
- Route Details tab — Summary of the current route stops and timing
- Map tab — Visual map of the route
If no existing route matches, you'll see a green info box: "This will create a new route since no existing route is available."
Step 11: Confirm
Click Confirm to create both the contact note and the pickup. The system will:
- Create a
customer.pickupsrecord with all the scheduling details - Auto-generate box records based on the number of boxes
- Add the pickup to the truck's route (or create a new route)
- Create a contact note on the customer record
- Update the customer's last contact date
What Happens After You Confirm
The pickup goes through these stages as operations handles it:
| Stage | What's Happening |
|---|---|
| Expected | Pickup is scheduled, waiting for the day to arrive |
| Arrival | Driver has arrived at the customer site |
| In Progress | Driver is actively loading materials |
| Next/End | Loading complete, driver moving to next stop or returning |
| Cancelled | Pickup was cancelled (manager action required) |
At each stage transition, the system automatically creates task checklists for the driver (locate materials, label boxes, take photos, get signature, etc.).
Common Situations
Customer Wants a Specific Date
Enter their preferred date in the Requested Pickup Date field. Then use Refresh to find the closest available date. If the system can't match their date, explain the available options. Use Force only as a last resort.
No Trucks Available
If no trucks show in the dropdown for the customer's region, the schedule may be full. Try a different date or contact your manager about adding capacity.
Driver Is On Leave
If the assigned driver has time off on the pickup date, you'll see a blue info banner showing the leave details. Select a different truck/driver or choose a different date.
Customer Profile Incomplete
If you can't check the Schedule Pickup box, look for the yellow warning — all Customer Profile fields need Yes/No answers. Ask the customer the profile questions during your call.
Tips
Do everything in one wizard
The Add a Note wizard is designed so you log the call AND schedule the pickup in one step. Don't close the wizard and try to create the pickup separately.
Always verify the customer profile
The profile information (forklift, dock, material location) directly affects route planning and driver preparation. Accurate profiles mean smoother pickups.
Check the route summary
Before confirming, review the Route Details tab to see how this pickup fits into the day's route. If the route looks overloaded, consider a different date.
Troubleshooting
Issue: Schedule Pickup checkbox is greyed out / cannot be checked
Symptom: You open the Add a Note wizard and the Schedule Pickup checkbox is greyed out. A yellow warning banner may appear at the top of the form. Cause: One or more Customer Profile fields are set to "Unknown" or left blank. All seven fields (Forklift, Dock, Material Together, Service Elevator, First Floor Only, Need Help, Customer Helps) must be set to either Yes or No before the system enables the Schedule Pickup checkbox. Fix: 1. Scroll to the Customer Profile section of the wizard 2. Look for any field that is blank or set to "Unknown" 3. Ask the customer the missing questions during your call 4. Set every field to Yes or No (there is no "N/A" option -- if a field does not apply, set it to No) 5. Once all seven fields have a Yes/No answer, the Schedule Pickup checkbox becomes available
Issue: No trucks appear in the Truck dropdown for the selected date
Symptom: You select a pickup date, but the Truck dropdown is empty or shows no available trucks for the customer's region. Cause: All trucks in the customer's service area are fully booked for that date, no trucks are assigned to the customer's region, or the truck is marked out of service. Fix: 1. Try a different date -- use the Refresh button to let the system suggest the next available date 2. If multiple dates show no trucks, the region may be temporarily at capacity. Contact your manager or the dispatcher about adding capacity. 3. If you must schedule on that date, enable the Force toggle to override routing constraints. Use this sparingly -- forced pickups bypass route optimization and are flagged for manager review. 4. If the customer is in a border area between regions, check if a truck from an adjacent region can serve them -- contact the dispatcher.
Issue: Refresh button suggests a date far in the future
Symptom: You click the Refresh button to get a date suggestion, but the system suggests a date weeks or even months away. Cause: The customer's region has heavy scheduling demand, or the customer's service window is very narrow (limiting which routes can serve them), or there is a truck shortage in the region. Fix: 1. Check if the customer has a rigid service window set -- a very narrow window (e.g., 9:00-10:00 only) dramatically limits scheduling options. Discuss with the customer whether a wider window is possible. 2. Try removing or widening the service window and clicking Refresh again to see if closer dates appear 3. If the customer needs service sooner, use the Force toggle to manually select a closer date 4. Inform the customer of the earliest available date and ask if they can wait, or if they need the forced override
Issue: Pickup was created but does not appear on the truck's route
Symptom: You confirmed the pickup wizard, but when you (or the dispatcher) look at the route for that date and truck, the pickup is not listed. Cause: The pickup may have been assigned to a different truck than expected, the pickup date may not match the route date, or the confirmation may not have saved properly. Fix: 1. Open the customer record and look at the pickup history -- find the pickup you just created and verify the date and truck assignment 2. Check if the route for that date/truck exists. If the pickup was the first stop on a new route, the route may have been auto-created -- look for a new route record. 3. If the pickup record exists but is not linked to a route, contact the dispatcher to manually add it 4. If no pickup record exists at all, the confirmation may have failed. Re-open the customer record and try scheduling again through the Add a Note wizard.
Issue: System shows a blue banner about driver leave on the selected date
Symptom: After selecting a date and truck, a blue information banner appears saying the assigned driver has approved time off on that date. Cause: The driver assigned to the selected truck has an approved leave request that overlaps with the pickup date. Fix: 1. Select a different truck that has an available driver on that date 2. Or select a different date when the original driver is available 3. Do not ignore the leave banner and schedule anyway -- the route will not have a driver and will need to be reassigned, which can cause delays 4. If no alternatives work, contact the dispatcher. A substitute driver may be available, or the route may be able to be reassigned.
Issue: Accidentally scheduled a pickup on the wrong date
Symptom: After confirming, you realize the pickup date is incorrect (wrong day, wrong week, etc.). Cause: Date was selected incorrectly in the calendar picker, or the Refresh suggestion was accepted without reviewing it. Fix: 1. Open the customer record and find the pickup in the pickup history 2. If the pickup is still in Expected status and the pickup date has not arrived, contact your manager or the dispatcher to reschedule 3. CSRs typically cannot directly edit a confirmed pickup date -- this requires manager-level access 4. If you catch the error immediately after confirming, inform your supervisor right away. It is easier to fix a scheduling error before the route is finalized. 5. Call the customer to inform them of the correct date if it changes
Next step: After scheduling, you'll make a Confirmation Call the morning before the pickup and a Verification Call on the day of the pickup.
Questions? Contact your supervisor or refer to the Customer Call Queues guide for working your daily queues.