CSR Training Sandbox Workflow
Before You Start
Sandbox Access
URL: http://66.23.224.253:8888
Training accounts:
| Username | Password |
|---|---|
csr1 |
csr1 |
csr2 |
csr2 |
dispatcher1 |
dispatcher1 |
manager1 |
manager1 |
You can also log in with any Scott Recycling employee email using password training.
This is a safe copy of our real system. Nothing here affects production — no emails send, no texts go out, no data changes carry over. Practice freely.
The sandbox resets periodically from a fresh copy, so don't worry about "breaking" anything. The queues are pre-loaded with practice data — real customer names with simulated phone numbers, so you'll have records to work through in every exercise.
Sandbox vs. Production
The sandbox uses simulated data — phone numbers, pickup dates, and weights are generated for training purposes. The queue logic, field layout, and workflow all match the live system exactly.
Training Path Overview
Complete these exercises in order. Each one builds on the previous. Plan for about 2.5 hours total.
| # | Exercise | What You'll Practice | Time |
|---|---|---|---|
| 1 | Navigate the System | Login, menus, finding the queues | 10 min |
| 2 | Understand the Customer Record | Every field on the customer form explained | 20 min |
| 3 | Work Queue D | Handling pickup requests | 20 min |
| 4 | Work Queue A | Making scheduled follow-up calls | 20 min |
| 5 | Handle Queue B Escalations | Hard-to-reach customers | 15 min |
| 6 | Work Queue C | Overdue pickups | 15 min |
| 7 | Work the Prospect Queue | New customer outreach | 20 min |
| 8 | Schedule a Pickup | Add a Note wizard — full walkthrough | 25 min |
Exercise 1: Navigate the System (10 min)
Goal: Get comfortable finding things in Odoo before handling any calls.
Steps
-
Log in at the sandbox URL with your email and password
training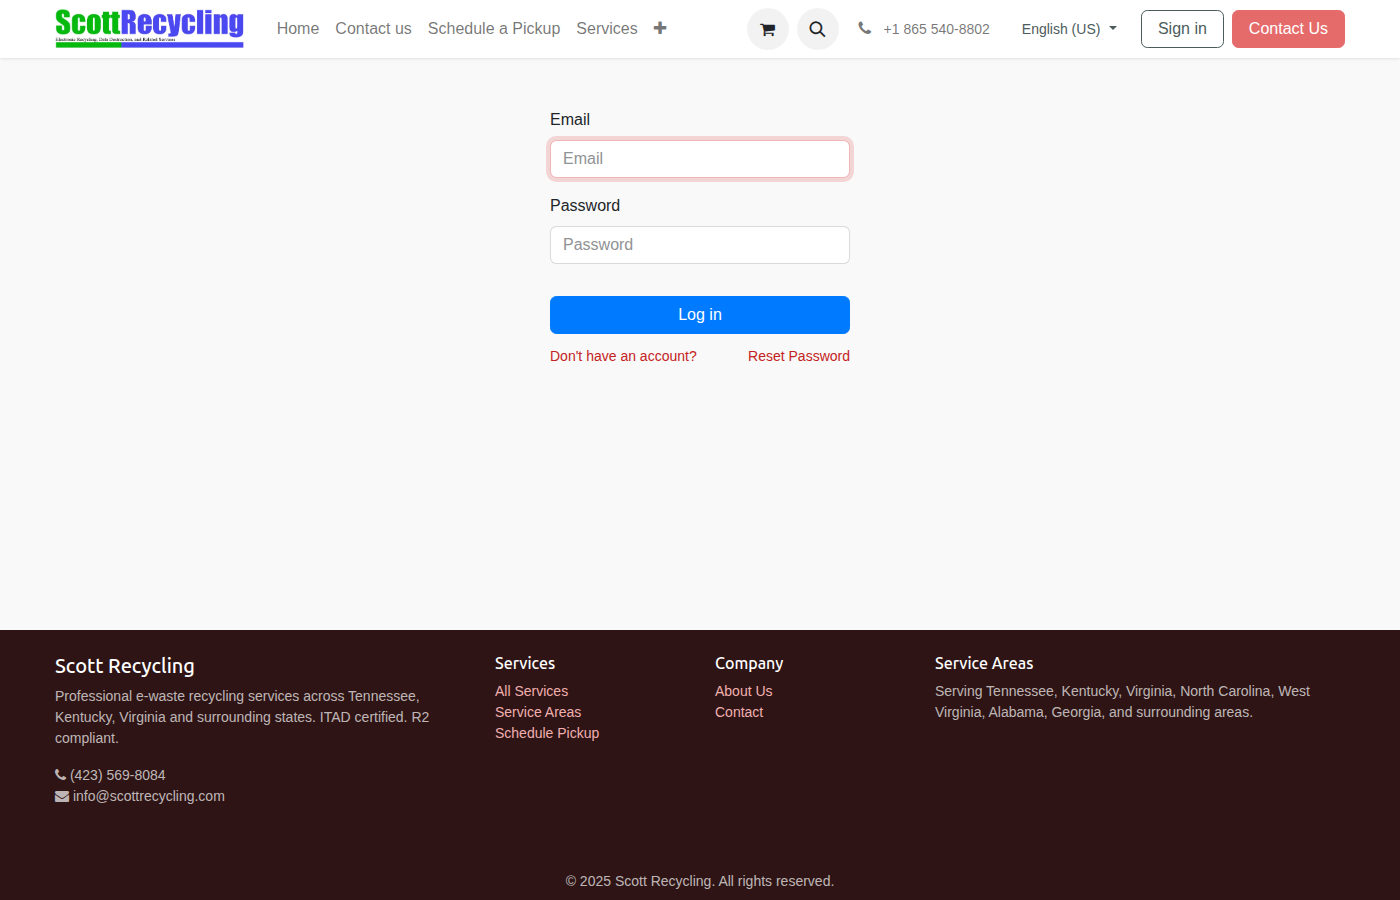
-
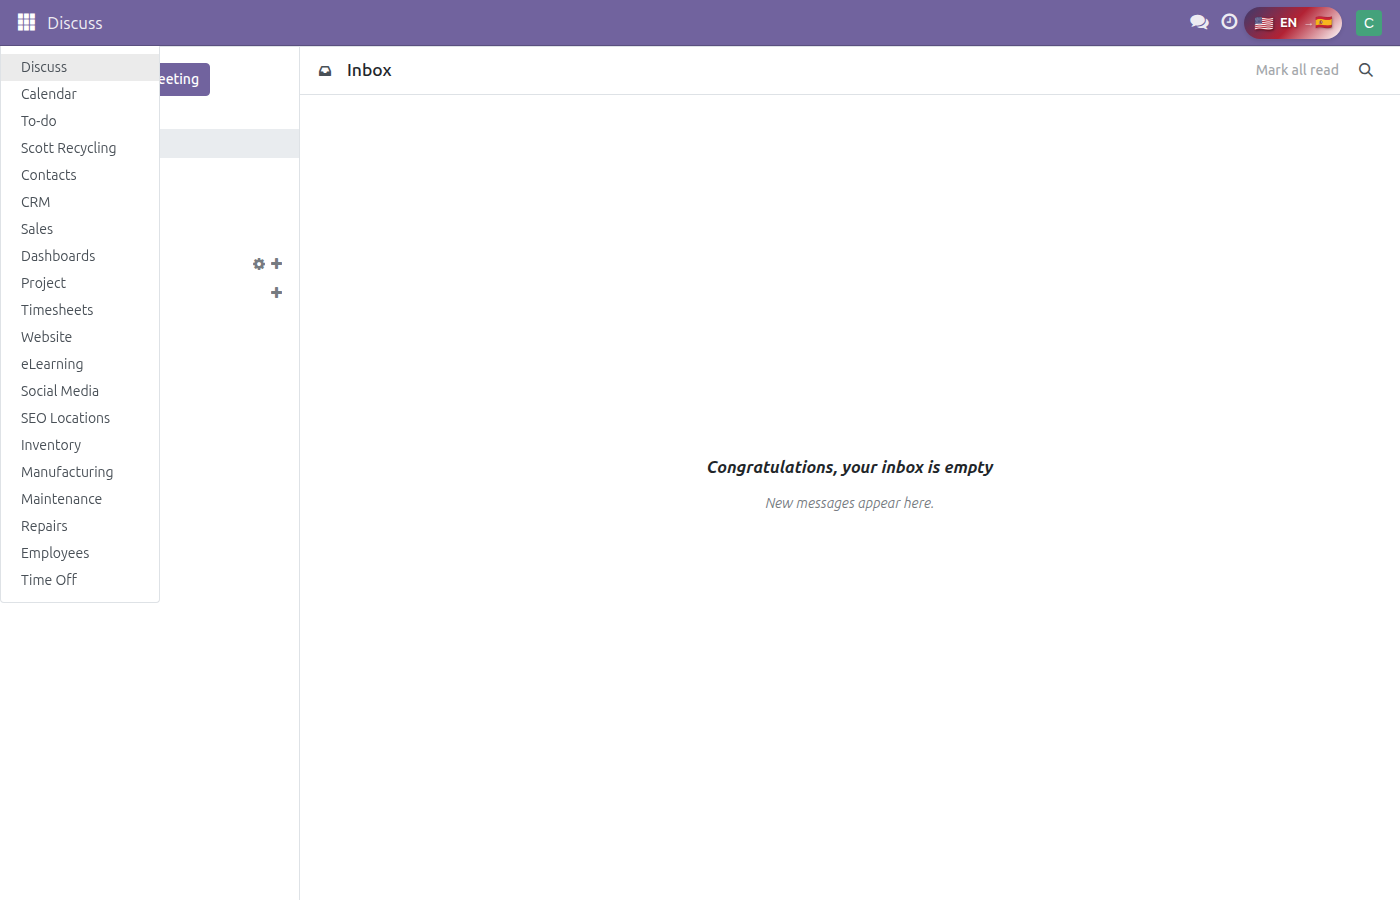
You should see the main Odoo dashboard — click the apps menu (waffle icon, top-left) to see all available apps
-
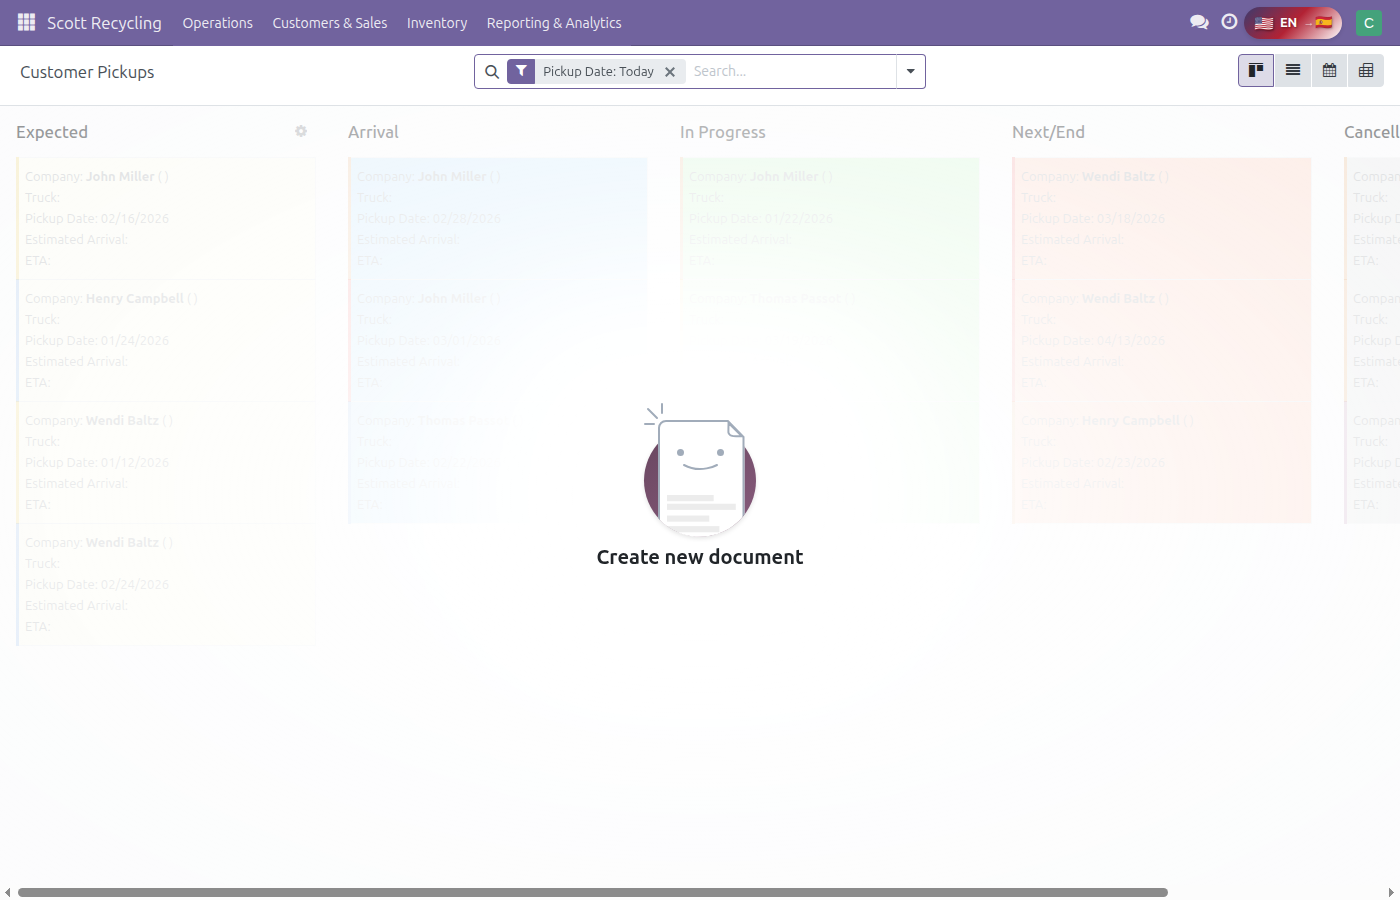
Open the Scott Recycling app — this is where all CSR work happens
-
Click the Customers & Sales dropdown in the top menu bar
- Browse through each option to see what's available:
- Queue A, B, C, D
- Key Accounts
- Prospect Queue
- All Customers
Explore
- Click into All Customers and search for a company name
- Open a customer record and notice the priority stars (★) near the top — customers with more stars are higher-value accounts and appear first in every queue
- Look at the Last Pickup weight, Last Pickup Date, and Yearly Total at the top of the record
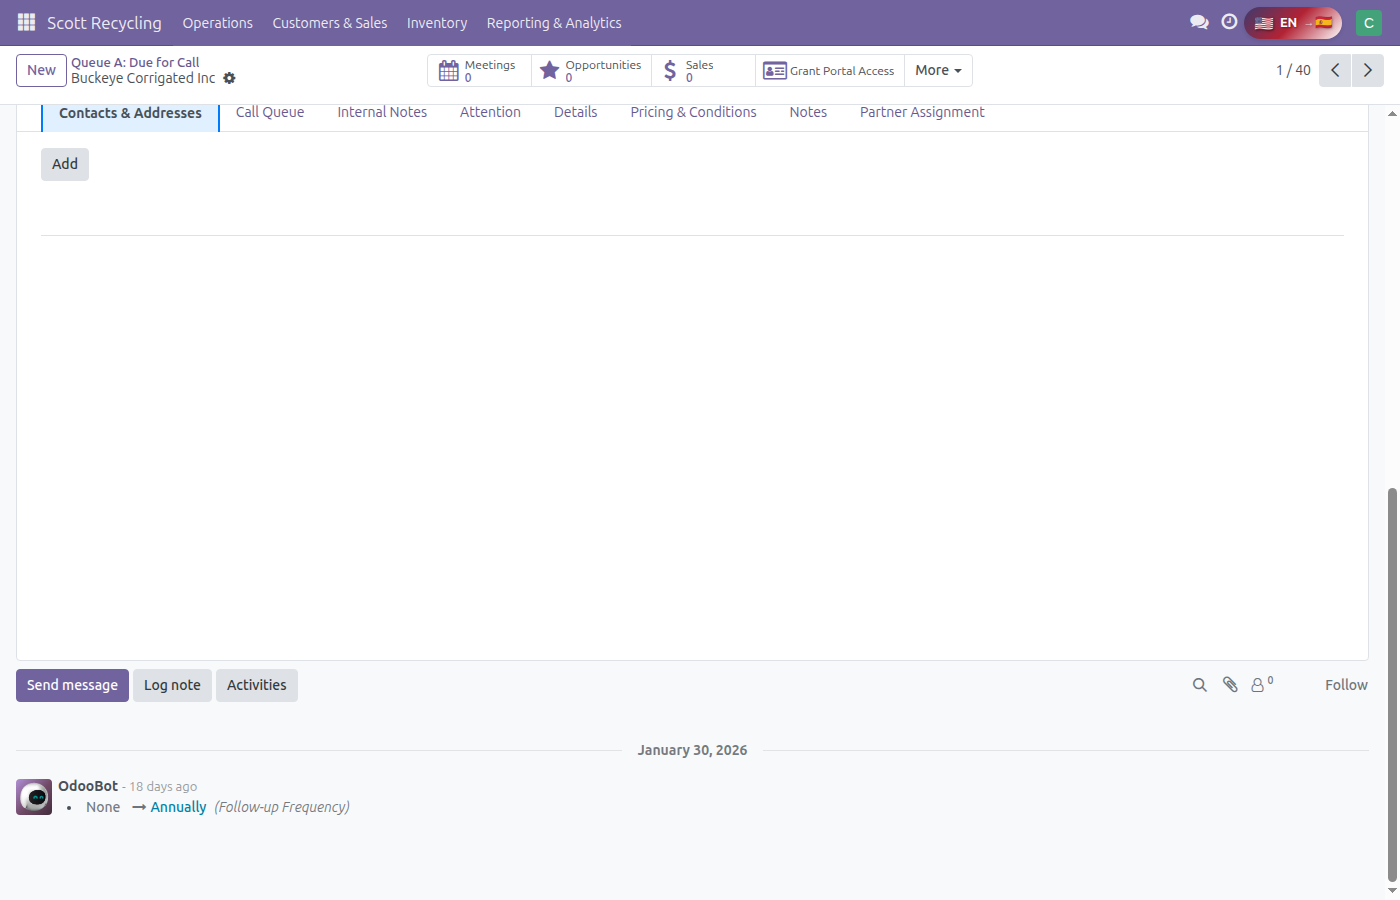
- Scroll down and notice the chatter (message history) at the bottom
Checkpoint
You should be able to answer:
- Where are the four call queues?
- How do you open a customer record?
- What do the priority stars mean?
- Where is the message history (chatter) on a customer record?
Exercise 2: Understand the Customer Record (20 min)
Goal: Learn what every field on the customer record means so you can work confidently in the queues.
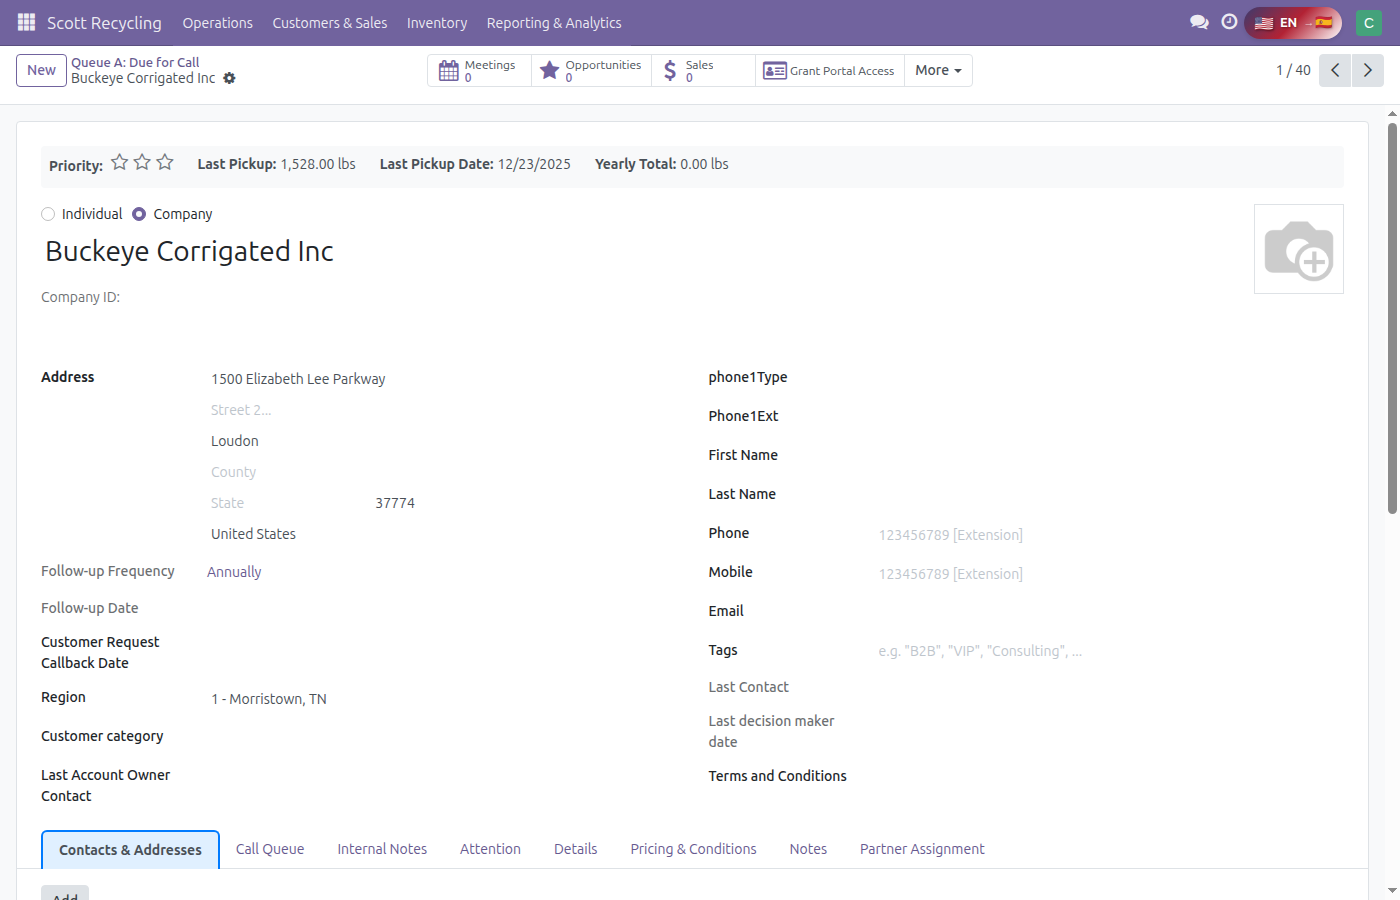
Open any customer record from All Customers and follow along. Every field you see is explained below, organized by where it appears on screen.
Header Bar
At the very top of the customer record, you'll see key stats at a glance:
| Field | What It Means |
|---|---|
| Priority Stars (★ ★★ ★★★) | Key account ranking based on yearly pickup weight. 3★ = 1,500+ lbs/year (Key Account), 2★ = 1,000–1,499 lbs, 1★ = 500–999 lbs, 0 = under 500 lbs. Every queue sorts by stars first, so key accounts always appear at the top. |
| Pickups (button) | Click to see all past pickups for this customer — dates, weights, trucks, and drivers. |
| Cancelled Pickups (button) | Shows cancelled pickups. A high count here is a red flag. |
Top Section — Company & Contact Info
This is the main identifying information for the customer.
| Field | What It Means |
|---|---|
| Company Name | The business name. This is the primary identifier. |
| Company ID | Our internal tracking number (read-only). |
| Street / City / State / Zip / County | The customer's physical address. County matters because it determines which truck route serves them. |
| Phone / Mobile | Primary contact numbers. Extensions are stored alongside. |
| Main contact email. | |
| First Name / Last Name | The contact person at this company — the person you'll be speaking with. |
Top Section — Customer Settings
Below the contact info, you'll see fields that control how and when we contact this customer.
| Field | What It Means |
|---|---|
| Follow-up Frequency | How often we call this customer (e.g., Monthly, Quarterly, Semi-Annually). This drives Queue A — when the frequency period expires, the customer enters Queue A for their next call. Set automatically based on account history; CSRs can't change it. |
| Customer Request Callback Date | If a customer says "call me back on the 15th," enter that date here. They'll appear at the top of Queue A on that date. |
| Region | Which truck route serves this customer — Morristown, Pulaski, or Sunbright. This determines which trucks appear when you schedule a pickup. |
| Account Type | The customer's category (e.g., Business, Government, School, Medical). Helps you tailor your conversation. |
| Last Contact | Date of the most recent successful contact with this customer (read-only). |
| Last DM Contact | Date we last reached the decision maker — the person who authorizes pickups. If this date is old, the customer may escalate to Queue B. |
Tabs
Below the top section, you'll see several tabs. Here's what each one contains:
Contacts & Addresses — Other contacts at this company (additional phone numbers, alternate contacts, shipping addresses).
Call Queue — The queue system dashboard for this customer. Shows which queue(s) they're in, their priority stars, yearly weight, next call date, cycle start date, and whether their pickup is overdue. Managers use this tab for actions like moving a customer to the next call cycle or clearing an escalation.
Internal Notes — General notes about the account that don't belong in the call log. Things like "Owner is retiring, transitioning to son" or "Seasonal business — no pickups Nov–Feb."
Attention — Flagged accounts that need special handling. If a customer is flagged, you'll see a comment explaining why (e.g., "Pricing dispute — do not schedule until resolved"). Check this tab before making any calls.
Details — The customer's service profile: preferred contact method, hours of operation, fax number, and whether they're a "hot" account (high priority for other reasons).
Pricing & Conditions — What we charge or pay this customer for different material types, and whether pricing has been approved by a manager. CSRs can view but typically don't edit this tab.
Notes — The contact log. Every call you make gets recorded here via the Add Note button. This is where you write what was discussed, the contact result (reached, voicemail, etc.), and any follow-up actions. This is the most important tab for daily CSR work.
Driver Notes — Instructions for the driver on pickup day. Things like "Use loading dock on east side," "Ask for warehouse manager," or "Forklift available." If a customer tells you something the driver needs to know, put it here.
Contact Results — What Drives the Next Call
When you log a call using Add Note, you must select a Contact Result. This isn't just record-keeping — the contact result you choose directly controls when this customer appears in your queue again and whether they escalate.
Successful contact results — these reset the customer's call cycle:
| Result | When to Use It |
|---|---|
| Spoke To Decision Maker | You reached the person who authorizes pickups |
| Spoke To Account Owner | You reached the business owner |
| Spoke To Someone | You reached someone, but not the DM or owner |
| Schedule Pickup | You scheduled a pickup during the call |
| Re-Schedule Pickup | You moved an existing pickup to a new date |
| Receive Email | Customer responded via email |
When you select one of these, the system:
- Sets the next call date to today + the customer's follow-up frequency (e.g., 30 days for monthly customers)
- Resets the attempt counter and missed cycle count
- Removes the customer from all queues immediately
- Updates the Last DM Contact date (which prevents Queue B escalation)
Failed contact results — these keep the customer in the cycle:
| Result | When to Use It |
|---|---|
| Left Voicemail | You left a message |
| No Answer | Phone rang, no one picked up |
| No Longer In Service | The number is disconnected |
| Sent Email | You sent an outbound email (no response yet) |
When you select one of these, the system:
- Increments the attempt counter (you get 3 attempts per cycle)
- After attempts 1–2: sets next call date to tomorrow (try again soon)
- After attempt 3: the cycle is complete — sets next call date to today + follow-up frequency
- After 2 missed cycles (6 total failed attempts): the customer escalates to Queue B
Choose the Right Contact Result
Selecting the wrong contact result has real consequences. If you spoke to the decision maker but select "Left Voicemail," the customer will keep appearing in your queue daily instead of moving to their next scheduled call date. If you select "Spoke To Decision Maker" when you only left a voicemail, the customer disappears for a month and you lose the opportunity to actually reach them. Always select the result that matches what actually happened.
The Add a Note Wizard — Field by Field
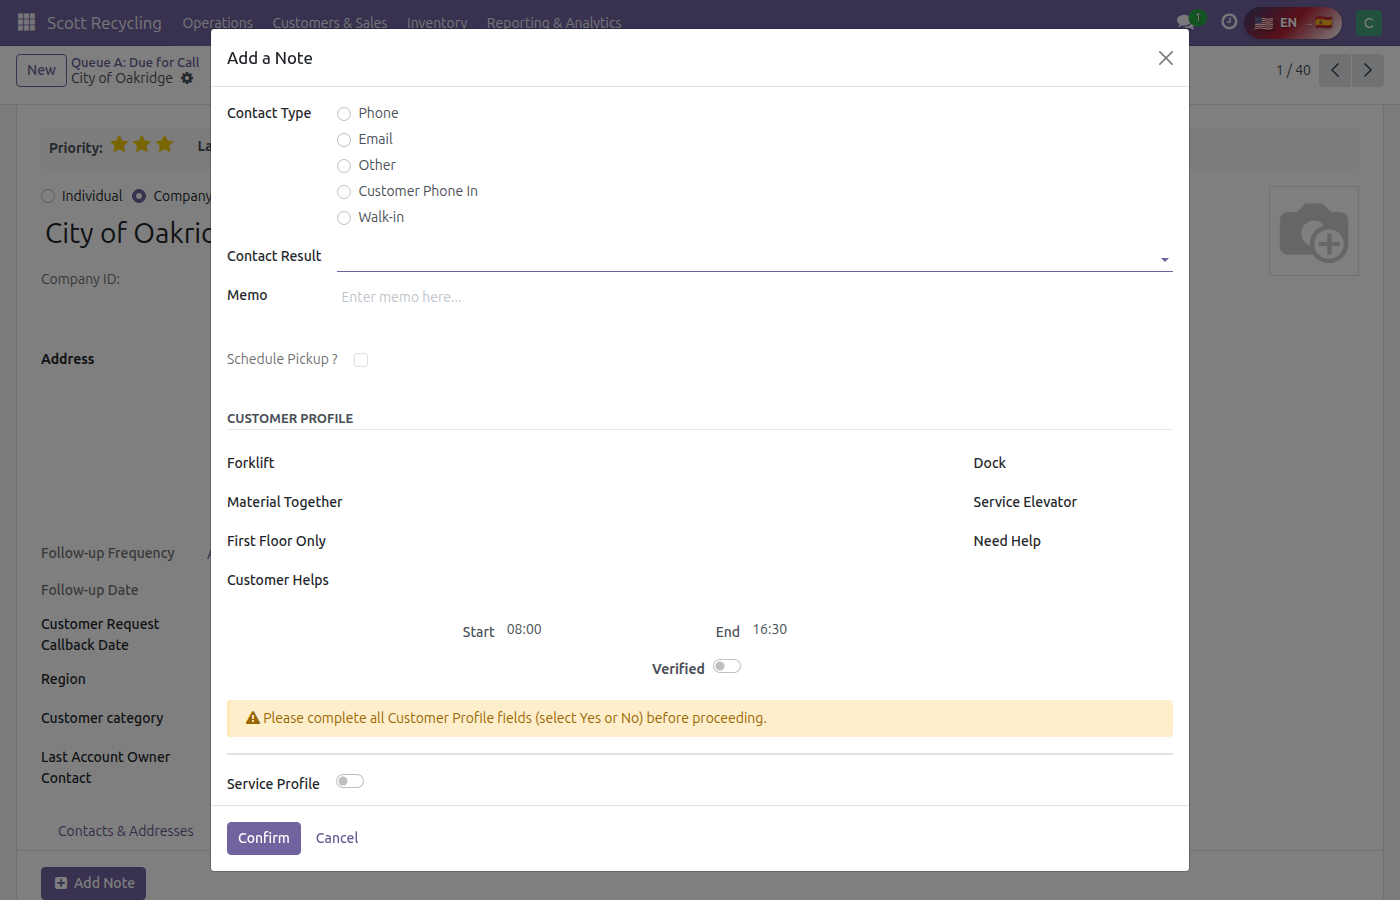
The Add Note button on the Notes tab opens the wizard you'll use for every customer interaction. It handles both logging calls and scheduling pickups. Here's every field you'll see, in the order it appears.
Contact Information (top of the wizard — always visible):
| Field | What It Means |
|---|---|
| Contact Type | How you communicated — Phone, Email, Other, Customer Phone In (they called us), or Walk-in. |
| Contact Result | What happened on the call (see Contact Results section above). This is required and drives the queue system. |
| Memo | Your notes about the conversation. Required — write what was discussed, what the customer needs, and any follow-up actions. |
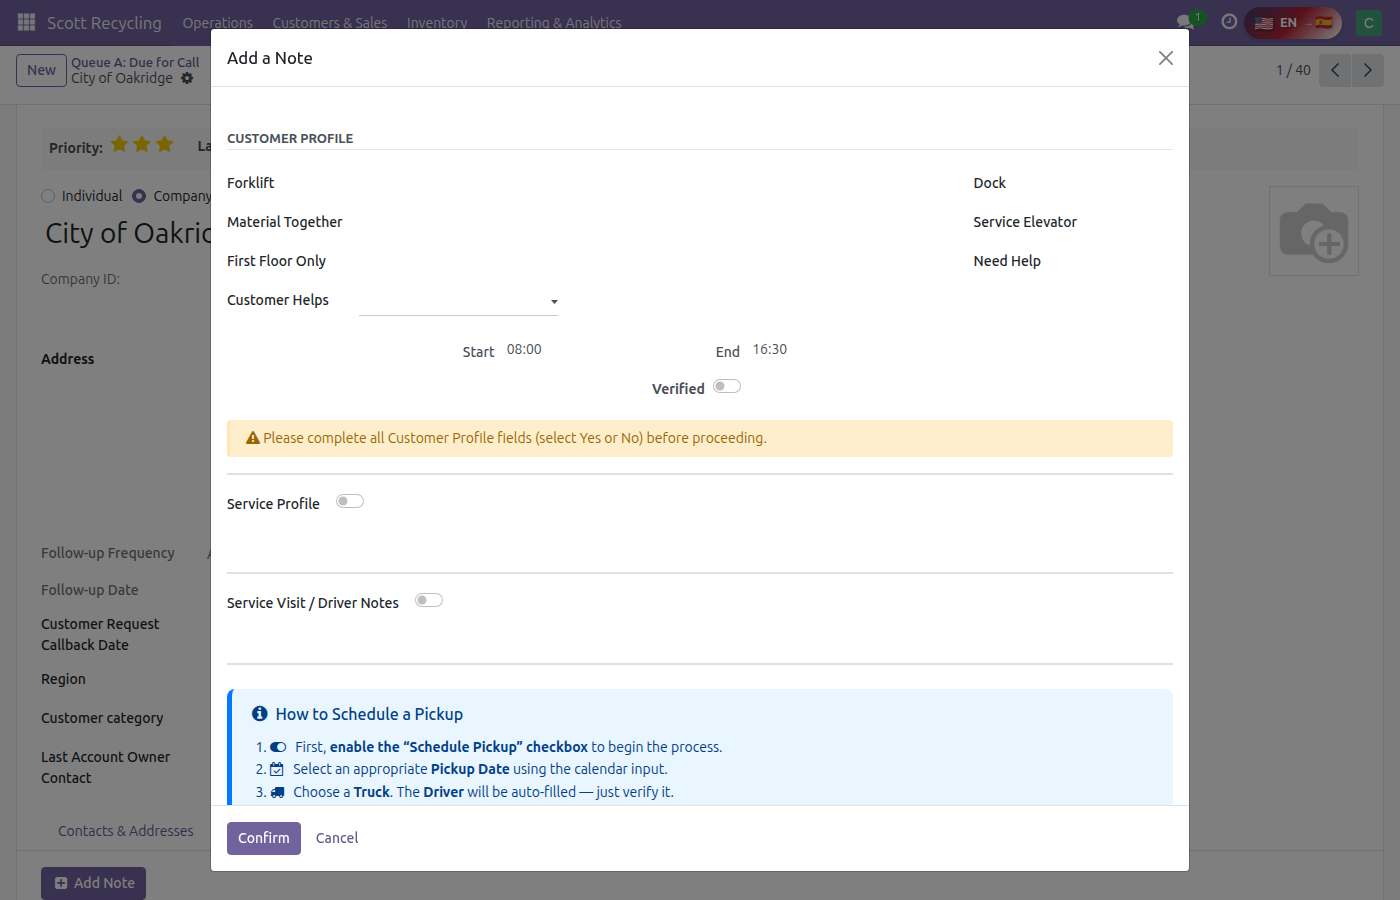
Customer Profile (7 Yes/No fields — must all be answered before you can schedule a pickup):
| Field | What It Means |
|---|---|
| Forklift | Does the customer have a forklift on-site to help load? |
| Dock | Does the customer have a loading dock our truck can back up to? |
| Material Together | Is all the material gathered in one spot, or will the driver need to collect from multiple locations? |
| Service Elevator | Is there a service elevator the driver can use to move material between floors? |
| First Floor Only | Is everything on the first floor? |
| Need Help | Does the customer need our driver to help carry/move material? |
| Customer Helps | Will someone at the customer's site help the driver load? |
These answers are saved to the customer record — you only need to fill them in once. On future calls, they'll already be set. The Schedule Pickup checkbox stays locked until every field has a Yes or No selected (not "Unknown").
Business Hours:
| Field | What It Means |
|---|---|
| Start / End | The customer's hours of operation in 24-hour format (e.g., 8:00 for 8 AM, 17:00 for 5 PM). The driver needs to arrive within this window. |
Service Profile & Driver Notes:
| Field | What It Means |
|---|---|
| Service Profile Notes | Detailed notes about the customer's site and service needs. Saved to the customer record. |
| Job Description (Driver Notes) | Instructions the driver sees on pickup day — things like "Use east loading dock" or "Ask for warehouse manager." |
| Verified toggles | Three checkboxes (Customer Profile, Service Profile, Driver Notes) that confirm you've reviewed and verified each section is accurate. |
Pickup Scheduling (only appears after checking "Schedule Pickup"):
| Field | What It Means |
|---|---|
| Pickup Date | The date the pickup will happen. Use the Refresh button first to get the system's suggested date based on truck availability. This field is read-only unless you enable Force. |
| Refresh button | Analyzes truck capacity, existing routes, driver schedules, and holidays to suggest the best available date. Always click this first. |
| Force toggle | Overrides the system and lets you manually pick any date. Use only as a last resort — forced pickups are logged for manager review. |
| Truck Assigned | Which truck will make the pickup. The dropdown only shows trucks that serve the customer's region (Morristown, Pulaski, or Sunbright). |
| Driver Assigned | Auto-fills based on the truck you select. Read-only. |
| Requested Pickup Date | The date the customer asked for (may differ from the actual scheduled date if that date wasn't available). |
| Reminder Date | When to send the customer a reminder about the upcoming pickup. |
| Expected Weight (LBS) | How much material you estimate. Default is 500 lbs. This affects route planning — the system checks if the truck can handle the weight. |
| Estimated No. of Boxes | How many boxes, pallets, or items. Also used for route capacity planning. |
| Additional Time | Extra time (in hours) the driver may need at this location beyond the standard stop time. |
| Service Window | Start and end times when the customer is available for pickup, in 24-hour format. |
| Terms and Conditions | Applicable terms for this pickup, filtered by the customer's account type. |
Route Details tab (appears after a truck and date are selected):
Shows a summary table with the existing route's box count, weight, and time — plus what this pickup will add — so you can verify the truck has capacity before confirming.
Queue List Columns
When you're looking at a queue (before opening a record), each row shows key information at a glance:
| Column | What It Means |
|---|---|
| ★ | Priority stars — higher means higher value. Queues sort by this first. |
| Name | Company name. |
| Phone / Email | Contact info so you can call without opening the record. |
| Last Contact | When we last successfully reached this customer. |
| Next Call Date | When the system says this customer is due for a call (Queue A). |
| Requested | The date the customer requested a callback (Queue A) or requested a pickup (Queue D). |
| Last DM Contact | When we last reached the decision maker (Queue B). |
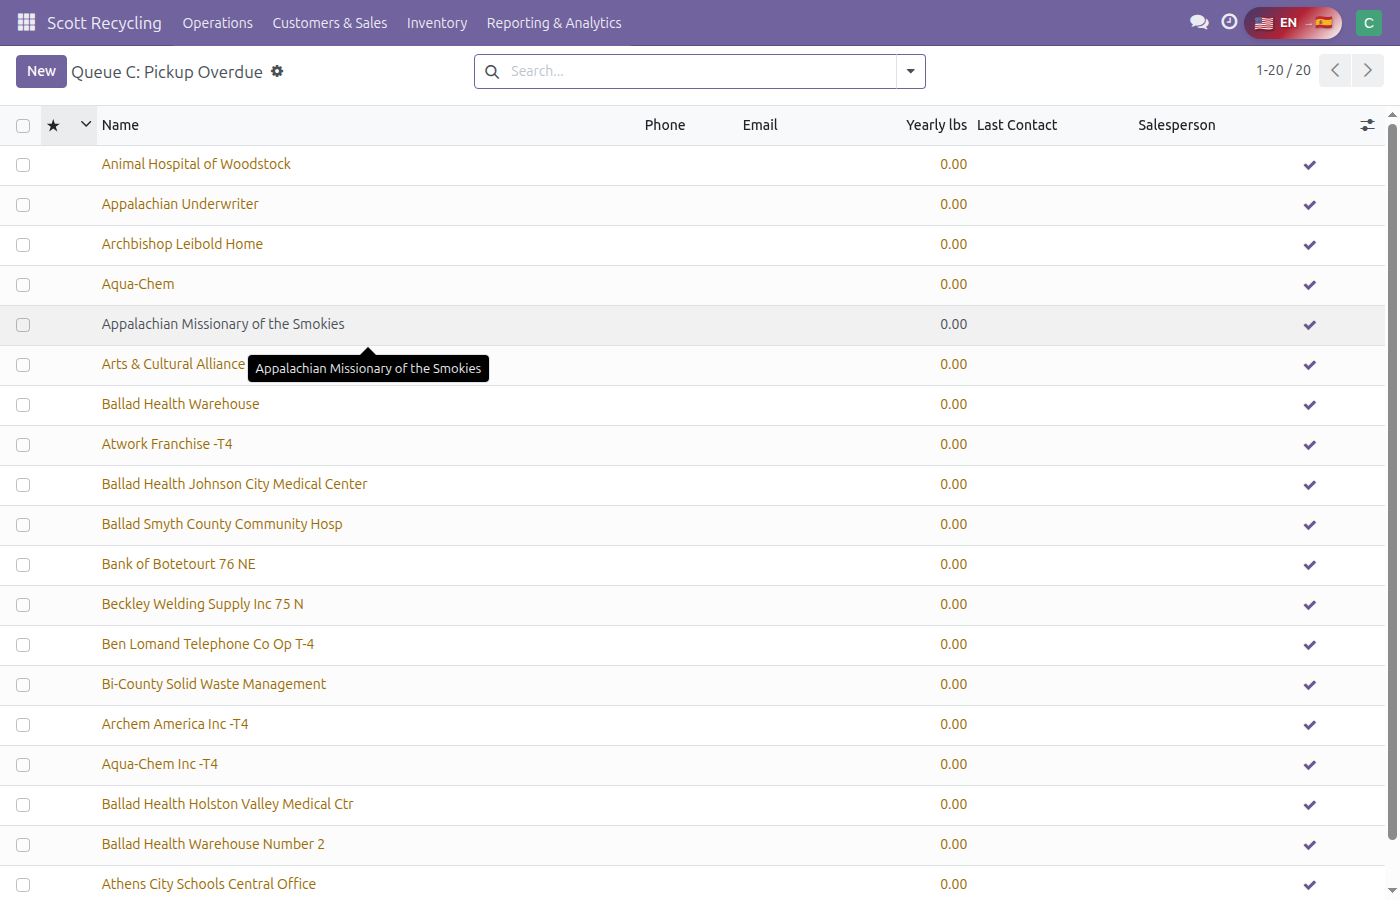
| Yearly lbs | Total pickup weight in the last 12 months (Queue C). |
Not every column appears in every queue — each queue shows the columns most relevant to that queue's purpose.
Checkpoint
You should be able to answer:
- What do the priority stars mean, and how do they affect queue order?
- What's the difference between "Last Contact" and "Last DM Contact"?
- Where do you record notes after a call?
- What's the "Follow-up Frequency" field and can you change it?
- Where would you look to see if a customer has special handling instructions?
- Why does the contact result you select matter? What happens if you pick the wrong one?
Exercise 3: Work Queue D — Pickup Requests (20 min)
Goal: Handle customers who responded to an email blast requesting a pickup. This is the highest priority queue.
Background
Queue D customers have actively asked for a pickup. They're warm — they want to hear from you. Always work Queue D first.
Steps
-
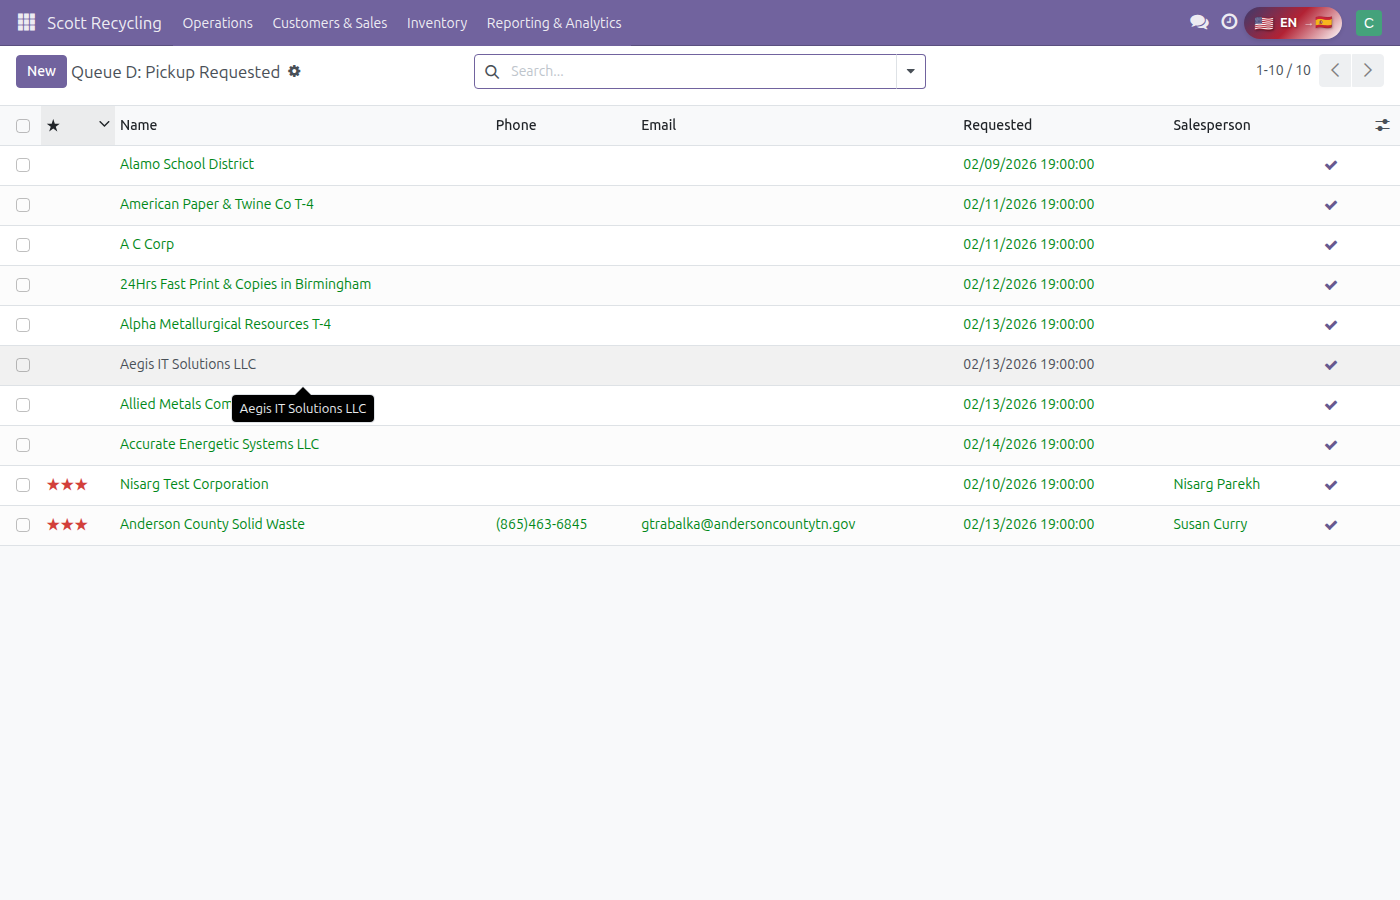
Go to Scott Recycling → Customers & Sales → Queue D
-
Notice the ★ column on the left — customers with the most stars appear at the top. Start with the highest-starred customers and work your way down.
- Pick a customer from the top of the list
- Open their record and review:
- Company name and contact info
- Last pickup date
- Notes in the chatter
- Simulate a successful call:
- Click Log Successful Contact
- In the notes field, write something like: "Spoke with [name]. Confirmed pickup for Friday. 3 pallets of laptops and monitors."
- Submit
- Notice: the customer disappears from Queue D (they've been contacted)
- Repeat with a second customer, but this time simulate a failed call:
- Click Log Failed Contact
- Select a reason (no answer, voicemail, etc.)
- Notice the customer stays in the queue for retry
Key Takeaways
- Queue D = highest priority (customer initiated)
- Successful contact clears them from the queue
- Failed contact increments the attempt counter
- Always add notes about what was discussed
- Start with the highest-starred (★★★) customers — they're key accounts
Exercise 4: Work Queue A — Scheduled Follow-ups (20 min)
Goal: Call customers whose scheduled follow-up date has arrived. This is routine outreach.
Steps
-
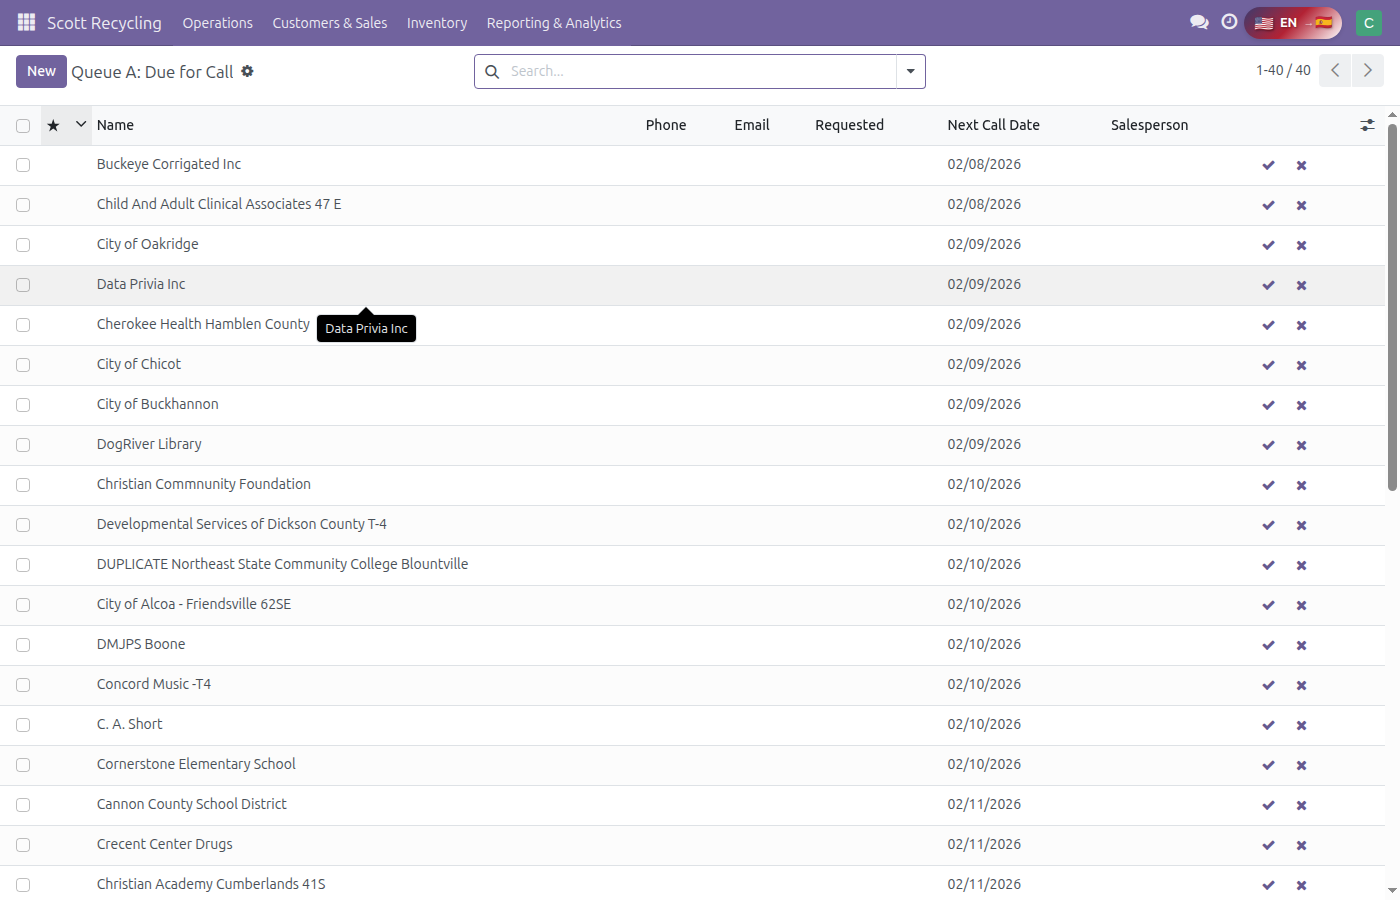
Go to Scott Recycling → Customers & Sales → Queue A
-
The queue is sorted by priority stars first, then by callback date, then by next call date. Start at the top — key accounts (★★★) and customers who requested a callback get priority.
- Pick a customer — note their last contact date and call frequency
-
Open their record and check the chatter for previous call notes
 5. Log a successful contact:
- Write realistic notes: "Checked in on current e-waste volume. Customer has ~2 pallets ready. Will call us when ready for pickup."
- Submit
6. Pick another customer and log a failed contact
7. Pick a third customer — this time, imagine they want a pickup:
- Log successful contact
- Then practice scheduling a pickup (see Exercise 8) or just note: "Wants pickup next week. Scheduling separately."
8. Review the pickup history on any customer record — scroll down to their pickups and notice each one is linked to a truck schedule (e.g., MOR-1, SBT-1, PUL-1) with a date, truck, and driver
5. Log a successful contact:
- Write realistic notes: "Checked in on current e-waste volume. Customer has ~2 pallets ready. Will call us when ready for pickup."
- Submit
6. Pick another customer and log a failed contact
7. Pick a third customer — this time, imagine they want a pickup:
- Log successful contact
- Then practice scheduling a pickup (see Exercise 8) or just note: "Wants pickup next week. Scheduling separately."
8. Review the pickup history on any customer record — scroll down to their pickups and notice each one is linked to a truck schedule (e.g., MOR-1, SBT-1, PUL-1) with a date, truck, and driver
Practice Scenarios
Try these realistic customer conversations while you work the queue:
Scenario A: The customer says: "We've been saving up electronics for a few months. We probably have 5-6 pallets — mostly old Dell desktops and some LCD monitors."
- What would you note in the chatter?
- Would you schedule a pickup right now or take another step first?
Scenario B: The customer says: "We have some old computers, but also a bunch of fluorescent tubes and a couple of old refrigerators. Can you take it all?"
- What do you accept? What don't you? (Hint: review Lesson 1 of Customer Management Mastery for the full list)
- How would you handle the items we don't take?
Scenario C: The customer says: "We're a medical office. We need to make sure all the hard drives are wiped. Can you give us documentation?"
- What service are they asking about?
- What would you tell them about Certificates of Destruction?
Exercise 5: Handle Queue B Escalations (15 min)
Goal: Contact customers who've been missed for multiple call cycles. These need extra attention.
Background
Queue B (Escalation) means we've tried to reach this customer multiple times across call cycles and haven't connected. These customers are at risk of churning.
Steps
-
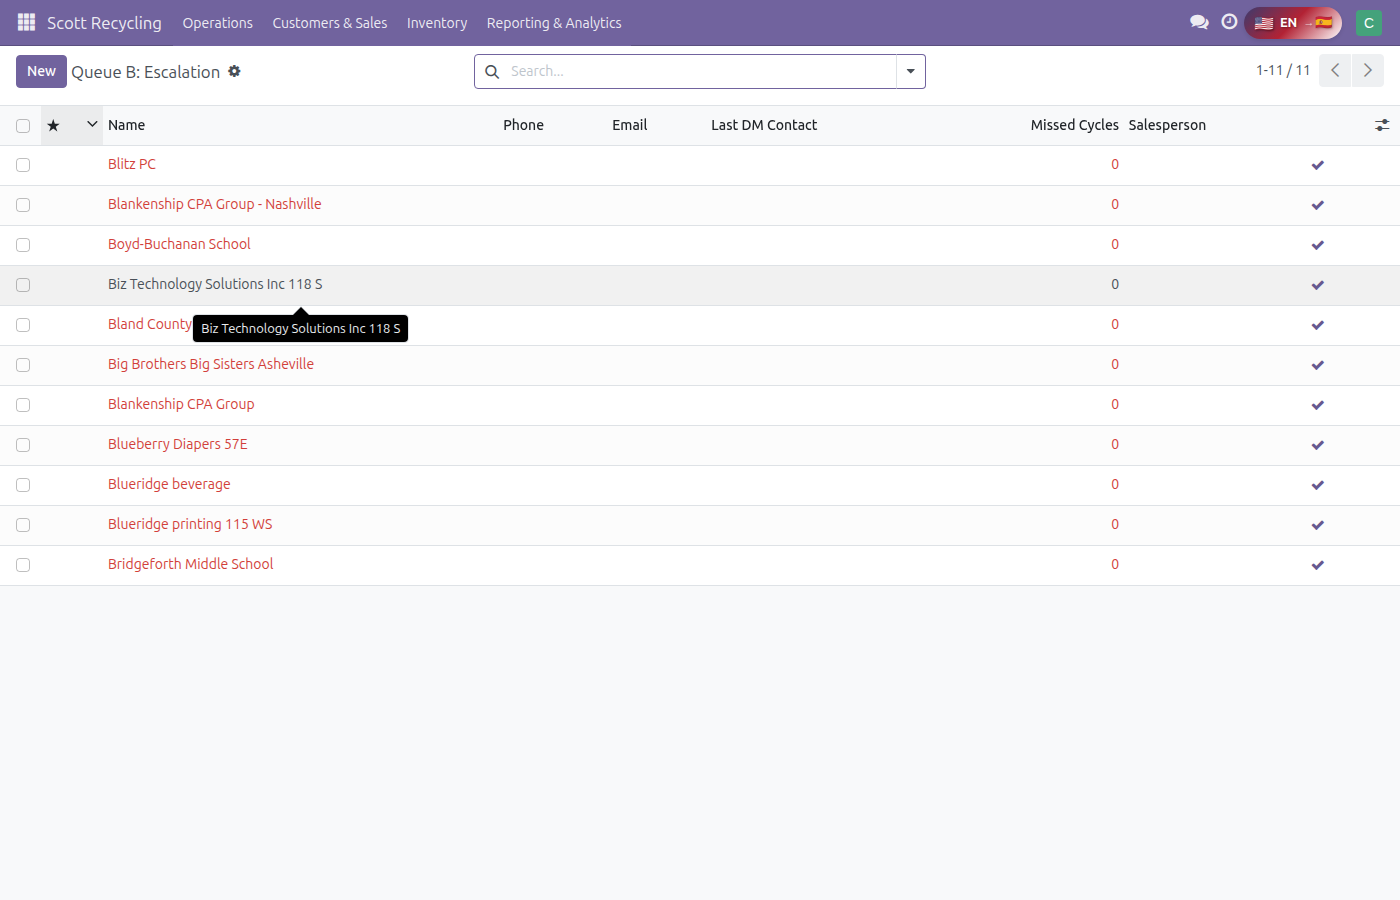
Go to Scott Recycling → Customers & Sales → Queue B
-
The queue sorts by stars first, then by Last DM Contact (oldest first). Starred customers who haven't been reached in a long time are at the very top — these are your highest priority.
- Open a customer and review their history carefully:
- How many failed attempts?
- When was last successful contact?
- What were previous notes?
- Log a successful contact with detailed notes:
- "Finally reached [name] after several attempts. They've been busy with office move. Still want service — confirmed pickup for next month. Updated call frequency to monthly."
- For a second customer, log a failed contact — notice how they remain escalated
Think About
- What would you do differently calling an escalated customer vs. a routine Queue A customer?
- When should you involve your manager with Queue B customers?
Exercise 6: Work Queue C — Overdue Pickups (15 min)
Goal: Reach out to customers whose pickups are overdue based on their historical pattern.
Background
Queue C customers haven't had a pickup in longer than usual. Maybe they forgot, maybe they're using a competitor, maybe they just don't have material yet. Your job is to find out.
Steps
-
Go to Scott Recycling → Customers & Sales → Queue C
-
The queue sorts by stars first, then by last contact date (oldest first). A ★★★ customer with an overdue pickup is a top priority — that's a key account we're at risk of losing.
- Open a customer and check:
- Their typical pickup frequency (how often do they usually get pickups?)
- Last pickup date
- Any recent notes or communication
- Log a successful contact:
- "Customer says volume has been low this quarter. Expects to have material ready in ~3 weeks. No issues with service."
- Try a second customer — simulate the customer wanting to cancel:
- "Customer considering switching to competitor. Concerned about pricing. Escalating to manager for retention call."
Think About
- How is Queue C different from Queue B? (C = pickup pattern, B = communication pattern)
- What retention tactics from the Customer Management Mastery course apply here?
Exercise 7: Work the Prospect Queue (20 min)
Goal: Advance new prospects through the sales pipeline.
Steps
-
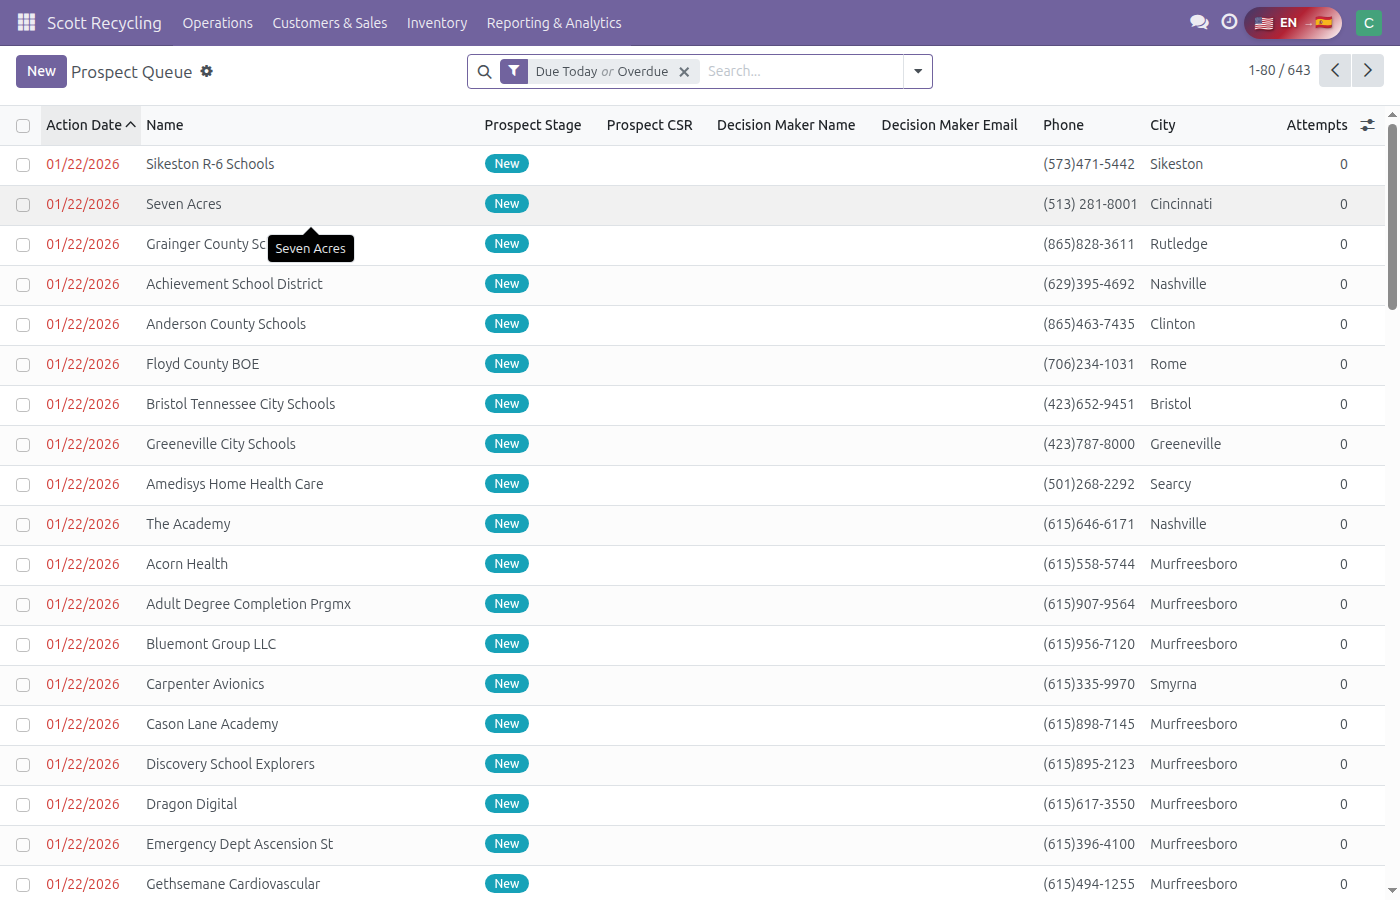
Go to Scott Recycling → Customers & Sales → Prospect Queue
-
Notice the stages: New → Initial Call → DM Identified → Packet Sent → Follow-up Call → Closed
- Find a prospect in the "New" stage:
- Open their record
- Review any available info (company name, source, notes)
- Advance them to "Initial Call":
- Click the appropriate action button (Mark Initial Call)
- Add notes: "Called and spoke with receptionist. Decision maker is [name], IT Director. Transferring to their extension next call."
- Find a prospect in "DM Identified" and advance to "Packet Sent":
- Notes: "Sent info packet to [name] via email. Scheduling follow-up for next week."
- Find a prospect and mark as "Not Interested":
- Select reason (too small, outside area, competitor locked, etc.)
Qualifying Practice
For each prospect, think through the qualifying questions:
- Do they generate e-waste regularly?
- What volume?
- Are they in our service area?
- Who's the decision maker?
- What's their current solution?
Exercise 8: Schedule a Pickup (25 min)
Goal: Walk through the entire Add a Note wizard — logging the contact, building the service profile, and scheduling the pickup with the right truck, date, and details.
Open the Wizard
- Go to All Customers and open any customer record
-
Click the Notes tab, then click Add Note
Step 1: Log the Contact
At the top of the wizard, fill in the contact information. Every field here matters — the contact result drives the queue system (see Exercise 2).
- Contact Type — Select how you communicated (Phone, Email, Customer Phone In, etc.)
- Contact Result — Select what happened. Since you're scheduling a pickup, choose Schedule Pickup
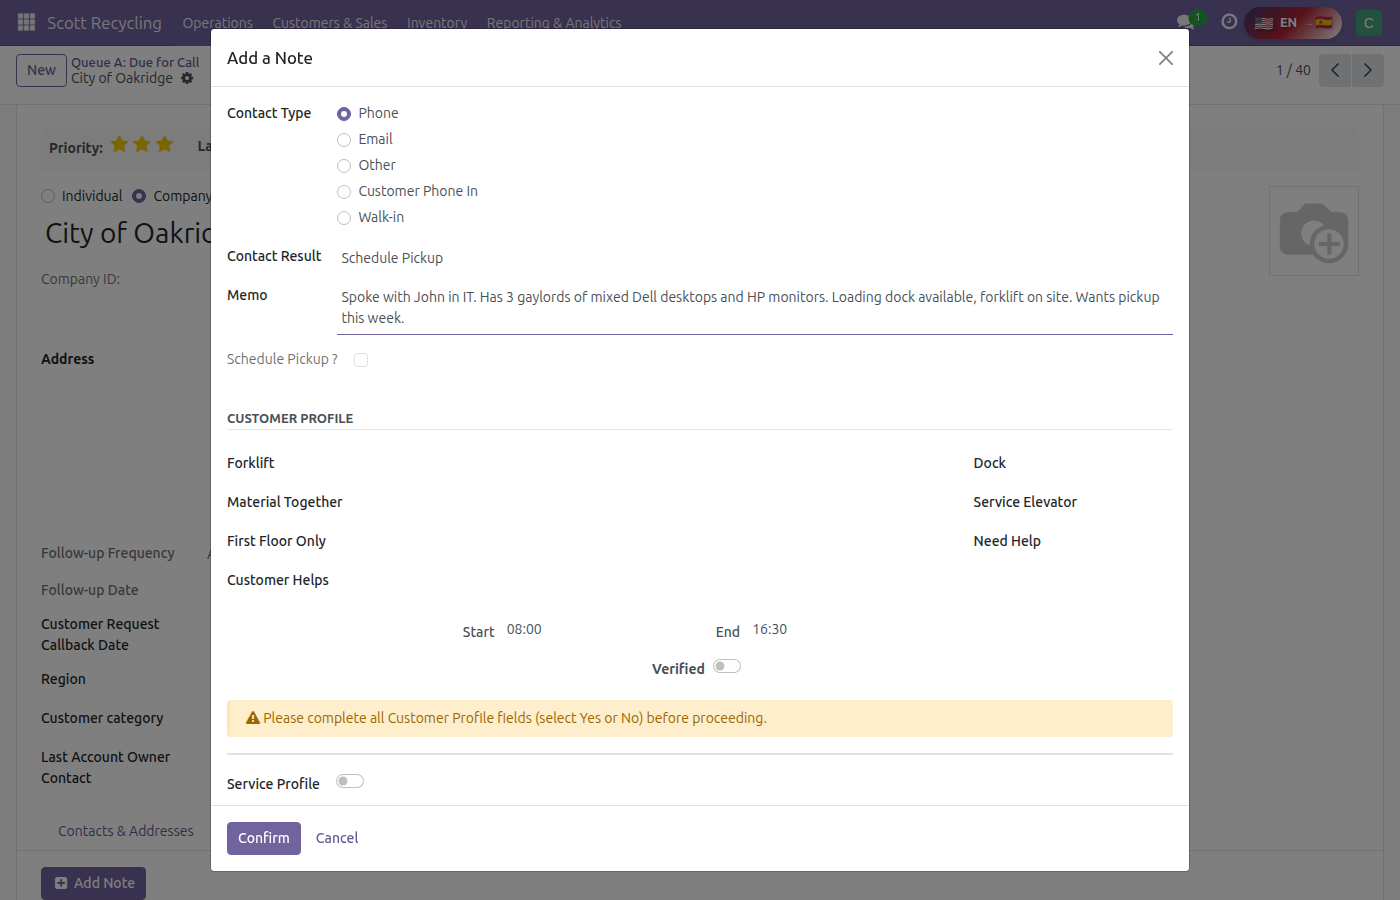
- Memo — Write what was discussed. Be specific: "Spoke with John in IT. Has 3 gaylords of mixed Dell desktops and HP monitors. Loading dock available, forklift on site. Wants pickup this week if possible."
The Memo Field Is Required
You cannot submit the wizard without filling in the Memo. Every contact must have notes explaining what happened on the call. A blank memo means no one knows what was discussed — not your manager, not the driver, not the next CSR who calls this customer. Write enough that anyone reading it later understands the conversation.
All Fields Must Be Completed
The wizard will not let you click Confirm until every required field is filled in. If you leave Contact Type, Contact Result, or Memo blank, the form will not submit. If you're scheduling a pickup, every Customer Profile question must be answered (Yes or No), and you must have a truck, date, and weight entered. Fill in everything as you go — don't skip fields thinking you'll come back to them.
Step 2: Complete the Customer Profile
Before the system lets you schedule a pickup, you must answer all seven Yes/No questions about the customer's site. These tell the driver what to expect and help dispatchers plan routes efficiently.
- Forklift — Does the customer have a forklift to help load the truck?
- Dock — Is there a loading dock our truck can back up to?
- Material Together — Is all the material gathered in one location, or will the driver need to collect from multiple spots?
- Service Elevator — Is there a service elevator for moving material between floors?
- First Floor Only — Is everything on the first floor?
- Need Help — Does the customer need our driver to help carry or move material?
- Customer Helps — Will someone at the customer's site help the driver load?
These answers are saved to the customer record permanently — you only fill them in once. On future pickups, they'll already be set. If anything changes (e.g., the customer got a new forklift), update them.
The Schedule Pickup checkbox stays locked until every field has a Yes or No selected. No "Unknown" answers allowed.
Step 3: Set the Business Hours
Enter the customer's hours of operation in 24-hour format (e.g., 8:00 for 8 AM, 17:00 for 5 PM). The driver needs to arrive within this window. Then toggle Verified to confirm you've checked these with the customer.
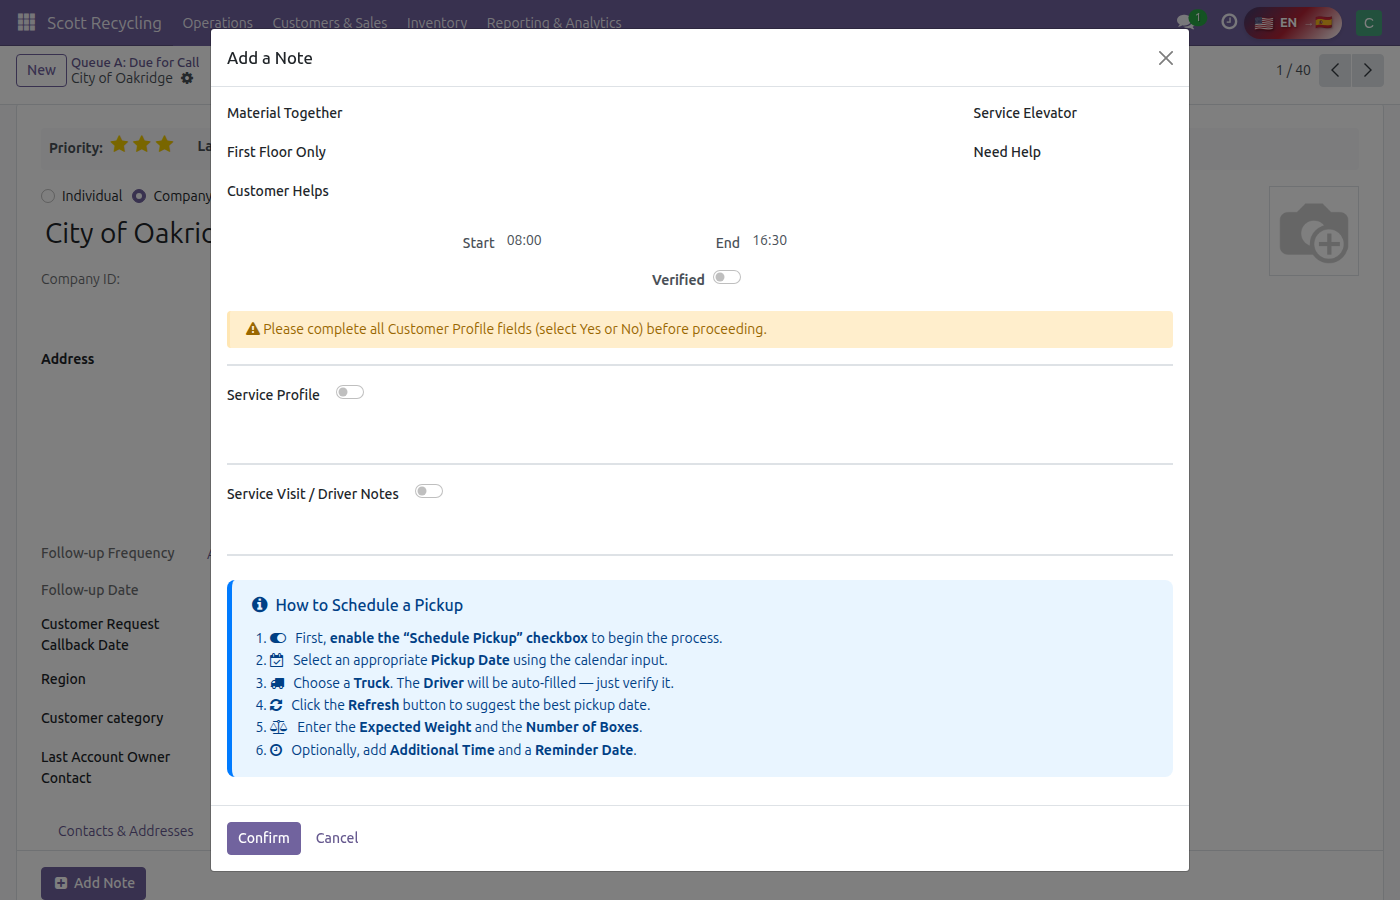
Step 4: Build the Service Profile
The Service Profile is a written summary of what the driver needs to know about this customer's site. There are two ways to build it:
-
Click "Generate" — The system auto-creates a profile from your Customer Profile answers. It produces a sentence like: "Customer: has forklift, has dock, material together, no service elevator, first floor only, no help needed, customer provides help." This gives the driver the basics at a glance.
-
Edit manually — Add any additional details the generated text doesn't cover. Things like: "Enter through the back gate on Elm St. Ask for warehouse manager Mike. Material is on pallets in the storage room behind the break room."
The generated text and your manual notes combine into one Service Profile that's saved to the customer record for all future pickups.
Once you're satisfied, toggle Verified to confirm the profile is accurate.
Step 5: Set Up the Driver Notes
Below the Service Profile, you'll see Service Visit / Driver Notes. This is what the driver sees on pickup day.
- Click "Copy to Service Visit" — This copies the Service Profile text into the Driver Notes section, giving the driver the same information
- Add pickup-specific details — This is where you add anything unique to this particular pickup that differs from the usual service profile. Things like: "Extra heavy load this time — 5 gaylords instead of the usual 2. Customer says the forklift is broken, driver will need to hand-load. Ask for Janet, not Mike (Mike is on vacation)."
The Service Profile is the permanent record of how this customer's site works. The Driver Notes can include one-time details specific to this pickup. Toggle Verified when complete.
Step 6: Enable Pickup Scheduling
Check the Schedule Pickup checkbox. This reveals the pickup scheduling section.

Step 7: Choose the Right Truck
Select a truck first — the dropdown only shows trucks assigned to this customer's region (Morristown, Pulaski, or Sunbright). When you select a truck, the Driver auto-fills based on who drives that truck.
Choosing the right truck matters because:
- Each truck runs a daily route in a specific region — a Morristown truck can't efficiently serve a Pulaski customer
- The system calculates drive time from the warehouse to the customer and back — wrong truck means wrong time estimates
- Route capacity (weight, boxes, total hours) is tracked per truck per day
Step 8: Set the Pickup Date
Click "Refresh" — This is always your first step. The system analyzes:
- How much weight and how many boxes are already on this truck's route for upcoming days
- Driver days off and public holidays
- Whether the truck can fit this pickup's weight and boxes without exceeding daily limits
- Drive time to and from the customer
It then suggests the best available date. The sandbox has 3 routes running daily (MOR-1, SBT-1, PUL-1), so you should see available dates.
If the suggested date doesn't work for the customer, click Refresh again to get the next available date. Keep refreshing and offering dates until the customer agrees to one. Your job is to find a date that works — not to force a date onto the schedule.
CSRs Cannot Force Pickups
The Force toggle overrides the scheduling system and lets you manually pick any date, regardless of truck capacity or route constraints. CSRs should never use this. If you've exhausted the available dates and the customer won't accept any of them, escalate to your manager. Only a manager can authorize a forced pickup, and it's logged for review.
Step 9: Fill In Pickup Details
- Expected Weight (LBS) — Estimate the total weight. Default is 500 lbs. This affects route planning — the system checks if the truck can handle it.
- Estimated No. of Boxes — How many boxes or containers. In our industry, a "box" is typically a gaylord box — a large corrugated container about the size of a small washing machine that sits on a pallet. A full gaylord of e-waste typically weighs around 500 lbs. So if the customer says "3 gaylords," enter 3 boxes and ~1,500 lbs.
- Additional Time — Extra time (in hours) the driver may need beyond the standard stop time. Use this for large pickups, difficult loading situations, or sites where material is spread across multiple buildings.
- Requested Pickup Date — The date the customer asked for, if different from the scheduled date. Useful for tracking when we couldn't meet their request.
- Reminder Date — When to send the customer a reminder about the upcoming pickup.
Step 10: Service Window
The Service Window (Start / End) defines when the customer is available for the driver to arrive.
Do Not Promise a Time Window
We schedule pickups for a day, not a time. Do not tell the customer "we'll be there between 10 and 2." Our routes are optimized daily and arrival times depend on other stops, traffic, and load order. If you lock us into a service window, dispatchers lose flexibility to build efficient routes.
If a customer insists on a specific time window, this must be approved by a manager. The service window fields are there for the rare cases where a window has been formally agreed to — not for casual promises made on a call.
The right thing to say is: "We'll have you on the schedule for [day]. The driver will be there during your business hours."
Step 11: Terms and Conditions
Select the applicable terms for this pickup. These are filtered based on the customer's account type and show the pricing/service terms that apply (e.g., Standard Terms, CRT charges, HDD serialization fees).
Step 12: Review and Confirm
- Check the Route Details tab — this shows a summary table with the existing route's box count, weight, and time, plus what this pickup adds, so you can verify the truck has capacity
- Review all your entries one last time — contact type, contact result, memo, customer profile, service profile, driver notes, truck, date, weight, and boxes
- Click Confirm
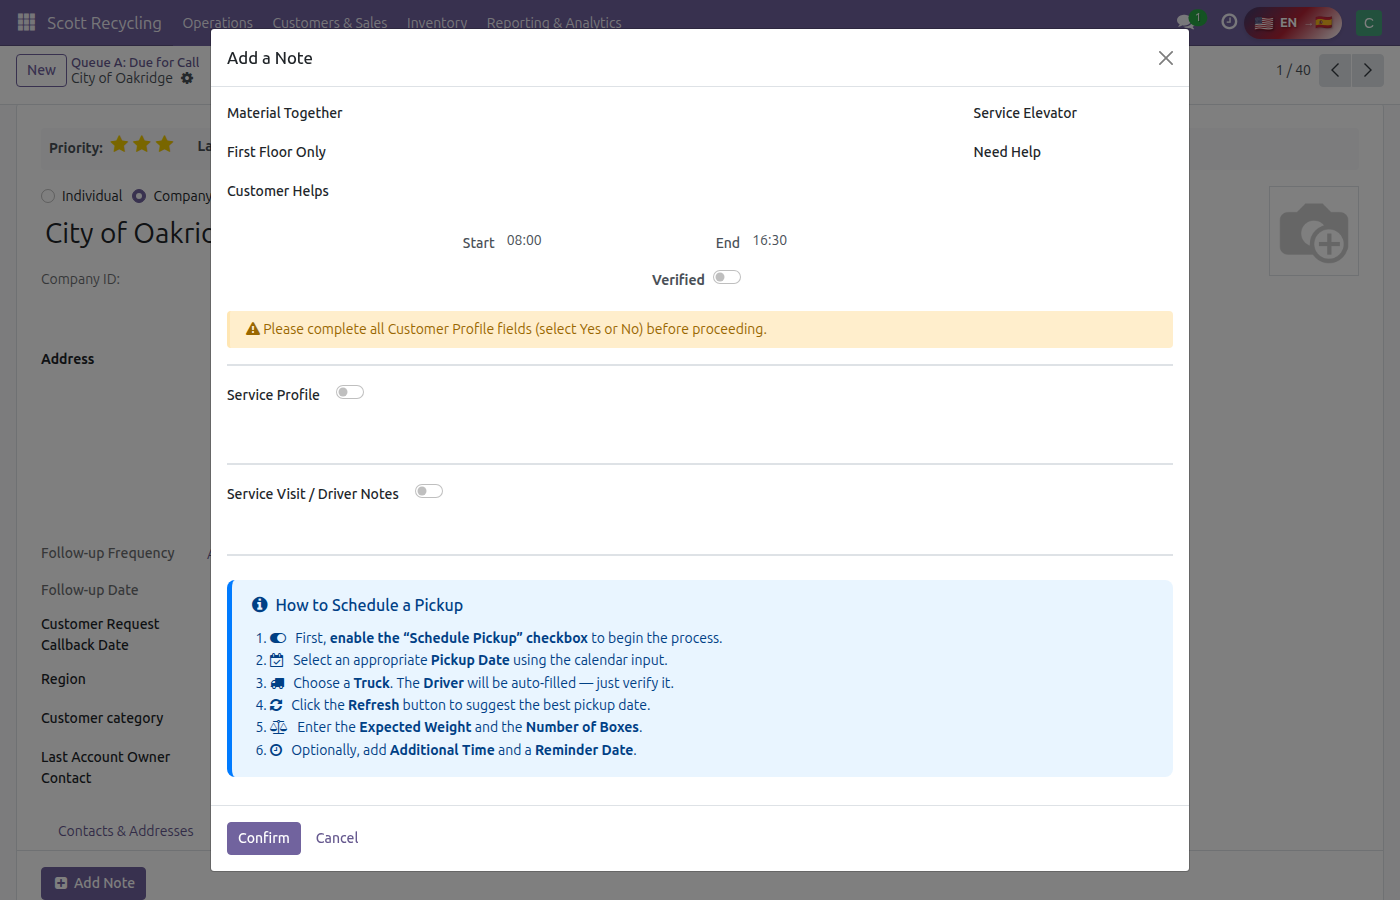
Step 13: Verify the Pickup Was Created
After clicking Confirm, the wizard closes and you're back on the customer record. Verify your work:
- Check the chatter — scroll down to the bottom of the customer record. You should see a new note with your memo text, contact type, and contact result
- Click the "Pickups" button in the header bar at the top of the customer record — this opens a list of all pickups for this customer. Your new pickup should appear with the date, truck, driver, and weight you entered
- Browse the Truck Schedule — go to Scott Recycling → Operations → Truck Schedule and look at the calendar or list view. Your pickup should appear on the date you scheduled, assigned to the truck you selected
Key Takeaways
- The Add a Note wizard handles both the contact log and the pickup — they're one workflow, not two separate steps
- Generate builds the service profile from the Customer Profile answers; Copy to Service Visit pushes it to the driver notes
- The Service Profile is the permanent site description; Driver Notes can include one-time details for this specific pickup
- Always click Refresh to get a date — keep clicking it to cycle through available dates until the customer agrees
- A "box" is a gaylord (~500 lbs each) — use this to estimate weight and box count
- Never promise a time window — we schedule days, not hours. Time windows require manager approval
- Never force a pickup — if no available date works, escalate to your manager
- Trucks are filtered by region — a Morristown customer only sees Morristown trucks
For the full step-by-step guide, see Scheduling a Pickup.
Wrap-Up Checklist
After completing all exercises, you should be comfortable with:
- Logging into Odoo and navigating to the Scott Recycling app
- Understanding what every field on the customer record means
- Finding and working each of the four call queues (D → C → B → A priority)
- Starting with the highest-starred (★★★) customers in each queue
- Logging successful and failed contacts with good notes
- Working the Prospect Queue and advancing prospects through stages
- Scheduling pickups using the Add a Note wizard (including truck and route selection)
- Understanding how pickups link to truck schedules and daily routes
What's Next?
- Review the Customer Management Mastery course for the concepts behind what you practiced
- Review Advanced Call Techniques for phone skills
- Learn the Service Visit Call scripts — the confirmation (day before) and verification (day of) calls that bracket every pickup
- Start working real queues with your supervisor shadowing you
- Ask your supervisor if you have questions about anything you saw in the sandbox
Remember: The sandbox is always available for practice. Come back anytime you want to try something new or refresh your skills before working live queues.