Attendance System Training — Sandbox Workout
Before You Start
Sandbox Access
URL: http://66.23.224.253:8888
Training accounts:
| Username | Password | Role |
|---|---|---|
dispatcher1 |
dispatcher1 |
Dispatcher (employee-level access) |
manager1 |
manager1 |
Manager (department manager + HR admin) |
You can also log in with any Scott Recycling employee email using password training.
This is a safe copy of our real system. Nothing here affects production — no emails send, no texts go out. Practice freely.
The sandbox resets periodically from a fresh copy, so don't worry about "breaking" anything. The system is pre-loaded with real attendance records, employee schedules, and weekly attendance data.
Sandbox Limitations
Because this is a training copy, some integrations are disabled:
- SMS notifications — The daily late attendance SMS won't actually send.
- Email notifications — Adjustment approval/rejection emails won't deliver.
- Auto-checkout emails — Won't send, but the auto-checkout records exist for you to explore.
Everything else works normally — you can clock in, submit requests, approve, reject, and export.
Duration: ~90 minutes
Training Path Overview
Complete these exercises in order. Each one builds on the previous.
| # | Exercise | What You'll Practice | Time |
|---|---|---|---|
| 1 | Clock In and Clock Out | Kiosk flow, PIN entry, action chooser | 10 min |
| 2 | View Your Attendance Portal | Portal navigation, weekly summary, punch table | 10 min |
| 3 | Request an Adjustment | All three request types, form submission | 10 min |
| 4 | Review and Agree to Your Hours | "I Agree" from portal and kiosk | 10 min |
| 5 | Explore the Payroll Report | KPI cards, color grid, row expansion, filters | 15 min |
| 6 | Approve & Reject Workflows | Two-tier approval, quick-approve, rejection | 15 min |
| 7 | Backend Attendance Views | Workforce menu, list views, search filters | 10 min |
| 8 | Excel Export & Scenarios | Export download, forgot-to-clock-out workflow | 10 min |
Exercise 1: Clock In and Clock Out (10 min)
Goal: Use the attendance kiosk to clock in and clock out.
Steps
- Navigate to the attendance kiosk in Odoo (Attendances app → Kiosk Mode, or use the kiosk URL)
- Find your employee name in the list and click it
- Enter your PIN when prompted
- You'll see the action chooser with two buttons:
- Check In / Check Out
- View My Week
- Click Check In / Check Out to clock in
- Wait a moment, then repeat the process to clock out
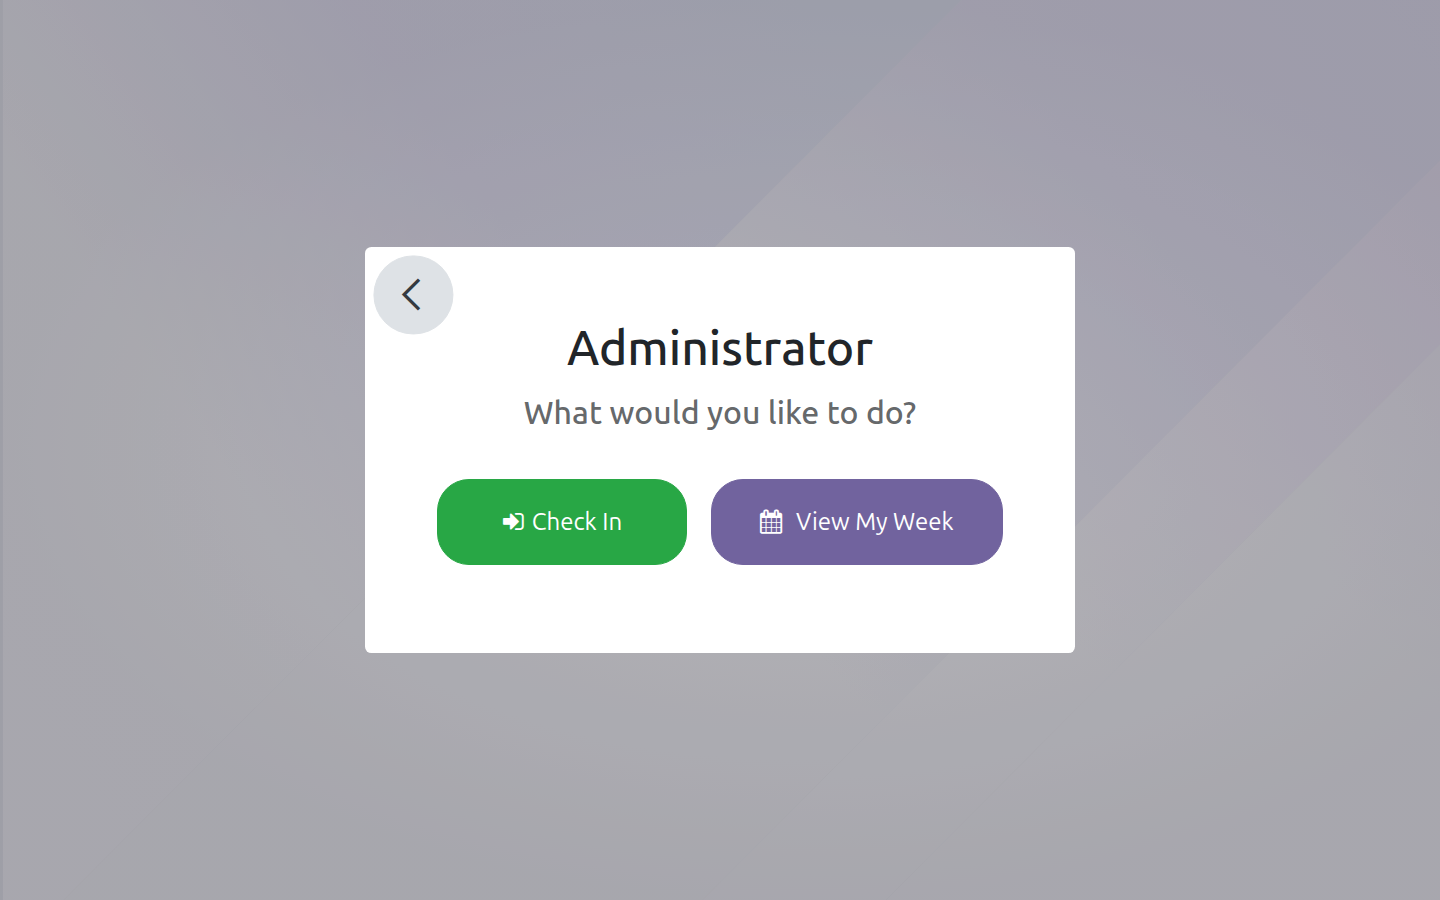
What's the Action Chooser?
After entering your PIN, instead of immediately clocking in or out, you see two options. This lets you choose between recording attendance or reviewing your weekly hours — both from the same kiosk screen.
Checkpoint
- Found the kiosk screen
- Entered PIN successfully
- Saw the two-button action chooser
- Completed a check-in
- Completed a check-out
Exercise 2: View Your Attendance Portal (10 min)
Goal: Navigate the employee attendance portal and understand what each part shows.
Steps
- Log in to the sandbox as any employee
- Navigate to
/view/emp_attendance(or find the link from the portal home page under "My Attendance") - Look at the weekly hours summary at the top — it shows Mon through Sat with hours per day
- Notice the review status badge in the top-right of the summary card
- Use the "This Week" and "Previous Week" buttons to navigate between weeks
- Try the date range filter — enter custom start and end dates and click Filter
- Scroll down to the attendance table — each row is one punch with check-in, check-out, hours, and status
- Look at the Adjustment column — some punches will show "Add Adjustment Request" and others will show "Submitted"
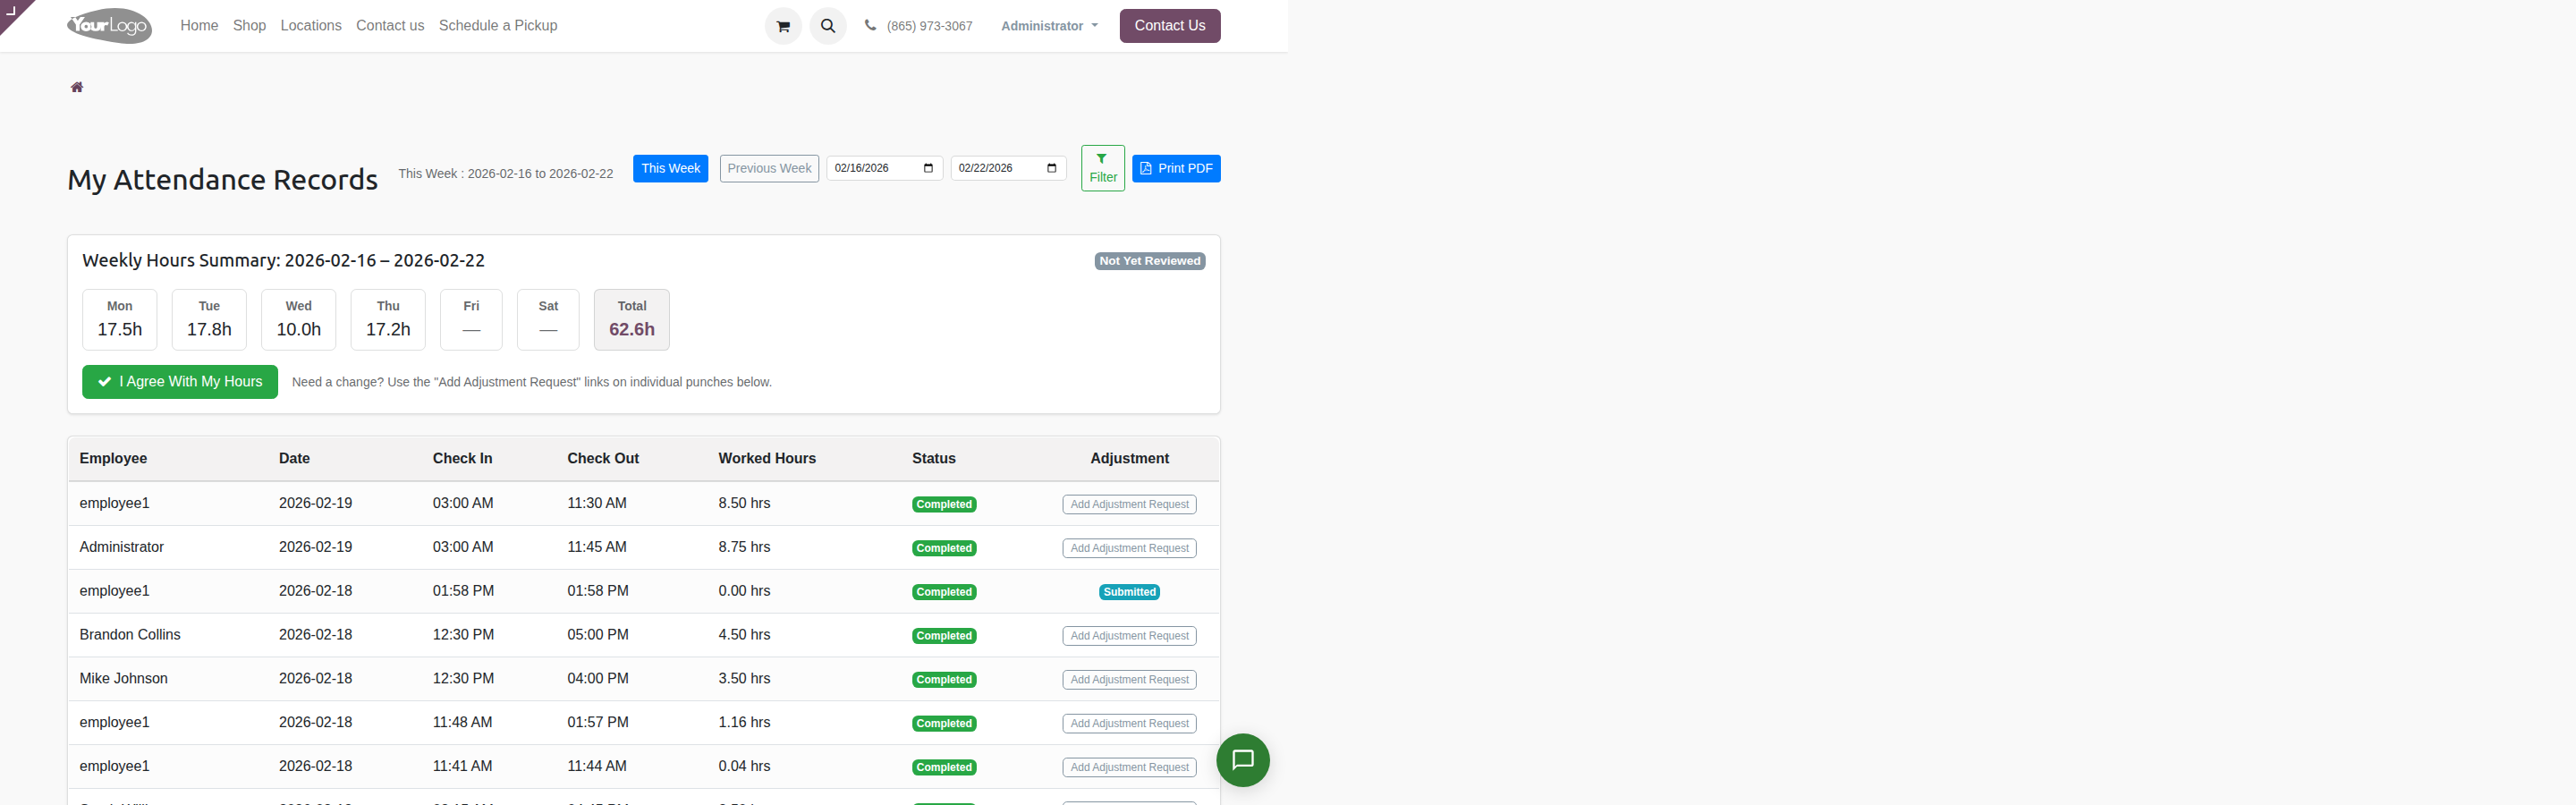
What the Status Badges Mean
| Badge | Meaning |
|---|---|
| Not Yet Reviewed (gray) | You haven't agreed to your hours yet |
| Agreed (green) | You clicked "I Agree" — awaiting manager approval |
| Approved (blue) | Manager approved your hours |
| Rejected (red) | Manager rejected — check the reason shown |
Checkpoint
- Navigated to the portal successfully
- Read the daily hours summary
- Switched between This Week and Previous Week
- Identified the review status badge
- Found the adjustment request links in the table
Exercise 3: Request an Adjustment (10 min)
Goal: Submit all three types of adjustment requests.
Steps
- From the portal attendance table, find a punch with an "Add Adjustment Request" link
- Click the link — it opens the adjustment request form at
/attendance/add_adjustment_request/<id> - The form shows the original check-in and check-out times (read-only)
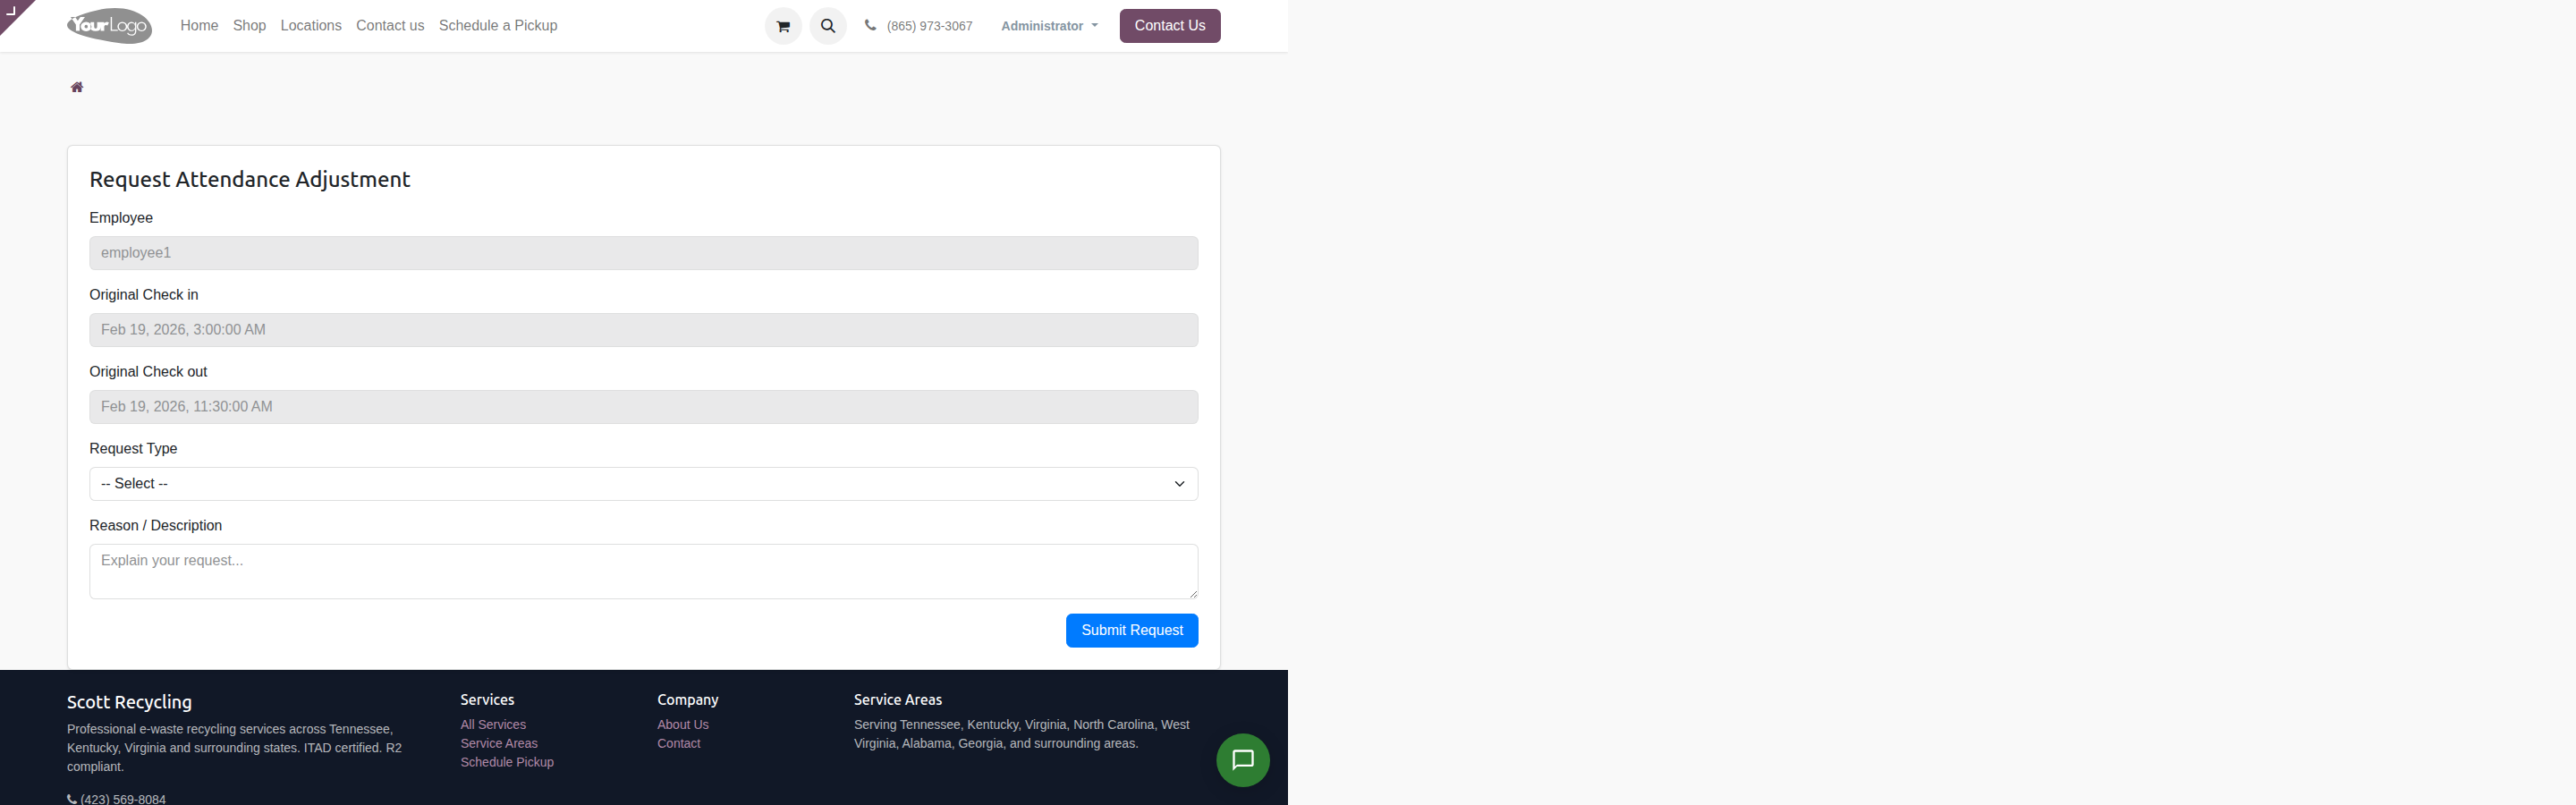
Practice each type:
Check In Adjustment:
- Select "Check In Adjustment" from the dropdown
- The "New Check In Time" field appears
- Enter a time (e.g., 7:00 AM)
- Write a reason: "Forgot to clock in — was at warehouse at 7 AM"
- Submit
Check Out Adjustment:
- Find another punch and open its adjustment form
- Select "Check Out Adjustment"
- Enter a new check-out time
- Reason: "System clocked me out early — was still working"
- Submit
Extra Work After Checkout:
- Find another punch and open its adjustment form
- Select "Extra Hours After Work"
- Enter hours (e.g., 1.5)
- Reason: "Stayed late for truck loading"
- Submit
One Request Per Punch
After submitting a request, that punch will show "Submitted" instead of the link. You'll need a different punch for each practice submission.
Checkpoint
- Found the adjustment request form
- Submitted a Check In adjustment
- Submitted a Check Out adjustment
- Submitted an Extra Work request
- Saw the "Submitted" badge replace the link after submission
Exercise 4: Review and Agree to Your Hours (10 min)
Goal: Complete the weekly review process from both the portal and the kiosk.
From the Portal
- Go to
/view/emp_attendance - Look at the weekly hours summary card
- If the status is "Not Yet Reviewed," you'll see the "I Agree With My Hours" button
- Click it — the page reloads with a success message and the badge changes to "Agreed"
From the Kiosk
- Go to the attendance kiosk
- Enter your PIN
- Choose "View My Week" from the action chooser
- The kiosk shows your weekly summary with daily hours and totals
- Click the "I Agree" button at the bottom
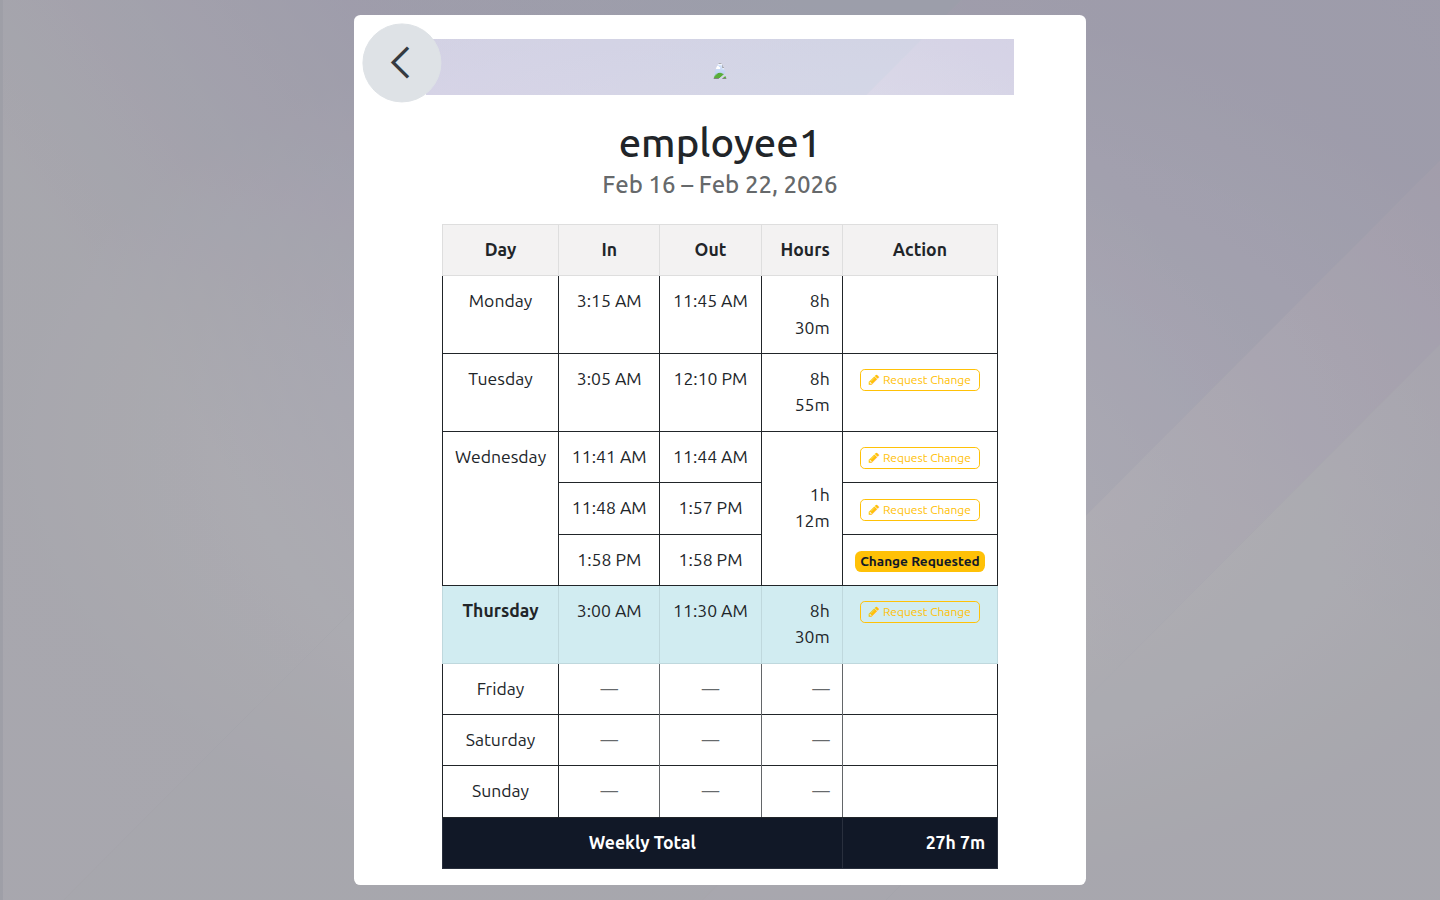
Already Agreed?
If you already agreed from the portal, the kiosk will show the agreed status instead of the button. Try this with a different week or a different employee account.
Checkpoint
- Agreed to hours from the portal
- Saw the status change to "Agreed"
- Agreed to hours from the kiosk
- Understand the difference between "Agreed" and "Approved"
Exercise 5: Explore the Payroll Report (15 min)
Goal: Navigate the payroll report dashboard as an HR admin.
Steps
- Log in as
manager1/manager1(needs HR Attendance Manager access) - Navigate to
/workforce/payroll-report(or use Workforce → Payroll Report in the backend menu) - Explore the KPI summary cards at the top:

| Card | What to Look For |
|---|---|
| Employees | Total count of active employees shown |
| Total Hours | Sum of all hours worked this week |
| OT Hours | Overtime hours (hours over 40 per employee weekly) |
| Missing Days | Days where scheduled employees had no attendance |
| Late Arrivals | Count of late check-ins |
| Pending Changes | Number of pending adjustment requests (click to go to backend) |
- Scroll to the color-coded grid:
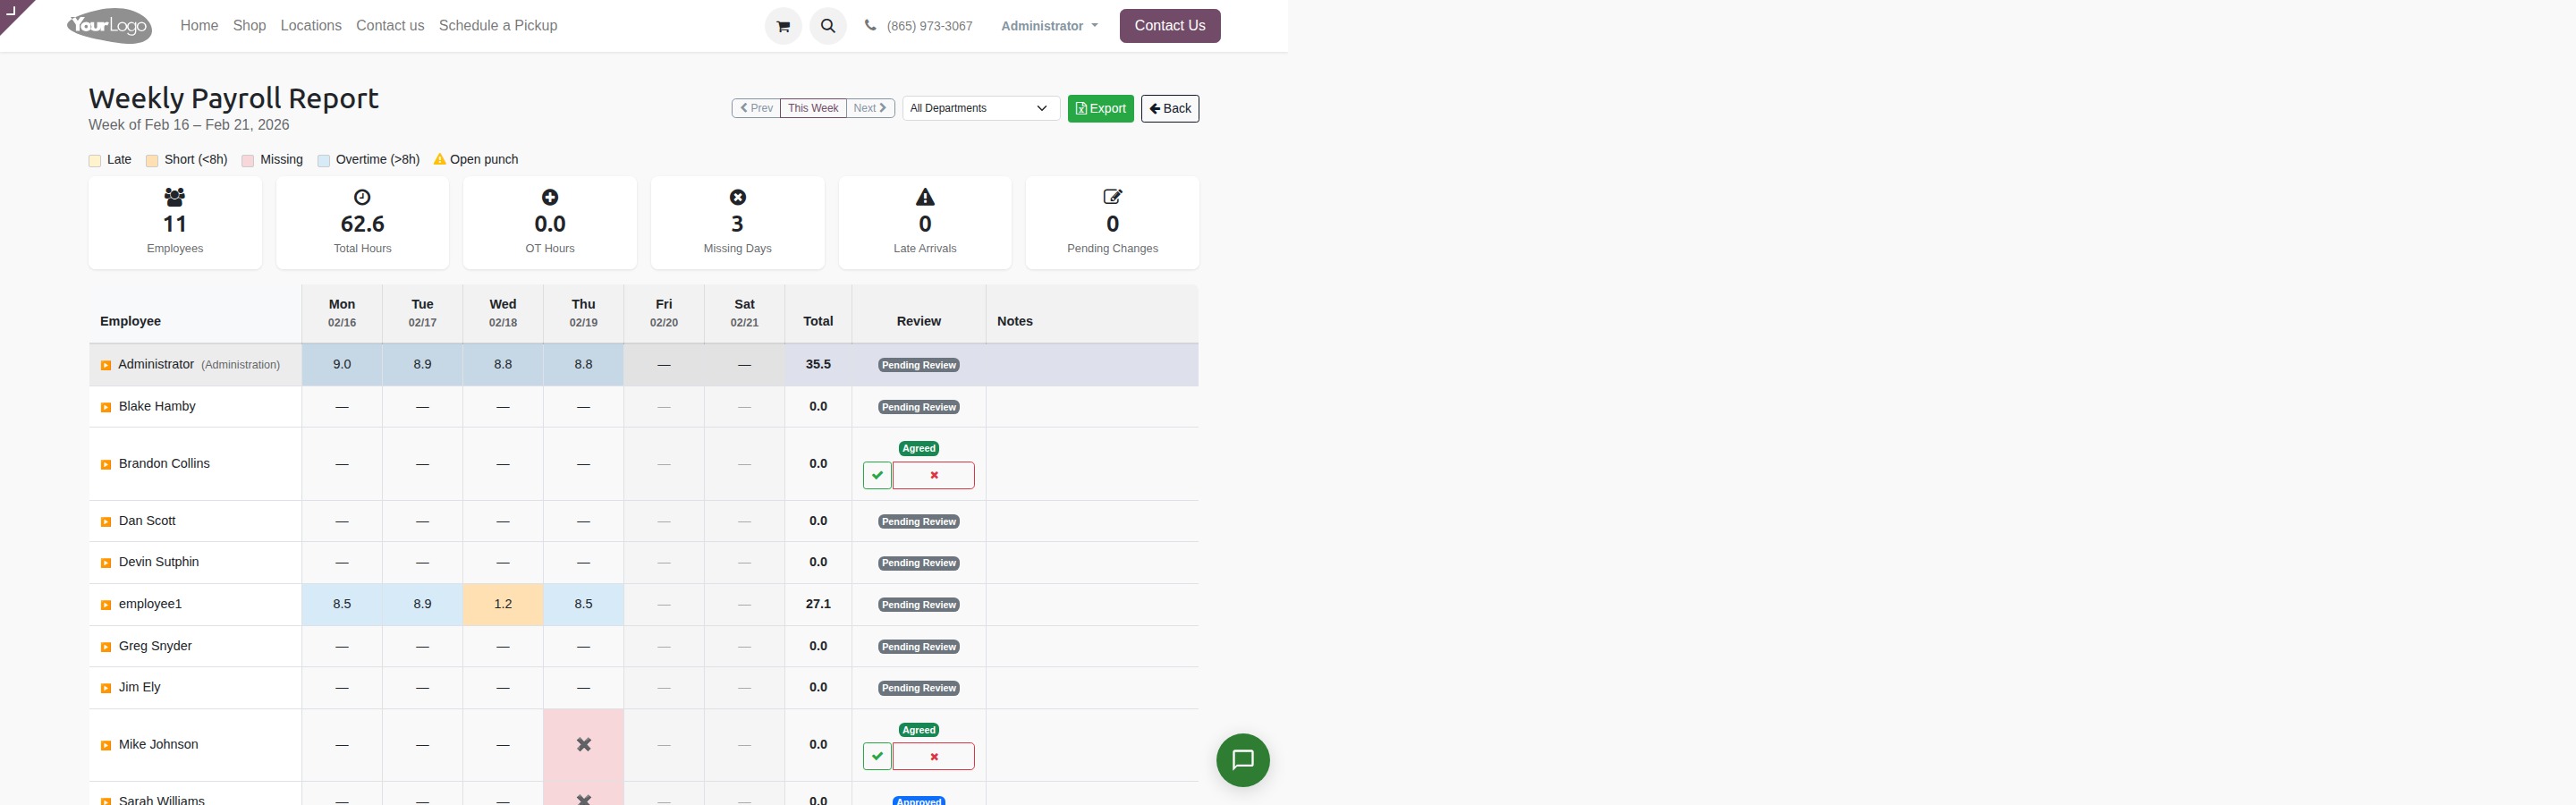
| Color | Meaning |
|---|---|
| Yellow | Late arrival |
| Orange | Short day (worked but less than 8 hours) |
| Red | Missing — no attendance on a scheduled day |
| Blue | Overtime (more than 8 hours that day) |
| Gray | Future date |
| Warning triangle | Open punch (no check-out yet) |
- Click an employee row to expand it — you'll see individual punch times with check-in → check-out arrows, hours, and late/auto badges
- Use the department filter dropdown to narrow the view
- Try the week navigation buttons (Prev / This Week / Next)
Checkpoint
- Found the payroll report at /workforce/payroll-report
- Read all six KPI cards
- Identified color-coded cells in the grid
- Expanded an employee row to see punch details
- Filtered by department
Exercise 6: Approve & Reject Workflows (15 min)
Goal: Practice the two-tier approval process for weekly attendance and adjustment requests.
Approve Weekly Attendance
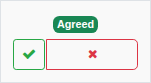
- On the payroll report, find an employee with an "Agreed" badge in the Review column
- You'll see a small checkmark (approve) and X (reject) button next to the badge
- Click the checkmark to approve
- The badge changes to "Approved" (or "Partially Approved" if only one tier has approved)
Reject Weekly Attendance
- Find another employee with an "Agreed" badge
- Click the X button — a modal appears asking for a rejection reason
- Enter a reason (e.g., "Hours don't match schedule — please review Monday's punch")
- Click Reject
- The badge changes to "Rejected"
Quick-Approve an Adjustment Request
- On the payroll report, find an employee with a "Change Requested" badge
- Expand the row — below the punches, you'll see a "Pending Change Requests" section
- Each request shows the date, type, requested time, and reason
- Click Approve to quick-approve (this bypasses two-tier — both tiers are set to the current user)
- Or click Reject and enter a reason
Two-Tier in the Backend
- Go to Workforce → Adjustment Requests in the backend
- Open a submitted request
- Click Approve — notice it moves to "Partially Approved" (only one tier done)
- To complete the second tier, you would need to log in as the employee's attendance manager
- In the sandbox,
manager1typically satisfies both tiers
Checkpoint
- Approved a weekly attendance from the payroll report
- Rejected a weekly attendance with a reason
- Quick-approved an adjustment request from the payroll report
- Understand the difference between partial and full approval
- Know that quick-approve bypasses two-tier
Exercise 7: Backend Attendance Views (10 min)
Goal: Navigate the Workforce menu and understand each backend view.
Steps
- Log in as
manager1 - Open the Workforce menu (under the main SR Management menu)
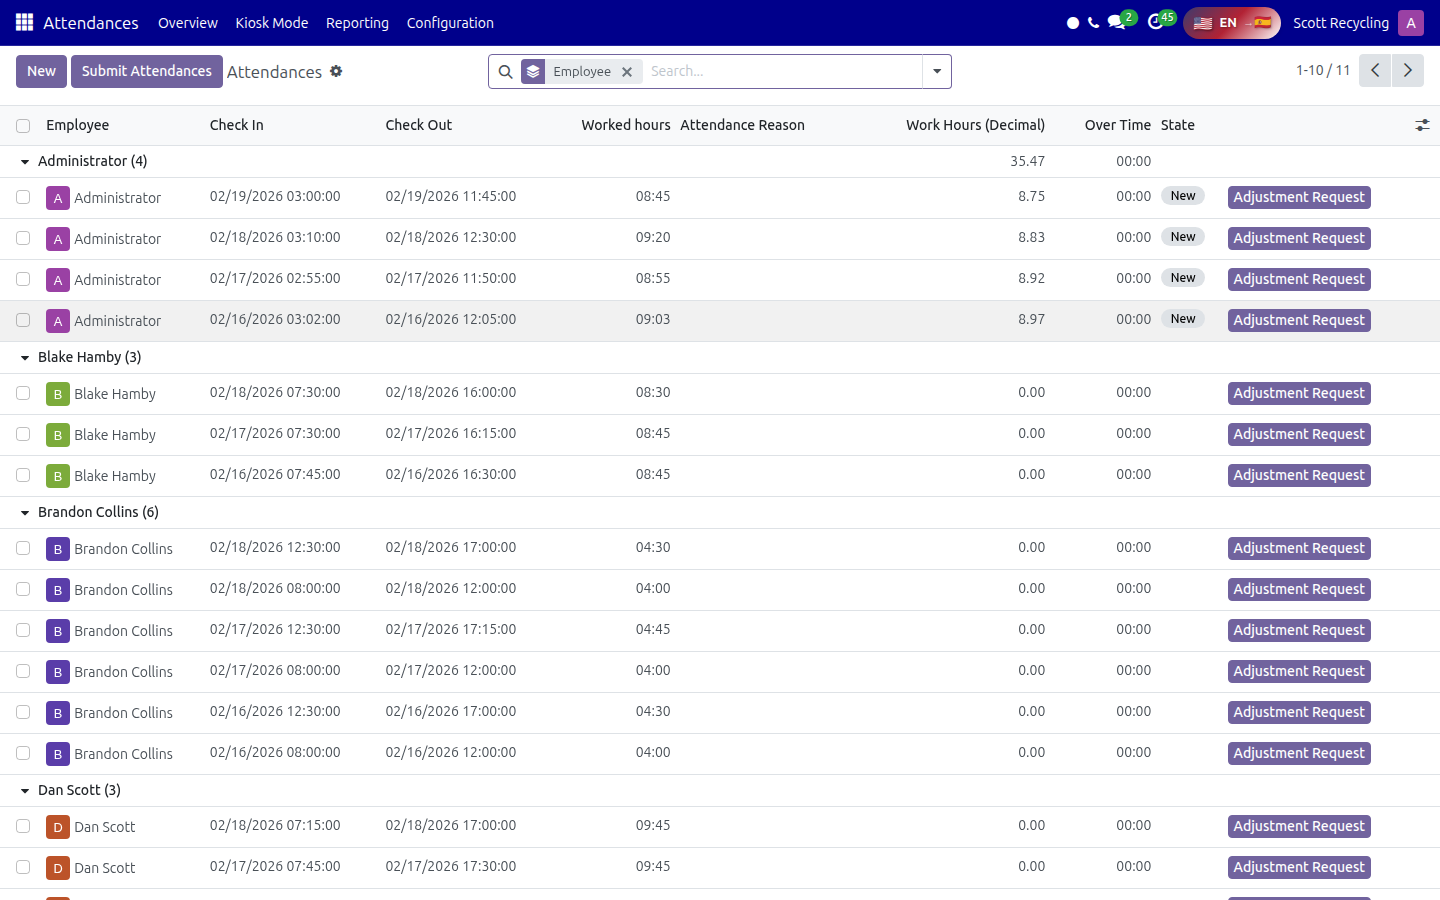
Explore each sub-menu:
| Menu | What to Look For |
|---|---|
| My Attendances | Your own records — shows the standard attendance list with check-in/out times and states |
| All Attendances | Every employee's records — use search filters to narrow by employee, date, or state |
| Pending | Only records with no check-out (open punches) — useful for identifying who's currently clocked in |
| Auto Checkout | Records that were auto-closed — the auto_checkout flag is True |
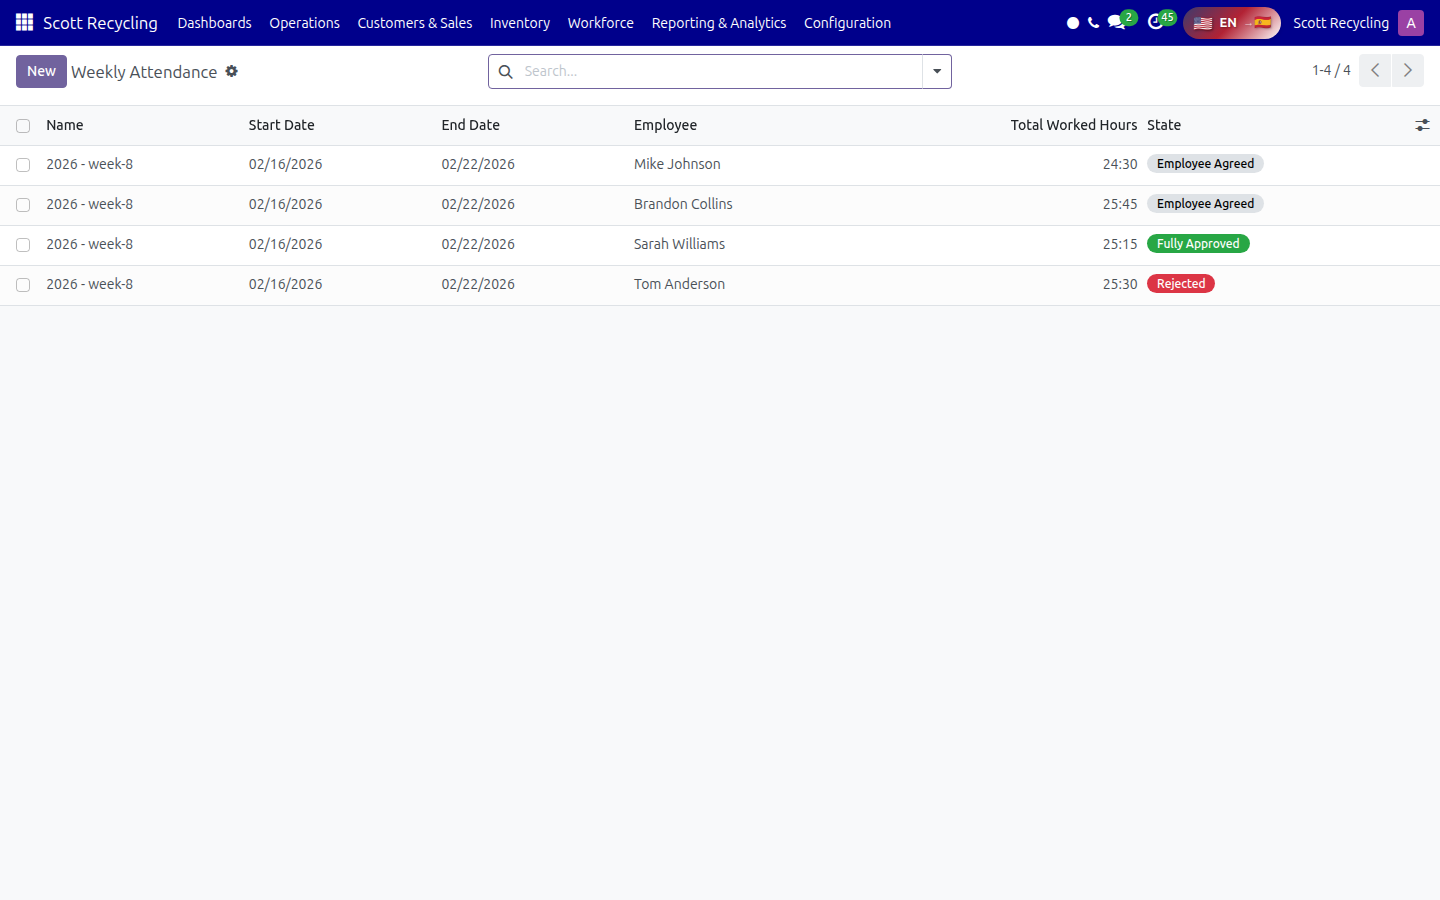
| Adjustment Requests | All requests in tree, form, and kanban views — try switching between views |
| Weekly Attendance | Weekly groupings — shows approve/reject buttons, employee notes, and state |
| Payroll Report | Redirects to the payroll report dashboard at /workforce/payroll-report |
- In All Attendances, try the Submit Attendance wizard:
- Select several attendance records in "New" state
- Click the "Submit" action to batch-submit them
- In Adjustment Requests, switch to Kanban view to see requests grouped by state
- Try searching by employee name, date range, or state
Checkpoint
- Found all seven sub-menus under Workforce
- Browsed All Attendances with search filters
- Viewed Pending (open punches) list
- Explored Adjustment Requests in kanban view
- Opened a Weekly Attendance record
Exercise 8: Excel Export & Scenarios (10 min)
Goal: Export payroll data to Excel and handle a "forgot to clock out" scenario.
Export to Excel
- Go to
/workforce/payroll-report - Click the green Export button in the header
- An Excel file downloads:
Payroll_Report_YYYY-MM-DD_YYYY-MM-DD.xlsx - Open it and verify two sheets:
- Summary — Color-coded grid matching the web view
- Detail Punches — Every individual punch with Employee, Date, Check In, Check Out, Hours, Flags
Scenario: Employee Forgot to Clock Out
Walk through what happens when someone forgets to check out:
- Auto-checkout fires — The attendance record is closed at 11:59 PM with the
auto_checkoutflag set - Email sent — The employee receives an email with a link to submit an adjustment request
- Employee submits adjustment — They click the link, select "Check Out Adjustment," enter their actual checkout time, and submit
- HR reviews — The request appears in the payroll report as "Change Requested"
- HR approves — The checkout time is corrected on the original attendance record
Practice this in the sandbox:
- Go to Workforce → Auto Checkout to find auto-closed records
- Open one and look at the
auto_checkoutfield — it should be True - Click the "Request Adjustment" button on the attendance form to open the adjustment request page
- Submit a Check Out Adjustment
- Go to the payroll report and quick-approve it
Checkpoint
- Downloaded the Excel export
- Verified the Summary and Detail Punches sheets
- Found an auto-checkout record in the backend
- Submitted an adjustment for an auto-checkout record
- Approved the adjustment from the payroll report
Quick Reference
Attendance States
| State | Meaning |
|---|---|
| New | Created, not submitted |
| Submit | Submitted for review |
| Partially Approved | One tier approved |
| Fully Approved | Both tiers approved |
| Rejected | Rejected by approver |
Adjustment Request Types
| Type | What Changes |
|---|---|
| Check In Adjustment | Updates the check-in time |
| Check Out Adjustment | Updates the check-out time |
| Extra Work After Checkout | Extends the check-out by the specified hours |
Grid Color Codes
| Color | Meaning |
|---|---|
| Yellow | Late arrival |
| Orange | Short day (< 8 hours) |
| Red | Missing (no attendance on scheduled day) |
| Blue | Overtime (> 8 hours) |
| Gray | Future date |
Approval Workflow
Employee Agrees → HR Admin Approves (Tier 1) → Partially Approved
                → Dept Manager Approves (Tier 2) → Fully Approved
Quick-approve from the payroll report bypasses two-tier and immediately sets both approvals.
Menu Navigation
| Menu Path | What It Opens |
|---|---|
| Workforce → My Attendances | Your attendance records |
| Workforce → All Attendances | All employee records (HR admin) |
| Workforce → Pending | Open punches only |
| Workforce → Auto Checkout | Auto-closed records |
| Workforce → Adjustment Requests | All change requests |
| Workforce → Weekly Attendance | Weekly groupings with approval |
| Workforce → Payroll Report | Payroll dashboard |