Pickup Blast Email Campaigns
Overview
The Pickup Blast module (sr_pickup_blast) is an advanced email marketing system for pickup request campaigns. Customers receive personalized emails with "Need Pickup" and "No Pickup Needed" response buttons that require no login. Responses are automatically tracked, leads created, contact notes logged, and customers move in and out of call queues based on their response.
This module extends the standard Odoo Email Marketing with pickup-specific features including A/B testing, customer segmentation, scheduled sending, response analytics, re-engagement automation, and configurable alerts.
Last Updated: February 2026 Target Audience: CSRs, Marketing, Managers
Navigation
| Location | What It Opens |
|---|---|
| Email Marketing → Mass Email from Filter | Opens the Mass Email Wizard to create a new pickup blast |
| SR Management → Customers → Email Responses | View all customer pickup email responses |
| Email Marketing → Response Analytics | Response analytics with pivot, pie, line, and bar charts |
| Email Marketing → Response Alerts | Configure alert thresholds for response and conversion rates |
Mass Email Wizard
The wizard walks you through creating a pickup email blast in multiple steps. Open it from Email Marketing → Mass Email from Filter.
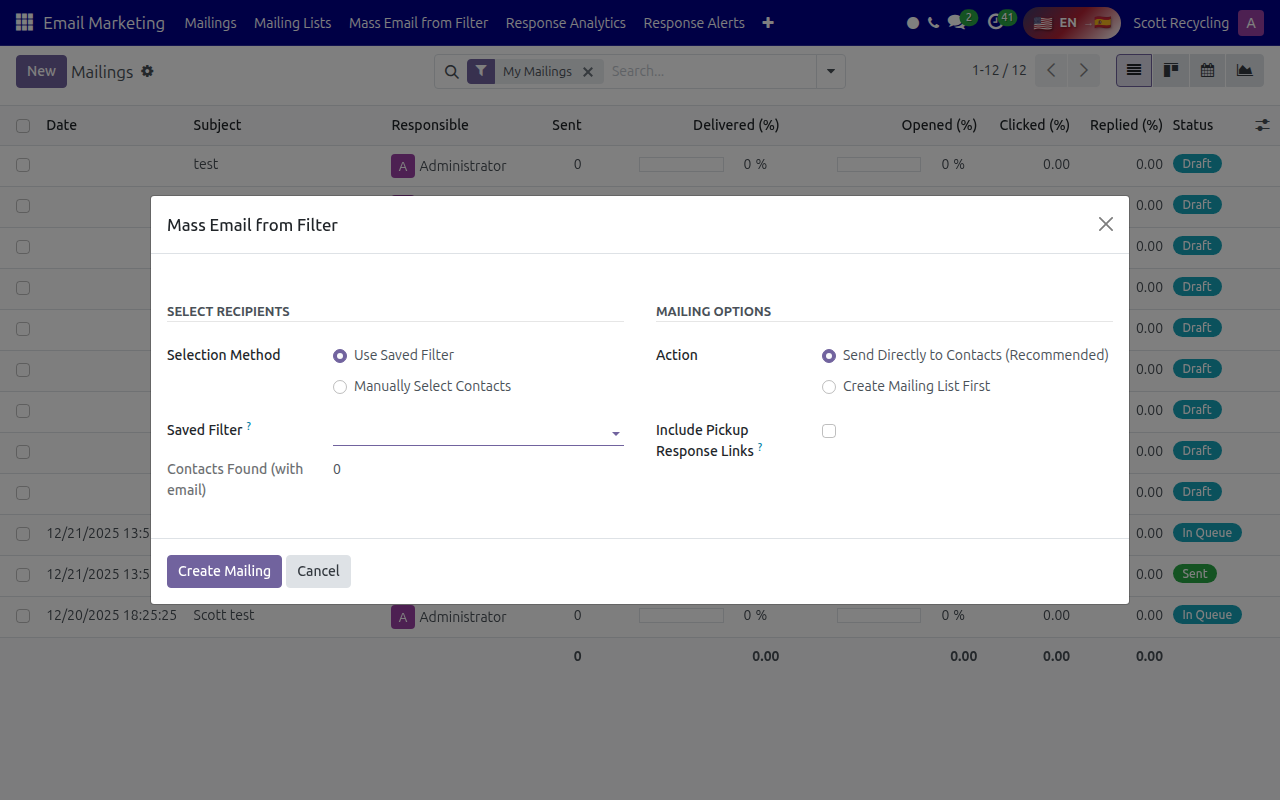
Step 1: Select Recipients
Choose how to select your target audience:
| Method | When to Use |
|---|---|
| Use Saved Filter | When you have a pre-defined customer segment saved in the Contacts list view |
| Manually Select Contacts | When targeting specific individual customers |
Using a Saved Filter:
- Set Selection Method to "Use Saved Filter"
- Select a filter from the Saved Filter dropdown (only filters saved on res.partner are shown)
- The Number of Contacts updates automatically as you change selections
Manually Selecting Contacts:
- Set Selection Method to "Manually Select Contacts"
- Click in the Contacts field and search for customers
- Select one or more contacts
Step 2: Apply a Segment Filter
Narrow your audience further using the Customer Segment dropdown:
| Segment | Description |
|---|---|
| All Contacts | No additional filtering (default) |
| Never Mailed (Pickup) | Contacts who have never received a pickup email blast |
| Mailed But No Response | Contacts who were mailed but never clicked a response link |
| Previous Responders | Contacts who have responded to at least one email |
| Previous Pickup Requesters | Contacts who have specifically requested a pickup before |
| Not Mailed in 30+ Days | Contacts not emailed in the last 30 days |
| Not Mailed in 60+ Days | Contacts not emailed in the last 60 days |
| Not Mailed in 90+ Days | Contacts not emailed in the last 90 days |
The contact count updates in real time as you change the segment filter.
Step 3: Subject and Preview Text
- Enter the Email Subject line
- Optionally enter Preview Text (the preheader shown next to the subject in email clients)
- Both fields show live character counters with status indicators:
Subject line guidance:
| Length | Status |
|---|---|
| Under 20 characters | Too short |
| 20-50 characters | Optimal |
| 51-60 characters | Getting long |
| Over 60 characters | May be truncated in inboxes |
Preview text guidance:
| Length | Status |
|---|---|
| Under 40 characters | Could be longer |
| 40-130 characters | Optimal |
| Over 130 characters | May be truncated |
Step 4: Enable Pickup Links
- Check the Include Pickup Response Links checkbox
- When enabled, each recipient receives personalized "Yes, Schedule a Pickup" and "Not right now" buttons
- The system generates a unique secure token (UUID) for each customer per mailing
Step 5: Schedule Sending (Optional)
- To send immediately, leave the Schedule Date field empty
- To schedule for later, set a date and time in the Schedule Date field
- Scheduled mailings are queued and sent automatically at the specified time
Step 6: A/B Testing (Optional)
- Check Enable A/B Testing to split recipients between two email variants
- Set the Variant A % slider (default 50%) to control the split
- Enter the Subject (Variant B) and Preview Text (Variant B) for the alternate version
- The system randomly splits contacts and creates two separate mailings for tracking
A/B testing requires at least 10 contacts
The system requires a minimum of 10 contacts for A/B testing to produce meaningful results. Each variant gets its own mailing record for independent analytics.
Step 7: Send a Test Email
- Enter a Test Email Address (defaults to your own email)
- Click Send Test Email
- You receive a test email with working pickup response buttons
- Test tokens are excluded from analytics
Step 8: Create and Send
- Click Create Pickup Mailing to generate the mailing with all tokens
- A confirmation message shows how many tokens were generated
- You are redirected to the mailing editor to review the email content
- Click Send when ready
Response Tracking
Viewing Responses
Navigate to SR Management → Customers → Email Responses or Email Marketing → Response Analytics to see all responses.
Response List Columns
| Column | Description |
|---|---|
| Partner | Customer name (clickable link to contact) |
| Customer email address | |
| Company ID | Company identifier |
| Response Type | Badge showing: Pending, Need Pickup, or No Pickup Needed |
| Response Date | When the customer clicked a response link |
| Expires | Token expiration date |
| Source Mailing | Which email campaign generated this response |
| Lead | Link to the CRM lead (if created) |
| A/B Variant | Which A/B test variant (A or B) the customer received |
Response Flow
Customer Clicks "Need Pickup"
When a customer clicks the green "Yes, Schedule a Pickup" button:
- The response record is updated to need_pickup with a timestamp
- A CRM lead is created or moved to the "Needs Pickup" stage
- A contact note is logged with "Receive Email" contact result
- The customer is marked as pickup_requested and enters Queue D (highest priority)
- The
last_decision_maker_dateis updated via the note system
Customer Clicks "No Pickup Needed"
When a customer clicks the gray "Not right now" button:
- The response record is updated to no_pickup with a timestamp
- A contact note is logged with "Receive Email" contact result
- The customer is removed from Queue D and their pickup request is cleared
- The next call date resets based on the customer's follow-up frequency
- The
last_decision_maker_dateis updated via the note system
Customer Confirmation Page
After clicking either button, customers see a branded confirmation page:
- Need Pickup: Green checkmark, "Pickup Request Received!" heading, "We'll be in touch soon" message
- No Pickup: Thumbs up icon, "Got It!" heading, "We'll check back with you later" message
Token System
Each customer-mailing combination gets a unique UUID token:
| Feature | Detail |
|---|---|
| Token format | UUID v4 (e.g., a1b2c3d4-e5f6-7890-abcd-ef1234567890) |
| Uniqueness | One token per customer per mailing (database constraint) |
| Expiration | Configurable via system parameter, default 90 days |
| Public URLs | No authentication required - customers click directly from email |
| URL format | /pickup/response/{token}/need or /pickup/response/{token}/no |
| Test tokens | Marked separately and excluded from analytics |
The token expiration period is controlled by the system parameter sr_pickup_blast.token_expiration_days.
Response Analytics
Access analytics from Email Marketing → Response Analytics. The view supports multiple visualization modes:
| View | What It Shows |
|---|---|
| List | All responses with filtering and sorting |
| Pivot | Cross-tabulate mailings by response types for comparison |
| Pie Chart | Distribution of response types (Need Pickup vs. No Pickup vs. Pending) |
| Line Chart | Response trends over time (by day, week, or month) |
| Bar Chart | Response time distribution (how quickly customers respond) |
Campaign Statistics
The system calculates aggregate stats per campaign:
| Metric | Description |
|---|---|
| Total Sent | Number of tokens generated (emails sent) |
| Pending | Recipients who have not yet responded |
| Need Pickup | Recipients who requested a pickup |
| No Pickup | Recipients who declined |
| Response Rate | Percentage of recipients who clicked either button |
| Conversion Rate | Percentage of recipients who requested a pickup |
| Avg Response Time | Average hours between email sent and response |
Response Alerts
Configure automated alerts when campaign performance drops below thresholds. Navigate to Email Marketing → Response Alerts.
Alert Configuration Fields
| Field | Description |
|---|---|
| Alert Name | Descriptive name for this alert |
| Active | Enable or disable the alert |
| Response Rate Threshold (%) | Alert when response rate drops below this value (default: 10%) |
| Conversion Rate Threshold (%) | Alert when pickup conversion rate drops below this value (default: 5%) |
| Check Period (Days) | Look at mailings sent within this many days (default: 7) |
| Minimum Emails | Minimum emails sent before triggering alerts to avoid false positives (default: 50) |
| Notify Users | Users who receive email notifications when the alert fires |
Alerts are checked automatically by a scheduled cron job. You can also click Test Alert to run a check immediately and see current rates.
Re-engagement Campaigns
Automatically follow up with non-responders. Access via Email Marketing → Re-engagement.
Re-engagement Configuration
| Field | Description |
|---|---|
| Campaign Name | Name for this re-engagement campaign |
| Active | Enable or disable automated follow-ups |
| Days After No Response | Send follow-up this many days after original email (default: 7) |
| Maximum Follow-ups | Maximum follow-up emails per contact per mailing (default: 1) |
| Follow-up Subject | Subject line for the follow-up email |
| Follow-up Preview Text | Preheader text for the follow-up |
| Total Follow-ups Sent | Running count of all follow-ups sent (read-only) |
The re-engagement cron job runs automatically and:
- Finds pending responses older than the configured number of days
- Checks that the max follow-up limit has not been reached for each contact
- Verifies the contact is not blacklisted
- Sends a follow-up email using the same token (so the original response record is updated)
- Logs each follow-up for tracking
You can also click Send Now on a campaign to trigger re-engagement immediately.
Partner Enhancements
The Pickup Blast module adds the following fields to each contact record:
| Field | Description |
|---|---|
| Last Pickup Mailing | Date when this contact was last included in a pickup email blast |
| Pickup Mailings | Total number of pickup email blasts sent to this contact |
| Pickup Responses | Number of times this contact responded to pickup emails |
| Response Rate % | Percentage of pickup emails that received a response |
These fields are visible on the contact form and can be used for filtering and reporting.
Common Tasks
Sending a Pickup Blast
- Navigate to Email Marketing → Mass Email from Filter
- Select your recipients using a saved filter or manual selection
- Choose a Customer Segment to narrow the audience
- Enter a compelling Subject line (aim for 20-50 characters)
- Add Preview Text (40-130 characters)
- Check Include Pickup Response Links
- Optionally set a Schedule Date for delayed sending
- Click Create Pickup Mailing
- Review the email in the mailing editor
- Click Send
Viewing Responses
- Navigate to SR Management → Customers → Email Responses
- Use built-in filters: Need Pickup, No Pickup, Pending, Today, This Week
- Click any response to see full details including the linked lead and note
Checking Campaign Stats
- Navigate to Email Marketing → Response Analytics
- Switch to Pivot view to compare campaigns side by side
- Group by Response Type and Source Mailing
- Use the Pie Chart view for a quick distribution snapshot
Setting Up Re-engagement
- Navigate to Email Marketing → Re-engagement
- Click New to create a campaign
- Set Days After No Response (e.g., 7 days)
- Set Maximum Follow-ups (recommended: 1-2)
- Write a follow-up subject and preview text
- Mark as Active to enable the automated cron job
Tips
Use segment filters to avoid email fatigue
Target "Never Mailed" contacts for initial outreach and "Not Mailed in 60+ Days" for re-engagement. Avoid emailing the same contacts too frequently.
Monitor response rates after each campaign
Check Response Analytics within 48 hours of sending. Most responses come within the first 24 hours. If rates are low, adjust your subject lines or sending times.
A/B test subject lines to improve performance
Create an A/B test with a 50/50 split. Compare response rates after a few days. Use the winning subject line style for future campaigns.
Set up alerts to catch declining engagement
Configure a Response Alert with a 10% response rate threshold. If your rates drop below that, you will be notified automatically so you can adjust your strategy.
Send test emails before every campaign
Always send a test email to yourself first. Verify the buttons work, the preview text shows correctly, and the email looks professional.
Questions? Contact your supervisor or refer to the Getting Started guide.